Do you want to build more dynamic, responsive, desktop-like web applications like Gmail and Google Maps? Then this article is for you! It guides you through the Ajax basics and through the process of building a simple Ajax application.
That application is named WebConsole, a browser interface for executing system commands for which you’d usually need shell access. There are also short examples of using the Ajax functionality of two popular JavaScript libraries – jQuery and YUI.
In this article, first published in 2005 and recently updated, I’ll explain the creation of one simple, reusable JavaScript function for making HTTP requests. Then, I’ll apply that function in the creation of a simple application.
Although there are some YUI and jQuery examples, the article is not a tutorial on a specific Ajax library. Instead, it aims to give you more hands-on information about making HTTP requests, so that you’re in a better position when evaluating such libraries or deciding to go on your own.
Key Takeaways
- Ajax allows for the creation of dynamic, responsive web applications similar to Gmail and Google Maps by handling HTTP requests within the browser.
- The tutorial introduces a reusable JavaScript function for making HTTP requests, which can be used across various applications without relying on specific libraries like jQuery or YUI.
- A simple example demonstrates the basic steps of making an HTTP request: creating an XMLHttpRequest object, assigning a callback function, and sending the request.
- The article introduces the WebConsole application, enabling server-side command execution through a browser interface, illustrating practical Ajax use.
- Security concerns are highlighted, emphasizing the importance of restricting executable commands and sanitizing inputs to prevent unauthorized server access.
- The tutorial covers advanced topics, including handling different data formats like XML and JSON, and integrating Ajax with popular JavaScript libraries for enhanced functionality.
A Simple HTTP Request Example
Let’s first revise the flow of making an HTTP request in JavaScript, and handling the response. This is just a quick example to refresh your memory. For all the spicy details, see SitePoint’s introductory article, “Ajax: Usable Interactivity with Remote Scripting.”
There are three basic steps:
- Create an
XMLHttpRequestobject. - Assign a callback function to handle the HTTP response.
- Make (send) the request.
Let’s see an example where we’ll request a simple HTML document, test.html, which only contains the text “I’m a test.” We’ll then alert() the contents of the test.html file:
<button id="mybutton">Make a request</button>


<script type="text/javascript">


var http_request = false;


function makeRequest(url) {


   if (window.XMLHttpRequest) { // Mozilla, Safari, IE7...

       http_request = new XMLHttpRequest();

   } else if (window.ActiveXObject) { // IE6 and older

       http_request = new ActiveXObject("Microsoft.XMLHTTP");

   }

   http_request.onreadystatechange = alertContents;

   http_request.open('GET', url, true);

   http_request.send(null);


}


function alertContents() {

   if (http_request.readyState == 4) {

       if (http_request.status == 200) {

           alert(http_request.responseText);

       } else {

           alert('There was a problem with the request.');

       }

   }

}


document.getElementById('mybutton').onclick = function() {

   makeRequest('test.html');

}


</script>
Here’s how this example works:
- The user clicks the “Make a request” button.
- This calls the
makeRequest()function with a parameter: the name of an HTML file in the same directory. In this case, it’stest.html. - The request is sent.
- The
onreadystatechangeevent fires and the execution is passed toalertContents(). alertContents()checks if the response was received and, if it’s okay, thenalert()s the contents of thetest.htmlfile.
Test the example for yourself, and view the test file.
The Problem
The above example worked just fine, but there’s one thing we need to improve before we’re ready for prime time. The improvement is to code a reusable request function that handles all the boring and repetitive object creation and request/response stuff, while leaving the presentational part to other functions, which are request-agnostic and deal with the result only, regardless of its source.
In the example above, we needed a global variable, http_request, that was accessible by both the makeRequest() and alertContents() functions, which is not good in terms of reusability and also risks naming collisions. Ideally, makeRequest() should perform the request and alertContents() should just present the result; neither function needs know about or require the other.
Here’s the code for our reusable request function:
function makeHttpRequest(url, callback_function, return_xml)

{

  var http_request, response, i;


  var activex_ids = [

    'MSXML2.XMLHTTP.3.0',

    'MSXML2.XMLHTTP',

    'Microsoft.XMLHTTP'

  ];


  if (window.XMLHttpRequest) { // Mozilla, Safari, IE7+...

    http_request = new XMLHttpRequest();

    if (http_request.overrideMimeType) {

      http_request.overrideMimeType('text/xml');

    }

  } else if (window.ActiveXObject) { // IE6 and older

    for (i = 0; i < activex_ids.length; i++) {

      try {

        http_request = new ActiveXObject(activex_ids[i]);

      } catch (e) {}

    }

  }


  if (!http_request) {

    alert('Unfortunately your browser doesn't support this feature.');

    return false;

  }


  http_request.onreadystatechange = function() {

    if (http_request.readyState !== 4) {

        // not ready yet

        return;

    }

    if (http_request.status !== 200) {

      // ready, but not OK

      alert('There was a problem with the request.(Code: ' + http_request.status + ')');

      return;

    }

    if (return_xml) {

      response = http_request.responseXML;

    } else {

      response = http_request.responseText;

    }

    // invoke the callback

    callback_function(response);

  };


  http_request.open('GET', url, true);

  http_request.send(null);

}
This function receives three parameters:
- the URL to get
- the function to call when the response is received
- a flag if the callback function expects an XML document (
true) or plain text (false, default)
This function relies on two JavaScript capabilities in order to wrap and isolate the request object nicely. The first is the ability to define new functions (called anonymous functions) on the fly, like this:
http_request.onreadystatechange = function() {...}
The other trick is the ability to invoke callback functions without knowing their names in advance; for example:
var callmeback = alert;

callmeback('test'); // alerts 'test'
Note how the name of the callback function is passed without any quotes.
You can easily make the function even more reusable by allowing the HTTP request method as well as any query string to be passed as parameters to the function and then used in calls to open() and send() methods. This will also allow you to make POST requests in addition to the GETs it was originally intended to perform.
Another capability of the function is the handling of response codes other than 200, which could be handy if you want to be more specific and take appropriate actions depending on the type of the success/error code returned.
The Simple Example Revisited
Now let’s redo the previous example in which the contents of a test.html file were alert()ed. This time, by employing our shiny new reusable request function, the revised versions of the two functions used will be much simpler:
function alertContents(text) {

   alert(text);

}


function makeRequest(url) {

   makeHttpRequest(url, alertContents);

}
As you can see, alertContents() is simply presentational: there are no states, readyStates, or HTTP requests flying around whatsoever.
Since these functions are now just one-liners, we can in fact get rid of them entirely, and change the function call instead. So the whole example will become:
<button id="mybutton">Make a request</button>

<script type="text/javascript">

  document.getElementById('mybutton').onclick = function() {

    makeHttpRequest('test.html', alert);

  }

</script>
Yes, it’s that easy! View the example and full source code (available through our old friend View Source).
Our Project: The WebConsole Application
Knowing the Ajax basics, and armed with a reusable way of making requests, let’s go deeper, to create a little something that can actually be used in real life.
The application we’ll create will allow you to execute any shell command on your web server, whether it’s Windows- or Linux-based. We’ll even put in a little CSS effort in an attempt to make the app feel more like a console window.
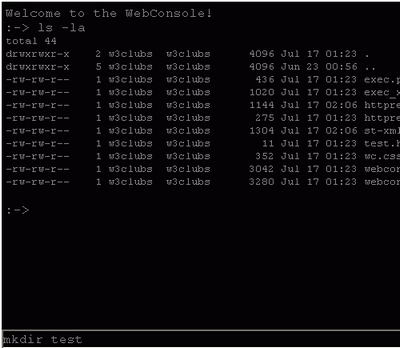
Interface-wise, we have one scrollable <div> that contains the results of the commands executed so far, and one <input> where we type the commands to be executed. They both have a black background and gray courier font. Here’s a screenshot.
The HTML
Here’s the HTML part of the application:
<form action="exec.php" method="get" id="console-form">
<div
class="console"
id="result">
Welcome to the WebConsole!
<br />
:->
</div>
<input
class="console"
name="command"
id="command"
type="text" />
</form>That’s it: a <div> that gets updated with the results of the command being executed, and an <input> into which we can type commands. It’s a nice, clean interface, with no <iframe> wrestling, no page reloads – none of that!
The CSS
The style sheet webconsole.css defines the styles for the result <div> and the command <input>:
.console {

    margin: 0px;

    font-family: courier;

    color: gray;

    background-color: black;

}

#result {

    overflow: auto;

    padding: 5px;

    height: 400px;

}

#result pre {

    display: inline;

}

#command {

    width: 100%;

    border: 1px solid white;

}
We make the <div> that shows the command execution results scrollable by setting its overflow property to auto. We also change the <pre> tag display property to inline (block is its default). There’s also the reusable .console class to make everything look “consoley:” gray monospaced font on black background.
The Server-side Code
Our application will make requests to a server-side script (exec.php), which receives a command through the GET parameter 'command'. This script simply checks that the command appears in the allowed list (you can edit this list to allow more commands), executes the command, and prints the result. The command is executed with the help of the native PHP function shell_exec(). PHP is used here, but it should be relatively easy to implement this functionality using your preferred server-side language.
<?php

if(strcmp(strtoupper(substr(PHP_OS, 0, 3)), "WIN") == 0) {

   // Windows commands

   $allowed_commands = array ('cd', 'dir', 'more webconsole.css', 'more test.html', 'copy test.html test.txt', 'more test.txt', 'del test.txt');

} else {

   // Linux, Mac OS X, etc. commands

   $allowed_commands = array ('ls -la', 'ls', 'ls -l', 'less webconsole.css', 'less test.html', 'touch test.txt', 'cp test.html test.txt', 'less test.txt', 'rm test.txt');

}


if (!empty($_GET['command']) && in_array($_GET['command'], $allowed_commands)) {

   echo shell_exec($_GET['command']);

} else {

   echo "This demo version lets you execute shell commands only from a predefined list:n";

   echo implode("n", $allowed_commands);

}

?>
WARNING!
The $allowed_commands array restricts the commands that users can execute through the console. You can add as many commands as you like to the array, but beware that any additional commands will really be executed on your web server: adding format c:: apachectl stop or rm –rf, for example, is not recommended!
The JavaScript
The first step in the JavaScript code is to define a namespace: a glorified label for what is essentially nothing more than just an empty object:
var WebConsole = {};All other variables and functions we need will be defined as properties of this object. This allows us to keep the global namespace clean and the code self-contained.
The flow of the JavaScript code in the application is as follows:
- The
WebConsole.keyEvent()function is attached to theonkeyupevent of the input field, and is called every time a key is pressed and released. WebConsole.keyEvent()checks if the key with code 13 is pressed (this is the Enter/Return key).- If Enter is pressed, the URL for the request is constructed like so:
exec.php?command=the-command-entered-by-the-user - The URL is passed to our reusable
makeHttpRequest()function. Also, the name of the callback function –WebConsole.printResult– is provided as a parameter tomakeHttpRequest(). - After a successful server response,
WebConsole.printResult()is called. WebConsole.printResult()updates the result<div>, scrolls down the<div>, and clears the command text box to make room for the next command to be typed.
Here’s what the body of the keyEvent() function could look like:
WebConsole.keyEvent = function(event)

{

  switch(event.keyCode){

    case 13:

      var the_shell_command = document.getElementById('command').value;

      if (the_shell_command) {

        var the_url = 'exec.php?command=' + escape(the_shell_command);

        makeHttpRequest(the_url, WebConsole.printResult);

      }

       break;

     default:

       break;

   }

}
Because we didn’t pass true as a third parameter to makeHttpRequest(), the text response (not XML) will be passed to printResult().
Next, let’s take a look at the function that will update the result <div>. There is one quick way to update that <div>, and that’s to use the innerHTML property of the element, like so:
document.getElementById('result').innerHTML += 'the-result-goes-here';But the use of innerHTML to dynamically update web pages is discouraged, because it treats the HTML code as a string, while modern web design thinking prefers to treat the page as a document containing an XML tree of nodes, accessible through the DOM methods and properties. The DOM is the path we’ll now take, in order to update our <div>.
Here’s the function; below it are some notes on how it works:
WebConsole.printResult = function(result_string)

{

  var result_div = document.getElementById('result');

  var result_array = result_string.split('n');


  var new_command = document.getElementById('command').value;

  result_div.appendChild(document.createTextNode(new_command));

  result_div.appendChild(document.createElement('br'));


  var result_wrap, line_index, line;


  for (line_index in result_array) {

    result_wrap = document.createElement('pre');

    line = document.createTextNode(result_array[line_index]);

    result_wrap.appendChild(line);

    result_div.appendChild(result_wrap);

    result_div.appendChild(document.createElement('br'));

  }

  result_div.appendChild(document.createTextNode(':-> '));


  result_div.scrollTop = result_div.scrollHeight;

  document.getElementById('command').value = '';

};
This function:
-
adds the command that was entered in the
<input>to the result<div>by creating a new text node and adding it to the document tree - displays the result of the command execution. This is done by splitting the result into lines and adding each line to the document tree, while wrapping each of these lines in
<pre>tags to preserve the spacing. We need to split the result because it may contain several lines (imagine the result if a'ls -la'(or'dir'on Windows) was executed) - adds a new cursor-like text node (
:->) - scrolls down the
<div>, using thescrollTopandscrollHeightproperties (non-W3C-standard but supported by modern browsers) - clears the command
<input>so that the next command can be entered
The last task in the JavaScript is to handle the events:
- form submits are simply “muted” so that there’s no page refresh
- the method
WebConsole.keyEvent()is attached to thekeyupevent of the input where commands are typed.
document.getElementById('console-form').onsubmit = function(){

    return false;

};

document.getElementById('command').onkeyup = function(e){

    if (!e && window.event) {

        e = window.event;

    }

    WebConsole.keyEvent(e);

};
And there you go! This was the last piece of the puzzle. What we have now is a working Ajax application, built from scratch.
A Little Extra
If you were curious enough to look at the source code of the previous example, you may have noticed that there is a bit more to this app than what we’ve discussed so far. The little extra is not really Ajax-related, but it makes the application feel more like a command prompt. The functionality in question involves the use of the up and down arrow keys to access the history of the commands used in a session.
Let’s say you executed 'ls -la', then 'ls'. If you hit the up-arrow key, the command <input> will be prefilled with the command that was used last; that is, 'ls'. Hit the up-arrow key again and the command input will show 'ls -la'. Hit the down-arrow key. You reach 'ls' again as you move through the history of commands. Try it out yourself.
The implementation of this feature is not difficult. We just need an array that will store all the commands executed so far:
WebConsole.commands_history = [];
…and an array pointer (an integer) that remembers where we were:
WebConsole.history_pointer = 0;Here’s the listing of the WebConsole.keyEvent() function. The lines that deal with the history functionality are shown in bold.
WebConsole.keyEvent = function(event)

{

  var the_url, the_shell_command;

  switch(event.keyCode){

    case 13:

      the_shell_command = document.getElementById('command').value;

      if (the_shell_command) {

        this.commands_history[this.commands_history.length] = the_shell_command;

        this.history_pointer = this.commands_history.length;

        the_url = 'exec.php?command=' + escape(the_shell_command);

        makeHttpRequest(the_url, WebConsole.printResult);

      }

      break;


    case 38: // this is the arrow up

      if (this.history_pointer > 0) {

        this.history_pointer--;

        document.getElementById('command').value = this.commands_history[this.history_pointer];

      }

      break;

    case 40: // this is the arrow down

      if (this.history_pointer < this.commands_history.length - 1 ) {

        this.history_pointer++;

        document.getElementById('command').value = this.commands_history[this.history_pointer];

      }

      break;

    default:

      break;

  }

};
Here are some notes on how the function works to provide the commands history:
- When we hit Enter (key code 13) and we make a request, the executed command is added to the
commands_historyarray, and the array pointer is reset to the new length of the array. - When hitting the up arrow (key code 38), which means “go back,” we decrement history_pointer and prefill the command
<input>with the previous command in the history list. - Hitting the down arrow increments the pointer by one, and we see the next command.
Working with XML
So far, we haven’t discussed how to request and use XML documents – the X in Ajax! We were using the responseText property of the XMLHTTP object. Requesting the document is no different than what we’ve already seen: we just need to instruct our reusable request function to return responseXML, as opposed to responseText. We do that by setting the third parameter to true:
makeHttpRequest(the_url, 'printResult', true);Then, we need to change our exec.php script to return valid XML, instead of plain text. Here’s the source code of the new script (exec_xml.php):
<?php


// $allowed_commands same as previous example


header('Content-Type: text/xml');

echo '<?xml version="1.0" ?>' . "n";

echo '<exec>' . "n";

echo '<command>' . htmlentities($_GET['command']) . '</command>' . "n";

echo '<result>';

if (!empty($_GET['command']) && in_array($_GET['command'], $allowed_commands)) {

    $result = array();

    exec($_GET['command'], $result);

    if (!empty($result)) {

        $result = array_map('htmlentities', $result);

        echo '<line>';

        echo implode("</line>n<line>", $result);

        echo '</line>';

    } else {

        echo '<line>No output from this command. A syntax error?</line>';

    }

} else {

    echo "<line>This demo version lets you execute shell commands only from a predefined list:</line>n";

    echo '<line>';

    echo implode("</line>n<line>", $allowed_commands);

    echo '</line>';

}

echo '</result>' . "n";

echo '</exec>';

?>
This way, if we execute the command 'ls test.html', the new server-side script will return the following:
<?xml version="1.0" ?>

   <exec>

       <command>ls test.html</command>

       <result>

           <line>test.html</line>

       </result>

   </exec>
If we execute a command that returns more lines (like 'ls -la'), every line in the response will be wrapped in <line> tags.
We’ll navigate the above XML document using the JavaScript DOM functions, in order to process the <result> and display it in our result <div>.
Here’s the body of the new WebConsole.printResult() method:
WebConsole.printResult = function(xmldoc)

{

  var result_div = document.getElementById('result');

  var result_collection = xmldoc.getElementsByTagName('line');


  var new_command = xmldoc.getElementsByTagName('command')[0].firstChild.nodeValue;

  result_div.appendChild(document.createTextNode(new_command));

  result_div.appendChild(document.createElement('br'));


  var number_of_items = result_collection.length;

  var result_wrap, line;

  for (var i = 0; i < number_of_items; i++) {

    if (result_collection[i].hasChildNodes()) {

      result_wrap = document.createElement('pre');

      line = document.createTextNode(result_collection[i].firstChild.nodeValue);

      result_wrap.appendChild(line);

      result_div.appendChild(result_wrap);

    }

    result_div.appendChild(document.createElement('br'));

  }


  result_div.appendChild(document.createTextNode(':-> '));


  result_div.scrollTop = result_div.scrollHeight;

  document.getElementById('command').value = '';

};
In order to update the result <div> with the data from the XML document, we follow the procedure:
- Access a node from the source XML.
- Get its value.
- Create a new node.
- Append it to the
<div>target tree.
As you see in the code xmldoc.getElementsByTagName ('command') is used, and it returns a collection (an array-like list object) of all <command> nodes. In our case, there’s only one such node. We access its value with the following:
xmldoc.getElementsByTagName('command')[0].firstChild.nodeValue;We take the node value, and create a new text node to append to the <div>, like this:
var new_command = xmldoc.getElementsByTagName('command')[0].firstChild.nodeValue;

result_div.appendChild(document.createTextNode(new_command));
We do the same with the <result> tag of the XML document. First, we get all <line>s:
var result_collection = xmldoc.getElementsByTagName('line');Then, we loop through each element in the result_collection. Again, we wrap each line of result in <pre> tags.
As you see, working with the XMLDocument is not much more difficult than working with the plain text response. You can test the XML version of the WebConsole yourself.
Using jQuery
jQuery is a popular JavaScript library. Let’s try using it for our Ajax functionality, instead of the reusable makeHttpRequest() function.
First you need to download the latest version of the library from here (I suggest the minified version) and include it in the page:
<script type="text/javascript" src="jquery-1.2.3.min.js"></script>There was a part where we used to call makeHttpRequest() like this:
the_url = 'exec.php?command=' + escape(the_shell_command);

makeHttpRequest(the_url, WebConsole.printResult);
Using jQuery’s Ajax() method you can now do:
var xhr = $.Ajax({

  url: 'exec.php',

  data: {'command': the_shell_command},

  success: WebConsole.printResult

});
Let’s see what we’ve got here:
$is a quick name for jQuery; you can also do this instead:jQuery.Ajax- We call the
Ajax()method and pass an object containing a URL to request, a data object (which will be escaped and converted to a query string by jQuery), and a callback function to call once the response arrives.
A working example of the web console using jQuery is here.
There are more ways to Ajax with jQuery, as a look at the documentation will confirm. For example, an often-repeated task of updating a <div> (with id mydiv) using the contents of the file (test.html) could be as simple as:
$("#mydiv").load("test.html");See an example here.
Using YUI
Another popular JavaScript library is YUI (Yahoo Interface Library). Let’s see how we can make our web console work with YUI’s Ajax functionality.
We don’t need to download YUI files because they are already hosted for free by Yahoo and can be used from their current location. The Ajax functionality is provided by the Connection Manager utility, which you include in your pages like so:
<script type="text/javascript" src="http://yui.yahooapis.com/2.5.1/build/yahoo/yahoo-min.js"></script>

<script type="text/javascript" src="http://yui.yahooapis.com/2.5.1/build/event/event-min.js"></script>

<script type="text/javascript" src="http://yui.yahooapis.com/2.5.1/build/connection/connection-min.js"></script>
Now, to take advantage of YUI we replace the call to makeHttpRequest() with:
// YUI's Ajax

YAHOO.util.Connect.asyncRequest(

    'GET',

    'exec.php?command=' + escape(the_shell_command),

    {

      success: function(xhr){

        WebConsole.printResult(xhr.responseText)

      }

    }

);
You can see that the asyncRequest() method takes:
- request method (GET, POST, HEAD, DELETE, and so on)
- URL
- an object that contains functions to handle success and failure scenarios
YUI passes XMLHttpRequest objects to the handler functions, so in this case we just take the contents of the responseText and forward it to printResult().
You can see how the URL was created by concatenating and escaping strings. In this case, there’s only one value we want to pass through the query string. But if there are more, it becomes pretty inconvenient. YUI helps you deal with such situations easily, by providing a setForm() method. Once you set the form, YUI will take the values from the form and take care of escaping and stitching together the query string:
YAHOO.util.Connect.setForm(document.forms[0]);

YAHOO.util.Connect.asyncRequest(

    'GET',

    'exec.php',

    {

      success: function(xhr){

        WebConsole.printResult(xhr.responseText)

      }

    }

);
Here’s a working example of the web console using YUI.
Using JSON
JSON (JavaScript Object Notation) is a popular data exchange format. It gives you another alternative to plain text or XML when it comes to communicating data from the server to the browser. JSON is extremely simple; in essence, it’s just JavaScript.
In JavaScript you can define an array and an object like this:
var a = new Array(1,2,3);

var o = new Object();

o.property = 'value';

o.property2 = 2;
You can do the same but using array and object literals, like so:
var a = [1,2,3];

var o = {'property': 'value', 'property2': 2};
This literal notation is what JSON uses to pass data. The quotes around properties in JavaScript proper are not required most of the time, but by convention they are required in JSON.
Let’s change our console so it uses the JSON format to transfer data. The flow would be:
- PHP on the server side creates an associative array with the result, then converts it to JSON using the built-in function
json_encode()which is PHP5-only, but it would be trivial to encode the response even manually. The JSON string is returned. - JavaScript in the browser receives the JSON string and transforms it into a native JavaScript object. An unsecure way to do so is by using the
eval()function. The better way is to use the free JSON library.
For example, if the command we execute is ls, the JSON response from the server will be something like the following (formatted and abridged for readability):
{

    "command":"ls",

    "result":[

        "exec.php",

        "exec_json.php",

        "exec_xml.php",

        "httprequest_example.html",

        "httprequest_test.html"

        // ... and so on

    ]

}
As you can see, JSON is more lightweight than XML, as there are no closing tags, XML document tags, or root nodes.
Changing our server-side script to return JSON results in something like this:
exec_json.php:


<?php


// $allowed_commands same as before


$return = array('command' => $_GET['command']);


if (!empty($_GET['command']) && in_array($_GET['command'], $allowed_commands)) {

    $result = array();

    exec($_GET['command'], $result);

    if (!empty($result)) {

        $return['result'] = $result;

    } else {

        $return['result'] = array('No output from this command. A syntax error?');

    }

} else {


    $return['result'] = $allowed_commands;

    array_unshift(

        $return['result'],

        'This demo version lets you execute shell commands only from a predefined list:'

    );

}


echo json_encode($return);

?>
In JavaScript, the part of WebConsole.printResult that accepts the data would become:
WebConsole.printResult = function(json_string)

{

  var data = eval('('+ json_string +')');

  var result_array = data.result;


  // ... same as before

}
You can see how after the eval(), data becomes a normal JavaScript object and you can access its properties, such as data.result and data.command. As mentioned already, eval() is an less-than-secure way of transforming a JSON encoded string into an object. A better way is by using the JSON library which helps us replace the eval() call with this:
var data = JSON.parse(json_string);A working JSON example is here.
Security Reminder
For the purposes of the demonstration of this application, I allow only a predefined set of harmless commands to be executed on my web server. If you expand the list of commands or allow any command whatsoever, don’t forget to protect the directory on your server in which you’ll install application. Leaving this application accessible to strangers can have devastating results. It’s pretty powerful: it will allow the user to execute any command, including, but not limited to, deleting everything on your web server!
Conclusion
We’ve come to the end of our example Ajax application. You know the basics, you saw the action, and you’re armed with enough knowledge to start experimenting yourself. You can warm up by modifying and playing around with this article’s code – it’s all included in the downloadable code archive – then move to projects of your own.
These are exciting times: the face of the Web is undergoing big changes, thanks to remote scripting. We’ve passed the phase of early adopters (Google, Amazon, Flickr, Yahoo) and now remote scripting with Ajax is becoming more common when creating responsive and user-friendly web pages. Your visitors nowadays are already spoiled by using GMail and Flickr, and you cannot afford to insult them with static Web 1.0-style pages!
Frequently Asked Questions about AJAX
What is the difference between synchronous and asynchronous AJAX?
Synchronous AJAX requests block the execution of code until a response is received. This means that the user interface can become unresponsive or “freeze” until the request is completed. On the other hand, asynchronous AJAX requests do not block the execution of the rest of the code. They allow the user interface to remain responsive while the request is being processed. This is why asynchronous requests are generally preferred over synchronous ones in web development.
How does AJAX handle data formats like XML and JSON?
AJAX can handle various data formats including XML and JSON. XML was initially the most common format for AJAX. However, JSON has become more popular due to its lightweight nature and ease of use with JavaScript. AJAX can parse these data formats and use them to update the web page without needing to reload the entire page.
Can AJAX work with technologies other than JavaScript?
While AJAX is heavily associated with JavaScript, it can also work with other technologies. For instance, you can use AJAX with jQuery, a popular JavaScript library, to simplify the process of making AJAX requests. AJAX can also be used with server-side languages like PHP to retrieve data from a database.
What are the security implications of using AJAX?
Like any web technology, AJAX has potential security implications. Since AJAX involves sending and receiving data between the client and server, it can be vulnerable to attacks such as Cross-Site Scripting (XSS) and Cross-Site Request Forgery (CSRF). Therefore, it’s important to implement proper security measures when using AJAX, such as validating and sanitizing input data.
How does AJAX affect SEO?
AJAX can potentially affect SEO as search engines may not be able to fully crawl and index AJAX content. However, Google has made advancements in crawling JavaScript and can index AJAX content to some extent. To ensure that your AJAX content is SEO-friendly, you can use techniques such as progressive enhancement and graceful degradation.
Can AJAX be used with HTML5 and CSS3?
Yes, AJAX can be used in conjunction with HTML5 and CSS3 to create dynamic and interactive web pages. For instance, the HTML5 History API can be used with AJAX to create navigable pages without full page reloads. CSS3 can be used to style the updated content.
What are some common use cases for AJAX?
AJAX is commonly used in web applications that require real-time data updates without refreshing the entire page. This includes applications like live search results, form submissions, chat applications, and interactive maps.
How does AJAX handle errors?
AJAX provides methods to handle errors that occur during the request. You can define a function to be executed if an error occurs when the request is being processed. This function can provide information about the error and take appropriate action, such as notifying the user or logging the error.
Can AJAX requests be cached?
Yes, AJAX requests can be cached to improve performance. By caching an AJAX request, the response is stored so that if the same request is made again, the stored response can be used instead of making a new request. However, this should be used judiciously as it can lead to stale data.
How can I debug AJAX?
Debugging AJAX can be done using browser developer tools. These tools allow you to inspect AJAX requests and responses, check the status of requests, and see any errors that occur. You can also use console.log statements in your JavaScript code to output information to the console for debugging purposes.
Stoyan is an engineer at Yahoo and the author the author of Object-Oriented JavaScript and other books and articles about web development. Outside work, his time is spent experimenting with random web technologies, blogging at phpied.com and playing the blues guitar to his daughters' despite their preference for Mickey Mouse CDs.