If you’re reading this article, you probably already have an interest in the subject of “Web standards,” and are curious about the application of standards in a site that’s built with Dreamweaver.
Perhaps you already have an understanding of Web standards, but you’re not sure how to use Dreamweaver to create compliant code. Or perhaps you’re a Dreamweaver user who wants to comply with Web standards, use CSS more extensively, and produce more accessible documents. Either way, this article has the answers you need: it will show you how work to Web standards using Dreamweaver.
This article is actually excerpted from SitePoint’s new release, Build Your Own Standards Compliant Website Using Dreamweaver 8, by Rachel Andrew. This book shows you, step-by-step, how to develop a standards compliant Website using XHTML Strict markup and CSS. With this book, you can swiftly and successfully develop attractive, functional sites that conform to Section 508 legislation, and pass the WAI accessibility guidelines with a Triple A rating, using the extensive capabilities of Dreamweaver 8. As always, you can download this information in pdf format, if you’d rather read it offline.
As we’ll discover in the course of this chapter, there are excellent commercial reasons why sites should be developed to meet Web standards. The decision to adopt Web standards shouldn’t be about jumping on a bandwagon, or keeping up with the latest Web development fashion. It’s about producing good quality work, and knowing that your development approach will benefit your clients or employers as well as site visitors.
Web Standards Defined
As we’ll be concerned with Web standards throughout this book, let’s take a moment to clarify exactly what we’re talking about.
Web standards are specifications that direct the use of development languages on the Web, and are set by the World Wide Web Consortium (or W3C). These specifications cover languages such as HTML, XHTML, and CSS, along with a range of other languages, such as MathML, a markup language designed to represent mathematical equations, that you might come across if you have a specific need. The W3C also publishes the Web Content Accessibility Guidelines (WCAG) – recommendations that address the accessibility of Web pages – via the Web Accessibility Initiative (WAI).
Note: Get the Spec, Direct!
You can read these specifications and recommendations at the W3C site, though they’re a little heavy going at times.
In this book, we’ll use the XHTML 1.0, CSS 1 and 2.1, and WCAG 1.0 specifications and recommendations, although you’ll be glad to know that we won’t be doing too much reading of the actual W3C documents themselves!
Who Needs Web Standards?
You might have a vague notion that Web standards are a good thing, but many sites – including many big name sites – don’t comply with Web standards, and they certainly seem to manage perfectly well. So why should we make the effort to comply with Web standards? Are there any real benefits in doing so? Who needs Web standards, and who needs to take notice of the W3C specifications and recommendations?
Web Designers and Developers
At the top of the list of people who need to worry about Web standards are people like us: the designers and developers who put together Websites. Will the time we spend learning how to develop to Web standards pay off for us?
Cleaner Markup Makes Bug-fixing Quicker
If you validate your pages using W3C validators, at least you’ll know that invalid markup is not the cause of any page display errors you might be experiencing. Sometimes, the process of validating a page, and fixing the errors that are found, can clear up display issues caused by elements not being closed correctly, or misspelled tags.
Even if validating your document doesn’t fix the issue, at least you know that the problem exists within a valid document. Once you know that the problem isn’t an error, you can start looking at other issues, such as the differing implementations of CSS in various browsers.
Complying with Accessibility Requirements is Easier
If you create valid XHTML markup, and you ensure that your document is semantically correct, and you separate your document’s content from its presentation (all of which we’ll discuss in this chapter), you’ll already have made considerable progress on many of the accessibility checkpoints outlined in WCAG 1.0. It’s also important to recognize that accessibility isn’t designed just for those with disabilities. An accessible site is able to be read by many different devices, including search engine indexers and “limited-resource” devices, such as mobile phones and PDAs, which don’t have the processing power to cope with messy, nonstandard markup.
Forward Compatibility
If you consider how your newly developed page looks in only a few current browsers, how can you be sure that it will display well in the next new browser? New browsers may display your pages badly, leaving you scrambling to find and fix problems as complaints come in. If you rely on tags that are specific to certain browsers, or have been removed from the specification entirely, you leave yourself open to this problem.
Complying with Web standards won’t eradicate this problem completely; however, standards compliance makes the serious failure of your design less likely, as browser manufacturers now follow the standards, too. While they may occasionally misinterpret some part of the specification, they’re unlikely to stop supporting it altogether. If the worst does happen, and a new browser has a strange effect on your standards-based Website, fixing it is likely to be easier than fixing a non-compliant site. If you’re experiencing a problem, it will probably have affected other standards-complaint sites. The great minds of the Web community will be figuring out fixes and writing articles to explain their solutions. And, as we’ve already discussed, bug fixing in a compliant document is far easier than in a non-compliant document.
Easier Redesigns
Have you ever had to redesign a Website by ripping the text from it and starting from scratch? Have you ever seen markup that was so littered with font tags and tiny table cells that it was easier to just start over? I know I have, and it’s a slow process that can chew up a good deal of the time and money dedicated to a site redesign.
Separating the document’s content from its presentation won’t just give you a warm glow of standards compliance: it means that the next time someone has to redesign the site, they won’t need to copy all the text out of the Web documents. All of the site text will have been marked up using semantic (X)HTML, and all of the presentational information – the stuff the site owners want to change – will be stored in a CSS file that can be replaced easily.
Some clients won’t even wait for a redesign before they start asking you to make changes: they’ll wait until you’ve almost finished their mammoth site, then ask you to “just switch that column from the left to the right.” With a standards compliant site whose page layout is controlled by CSS, you can move page elements around easily, without needing to hack away at complex table structures on many pages. This makes changes to page layouts comparatively simple.
The separation of structure from presentation can also make it easier to provide added features, such as a high-contrast, low-graphics version of the site for visitors who prefer to use the site that way. Why create separate text-only versions of all your pages when you can simply swap out the style sheets?
Browser Manufacturers
The manufacturers of browsers that access the Websites we build do take notice of Web standards. In the past, browser manufacturers added their own, proprietary tags and attributes to the basic languages. But now, more than ever, they’re working to comply with the standards, and, certainly with the newest browsers, attempts are being made to display (X)HTML and CSS as described in the specifications.
Web browsers will, for the foreseeable future, attempt to render even the most poorly marked up, invalid code, because if they didn’t, hundreds of thousands of badly written sites would display as a complete mess – and the general public would most probably blame the browser, not the Web designer. However, other devices, which don’t have the rendering power of a desktop computer, rely far more heavily on the standards compliance of the markup they encounter.
Authoring Tool Manufacturers
Authoring tool manufacturers – such as Macromedia, which creates Dreamweaver – have to follow Web standards just as Web designers do, as, increasingly, their customers demand that these authoring environments output valid markup. Traditionally, visual development environments received bad press for creating messy, invalid markup; however, newer versions of the leading visual development environments have cited standards compliance and accessibility features as main selling points. The manufacturers are definitely listening – and responding – to the market’s demands.
Web Users
The users of the Websites we design also benefit from our adoption of Web standards, even if they don’t realize it! Perhaps they unwittingly use sites that specifically have been developed to display well in the most popular browser. If those users switch to a different browser, they might find that they no longer enjoy such a great online experience, as the proprietary markup used by those sites won’t work in the new browser. A standards compliant site has a far greater chance of working well across all browsers, both those that were in existence when you developed the site, and the new browsers that will launch later in the site’s lifetime.
In addition, a Website that’s developed in line with accessibility recommendations is likely to be accessible to users who might find browsing the Web a frustrating experience. The Web should offer opportunities for easier shopping, reading, and research to visually impaired or otherwise disabled users. It shouldn’t frustrate them with sites that use proprietary markup, or other techniques that effectively lock out of the site anyone who doesn’t use a “regular” browser in a “regular” way.
Using Web Standards
How do we ensure that we’re using these Web standards correctly? What does it take to comply with the standards?
First, we need to conform to the specification. This means that we should use only those elements and attributes that are included in the specification, avoiding the proprietary elements introduced by browser manufacturers, such as Internet Explorer’s <marquee> tag, and Netscape’s <blink> tag. We should also avoid using elements that appeared in earlier specifications (such as HTML 3.2) and have since been removed when we’re working on documents developed to a later specification.
Creating a Valid XHTML Document
We’ll use XHTML throughout this book, so we’ll be working to the W3C’s XHTML 1.0 Recommendation (in W3C parlance, a “recommendation” is a specification). XHTML is basically the latest version of HTML, and was designed to replace HTML as the markup language for Web pages. Though it’s a reformulation of HTML as XML, XHTML is almost identical to HTML, apart from a few small differences that we’ll discuss in Chapter 3, XHTML and Semantics.
You can create an XHTML document through Dreamweaver’s New Document dialog (File > New…). Make sure Basic page is selected in the Category list, then select HTML from the Basic page listing that appears, as shown in Figure 1.1, “Creating a new XHTML document in Dreamweaver.” You can then select one of the XHTML options from the Document Type (DTD) drop-down list.
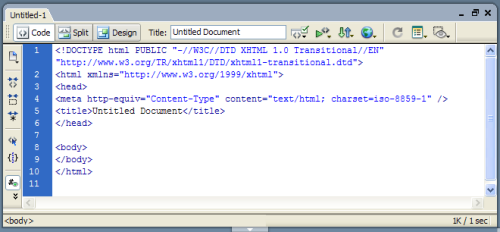
Clicking Create will create the new document. Switch to Code View, by clicking the Code button at the top of the document window, to see exactly what’s included in a simple XHTML document. This is illustrated in Figure 1.2, “Displaying the new XHTML document in Code View.”
Figure 1.1. Creating a new XHTML document in Dreamweaver.
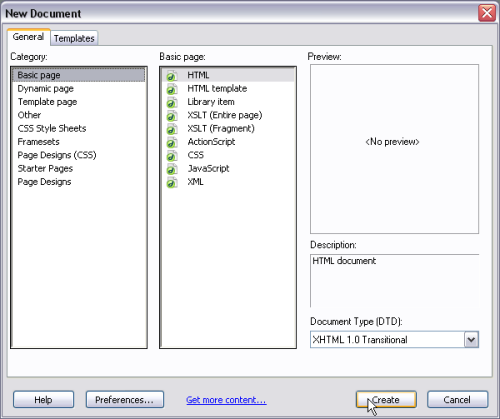
Figure 1.2. Displaying the new XHTML document in Code View.
The first line of the document will look something like this:
<!DOCTYPE html PUBLIC "-//W3C//DTD XHTML 1.0 Transitional//EN"

    "https://www.w3.org/TR/xhtml1/DTD/xhtml1-transitional.dtd">
This is called the document type declaration, or DOCTYPE. As you can easily infer from its name, the DOCTYPE declares what your document is – which (X)HTML specification you’re working to. In this example, we’re working to XHTML 1.0 Transitional, Dreamweaver 8’s default. The Transitional part tells us something else about the version of XHTML that we’re working with. XHTML 1.0 comes in three “flavors:” Strict, Transitional, and Frameset. Dreamweaver uses the Transitional DOCTYPE by default, and Frameset if you insert frames into the document.
XHTML Strict is, as you would expect, the strictest form of XHTML. An XHTML Strict DOCTYPE looks like this:
<!DOCTYPE html PUBLIC "-//W3C//DTD XHTML 1.0 Strict//EN"

    "https://www.w3.org/TR/xhtml1/DTD/xhtml1-strict.dtd">
If you’re using a Strict DOCTYPE, you can’t use any deprecated elements (tags) or attributes in the document; nor can you use frames. Deprecated elements are those that have been flagged for removal in future versions of XHTML. Many deprecated elements control the appearance of the page, performing the kinds of functions that can be handled by CSS. The main difference between Strict and Transitional DOCTYPEs is that, with the Strict DOCTYPE, you’re far more limited in terms of the presentational attributes and elements you can include in the document.
Note: Using the Strict DOCTYPE in Dreamweaver
Dreamweaver isn’t quite as careful as it could be about adhering to the standard. If you use the Strict DOCTYPE, take extra care to validate your documents and replace any invalid attributes. Typically, it will be quite easy to replace them with CSS.
The Frameset DOCTYPE supports the use of frames, and Dreamweaver will use it automatically if you include any frames in your document. The Frameset page will then reference at least two other HTML pages, which can use any DOCTYPE they like. The Frameset DOCTYPE looks like this:
<!DOCTYPE html PUBLIC "-//W3C//DTD XHTML 1.0 Frameset//EN"

    "https://www.w3.org/TR/xhtml1/DTD/xhtml1-frameset.dtd">
HTML 4.01 offers the same three DOCTYPE flavors – Transitional, Strict and Frameset – which work in exactly the same way as the above XHTML DOCTYPEs. If you used one of these, you would need to mark up your document in HTML, rather than XHTML. We’ll explore the differences between HTML and XHTML later in this book, as we start to create our Website.
Validating your Document
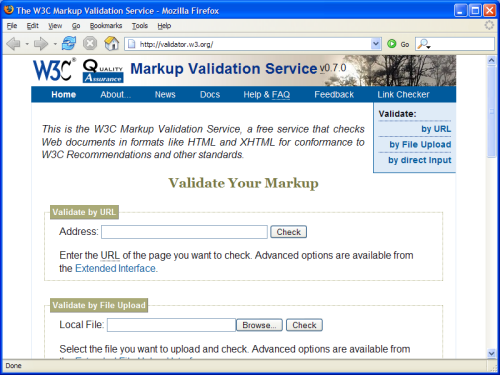
How can you ensure that a document you’ve created in HTML or XHTML is valid, and conforms to the specification? Run it through the W3C Validator shown in Figure 1.3, “Using the W3C Validator.”
To use the validator, you can enter the URL of the page you’d like validated (if it’s live on the Web), or you can upload a file from your computer.
Figure 1.3. Using the W3C Validator.
Once you’ve told the W3C Validator where to find your (X)HTML, click the Check button. A page will display, announcing the joyful news that your page is valid, or providing a list of errors that you can work through before you re-check the page’s validity. If you’ve been working in Dreamweaver to create an XHTML document, you should have very few errors to fix; however, later in this book, we’ll look at some of the more common errors that can occur as we build Websites.
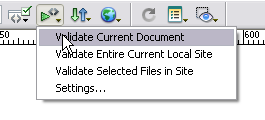
To help you ensure the validity of your pages during development, Dreamweaver provides a built-in validator. To run the validator, select File > Check Page > Validate Markup, or click the Validate Markup button. The validation results appear at the bottom of the window. As shown in Figure 1.4, “The validator in Dreamweaver,” you can choose to validate the current document, the entire local site, or selected files within the site.
Figure 1.4. The validator in Dreamweaver.
Though this validator provides a useful check as you go along, I always check my documents at the W3C’s online validator prior to their publication online. The Dreamweaver validator cannot validate any markup that’s generated dynamically using a server-side language such as PHP or ASP. So, if you’re generating pages – or parts of pages – in this way, you’ll definitely need to use the online validator after uploading your pages.
Using Valid CSS
As we’ll discover when we build our site, CSS replaces all of the deprecated presentational elements in HTML, as well as adding plenty of scope for interesting design ideas that aren’t possible using HTML alone. CSS is also a Web standard, and the W3C has developed specifications against which we can validate our CSS code, just as we do for (X)HTML.
When it comes to CSS, you have three options for validation: point to a file on a live server (either a CSS file, or an HTML page with embedded CSS), upload a CSS file from your computer, or paste the CSS directly into a text area. As with the (X)HTML validator, the result will either be a congratulatory message, or a list of errors for you to fix before revalidating your style sheet. Dreamweaver does not offer a built-in CSS validator.
Validating for Accessibility
When designing a Website, designers and developers can become consumed by the way the pages display in a Web browser, or range of browsers; we can forget that, for many people, just getting the content is all that matters. Many Web users employ some kind of assistive technology – such as a screen reader, which reads the text of the page aloud – or have a disability that makes using the Web in the way that most of us do, with a graphical display in a Web browser, very difficult, if not impossible.
Through its Web Accessibility Initiative (WAI), the W3C offers recommendations that we can follow to ensure that our sites are accessible to these users; therefore, we should check that our sites comply with the WCAG 1.0 recommendations. As we’ll see in Chapter 7, Accessibility and Chapter 8, Building the Site, validating the accessibility of Web documents is rather more tricky than checking your documents for valid (X)HTML and CSS. “Yes” and “no” answers are not always provided for the WCAG 1.0 recommendations’ different checkpoints.
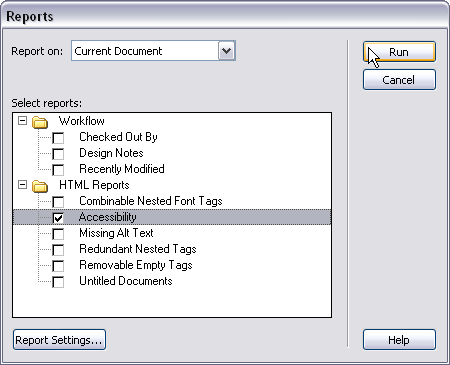
Dreamweaver contains an accessibility validator, which can be run from the Reports dialog (Site > Reports…), as shown in Figure 1.5, “Running an accessibility report from the Reports dialog.”. Check the Accessibility checkbox and click Run.
Figure 1.5. Running an accessibility report from the Reports dialog.
The report that displays in the Results Panel will include notes such as, “Color is not essential,” (which appears in Figure 1.6, “The UsableNet Accessibility Reference displaying in the Results tab of the Reference Panel.”); this relates to a checkpoint that advises that the use of color in the document should not be essential to users’ understanding of the page. You would fail this checkpoint if, for example, the only way you communicated the status of an article on your site was through color-coded icons. In this case, your pages wouldn’t be accessible to users who could not differentiate between the colors. You would pass the checkpoint if you used both color-coding and a textual status note. Of course, there’s no way for an automatic validator to know which approach you’ve taken, so you need to make your own, manual check and decide whether you pass or fail a checkpoint. And, to do so in an informed way, you need to have an understanding of what each point means.
That said, Dreamweaver can help: in the Reference tab of the Results Panel, you’ll find the UsableNet Accessibility Reference depicted in Figure 1.6, “The UsableNet Accessibility Reference displaying in the Results tab of the Reference Panel.”, which explains the checkpoints and provides methods by which you can check whether your site passes or fails each one. Right-click on any checkpoint and select More Info… to display an explanation of that checkpoint.
Figure 1.6. The UsableNet Accessibility Reference displaying in the Results tab of the Reference Panel.

There are also online accessibility validators, the most popular of which is WebXACT (previously known as Bobby), and Cynthia Says. These are accompanied by the same provisos as the Dreamweaver validator in that the results these systems provide require interpretation: they cannot give you a “yes” or “no” answer.
Applying a Semantic Document Structure
Implied in our adherence to Web and accessibility standards is the adoption of semantic document structure. A semantic document uses HTML tags for their meanings, not their appearance. For example, a semantic document would use the <h1>, <h2>, and similar tags to mark up a page’s headings. If we didn’t want to display the default appearance of these headings, we could easily change it using CSS. Similarly, the use of an unordered list (<ul>) tag to mark up a list of links would be preferable to separating those links with line breaks. If we want the list of links to appear without bullets, we can achieve the effect using CSS.
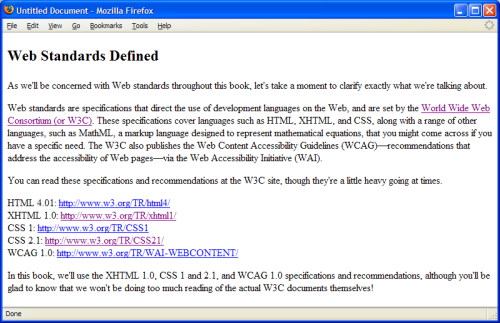
We will look at this issue in more depth in Chapter 3, XHTML and Semantics; however, here’s a simple example. If I were to mark up a section of this chapter as an XHTML document, I might end up with something that looks like Figure 1.7, “Marking up the chapter as XHTML.”
Figure 1.7. Marking up the chapter as XHTML.
The markup for the page could be something like this:
<!DOCTYPE html PUBLIC "-//W3C//DTD XHTML 1.0 Transitional//EN"
"https://www.w3.org/TR/xhtml1/DTD/xhtml1-transitional.dtd">
<html xmlns="https://www.w3.org/1999/xhtml">
<head>
<title>Untitled Document</title>
<meta http-equiv="Content-Type" content="text/html;
charset=iso-8859-1" />
<style type="text/css">
<!--
.heading {
font-size: 24px;
font-weight: bold;
}
-->
</style>
</head>
<body>
<p class="heading">Web Standards Defined</p>
<p>As we'll be concerned with Web standards throughout this book,
let's take a moment to clarify exactly what we're talking
about.</p>
<p>Web standards are specifications that direct the use of
development languages on the Web, and are set by the
<a href="https://www.w3.org/">World Wide Web Consortium (or
W3C)</a>. These specifications cover languages such as HTML,
XHTML, and CSS, along with a range of other languages, such as
MathML, a markup language designed to represent mathematical
equations, that you might come across if you have a specific
need. The W3C also publishes the Web Content Accessibility
Guidelines (WCAG)—recommendations that address the
accessibility of Web pages—via the Web Accessibility
Initiative (WAI).</p>
<p>You can read these specifications and recommendations at the
W3C site, though they're a little heavy going at times.</p>
<p>HTML 4.01: <a href="https://www.w3.org/TR/html4/">
https://www.w3.org/TR/html4/</a><br />
XHTML 1.0: <a href="https://www.w3.org/TR/xhtml1/">
https://www.w3.org/TR/xhtml1/</a><br />
CSS 1: <a href="https://www.w3.org/TR/CSS1">
https://www.w3.org/TR/CSS1</a><br />
CSS 2.1: <a href="https://www.w3.org/TR/CSS21/">
https://www.w3.org/TR/CSS21/</a><br />
WCAG 1.0: <a href="https://www.w3.org/TR/WAI-WEBCONTENT/">
https://www.w3.org/TR/WAI-WEBCONTENT/</a></p>
<p>In this book, we'll use the XHTML 1.0, CSS 1 and 2.1, and WCAG
1.0 specifications and recommendations, although you'll be glad
to know that we won't be doing too much reading of the actual
W3C documents themselves!</p>
</body>
</html>As so many designers are now comfortable with the use of CSS for styling text, we often see text that’s marked up as a paragraph (i.e. it appears between <p> and </p> tags), but is styled as a heading using CSS. To be semantically correct, I should have used a h1 element (as that denotes a heading), then used CSS to make it display as required.
Take a look at the list of URLs for the different W3C specifications: they’ve been split onto separate lines using the <br/> tag. The correct way to structure these links would have been as an unordered list. We could even indicate that this content constitutes a note using a <div> tag:
<div class="note">

<p>You can read these specifications and recommendations at the

  W3C site, though they're a little heavy going at times.</p>

<ul>

  <li>HTML 4.01 <a href="https://www.w3.org/TR/html4/">

    https://www.w3.org/TR/html4/</a></li>

  <li>XHTML 1.0 <a href="https://www.w3.org/TR/xhtml1/">

    https://www.w3.org/TR/xhtml1/</a></li>

  <li>CSS 1 <a href="https://www.w3.org/TR/CSS1">

    https://www.w3.org/TR/CSS1</a></li>

  <li>CSS 2.1 <a href="https://www.w3.org/TR/CSS21/">

    https://www.w3.org/TR/CSS21/</a></li>

  <li>WCAG 1.0 <a href="https://www.w3.org/TR/WAI-WEBCONTENT/">

    https://www.w3.org/TR/WAI-WEBCONTENT/</a></li>

</ul>

</div>
A document can be perfectly valid against its specification while structured in a non-semantic manner. We need to use common sense and judgment to look at our documents and decide whether we’re using the correct tags to mark up each element on the page.
Thanks to CSS, the look and feel of the document need not be compromised by our use of correct elements and adherence to semantic document structure. However, marking up documents correctly is extremely beneficial when we start to consider site visitors who don’t use traditional Web browsers to read content. We’ll discuss this issue more throughout this book.
Separating Presentation from Document Structure
Another issue that’s implied by working to Web standards is that of separating presentation from content. The content comprises the semantic document that we discussed in the last section; the presentation is what makes it appear as it does on a computer, projector, or printed page.
If you’re using a Transitional DOCTYPE, you can include in your document many tags and attributes that do not describe what the different elements in the document are, but instead, state how they should look. Presentational tags include <font> and <center>, and can be replaced using CSS. Other attributes are used for presentational elements such as borders: for example, <img border="0"/>.
Using such presentational elements can make it difficult to change the way elements look. Best practice Web development entails the separation of the structure of a document from its presentational aspects. This separation is achieved by the use of CSS, wherever possible, to dictate how the document should look. If you want to validate against a Strict DOCTYPE, for the most part you’ll be required to apply this separation, as the tags and attributes that are absent from the Strict DOCTYPEs are largely presentational.
This separation of structure from presentation also underlies the recommendation that tables not be used for page layout purposes. The <table> tag was initially designed to describe tabular data, such as that found in a spreadsheet, not to force page elements into certain locations on the page. If your page uses a table to lay out page elements, you’ve mixed your structure and presentation – even though the page may well validate to a Strict DOCTYPE.
Summary
In this chapter, we’ve learned what Web standards are, and explored the core issues that we must consider if we want to develop Web pages to Web standards. We’ve also looked at some of the reasons why Web standards are helpful to those designing for the Web, and why investing time to understand this approach will pay off in future.
As is the case with all visual development environments, Dreamweaver has not achieved a reputation for creating clean markup. For many, however, developing in a visual environment is a better way to work than hand-coding HTML and CSS in a text editor. This book will discuss how you can use Dreamweaver to ensure that your work is standards compliant, and addresses all of the issues we mentioned in this chapter: valid markup and CSS, semantic document structure, the separation of structure from presentation, and meeting accessibility recommendations. Any tool – be it Notepad or Dreamweaver – is only as good as its operator, so let’s move on and create a standards compliant Website using Dreamweaver 8.
Chapter 2. Site Planning and Setting up for Development
Before we dive in and start developing our site, we need to make some decisions about how the site will look, how it will be hosted, and how it will be structured. The Website we’ll build through the course of this book will be called Code Spark; it will be a Web design resource site much like sitepoint.com. I have chosen this as the subject matter for the site not because I assume that every reader wants to build a Web design resource site, but because the concepts that we’ll explore while creating this site are common to many other types of Website. The decisions we’ll need to make during this project will parallel the kinds of options you’ll have to consider around most of the sites you’ll build. Whether you follow this book, creating the Code Spark resource site using the example graphics provided, or using the techniques described here to develop your own project, is entirely up to you.
The Code Spark Site Design
Features of the Code Spark Website
Before we can begin to design the layout of the site, we need to consider the site’s features, so that we know exactly what we need to include in the layout. Code Spark is a Web design and development tutorial site, so we’ll have to handle tutorials that explore design and development techniques, and articles that discuss interesting developments in the area of Web design.
Tutorial Pages
The tutorials will comprise the majority of the site’s content, so we obviously need a design that facilitates the formatting of this type of content. Tutorials tend to include a number of screenshots – which might be quite wide – and code samples, which need to be formatted so that the tutorial author’s line breaks are preserved. We want to ensure that our article page allows for the display of such page elements.
We’ll also want to make sure that, if readers like the tutorial they’re reading, they’ll be able to find similar tutorials on the Code Spark site. Perhaps the easiest way to do this is to add to the tutorial page a list of other articles written by that author.
The Homepage
We’ll want to make the focus of Code Spark – Web design and development tutorials – obvious from the get-go, so we’ll present a number of regularly updated feature tutorials on the homepage of the Website. This way, new visitors can quickly and easily ascertain what the site’s about, and returning visitors can see what’s new at a glance.
Site Navigation
Once we’ve prepared and published our tutorial content, we’re going to need to give visitors various ways to find it. The subject of “Web design and development” is fairly broad, so our content will need to be sensibly categorized. This way, visitors can quickly access all the articles that discuss Dreamweaver, CSS, or PHP development, for example. A tutorials index page, which displays the categories list, along with a couple of sample tutorials, will give the user an immediate understanding of the information contained in the categories. Making a list of these categories available on every page of the site helps to reinforce the content categories in the minds of users, and gives them quick, easy access to the latest tutorials on the topics in which they’re most interested.
A list of the most popular and highly rated tutorials is a good way to allow the cream of your Website to rise to the top. By making it easy for users to find your site’s best content from the homepage, your visitors will be more likely to read those tutorials and come away with a good impression of Code Spark – perhaps even telling their friends about it. A sitemap is also very useful to visitors: it’s a well-known tool that allows users to quickly get a feel for the way the Code Spark content is organized, and gives them a direct pathway to the tutorials that interest them.
Now, navigating the site by browsing its carefully thought-out categories might be good for users who are looking to improve their CSS skills, for example. But if a user needs a tutorial on a specific topic – such as building a CSS-based three-column page layout – that person’s going to want a faster way to locate it. By providing a search field, you make it very easy for users to quickly find specific tutorials, a task that – as you’d know if you’ve ever had to visit a huge site like Microsoft’s Developer Network (MSDN) – can otherwise be very difficult indeed.
As we’re concerned with accessibility, we want to add features that will help visitors use the site, such as a style sheet switcher that allows users to increase and decrease the font size, and a list of keyboard shortcuts that they can use to navigate the site. We’ll also need to provide a page that explains what the Website’s all about, and a way for visitors to get in touch with the people who run the site.
Bearing all of the above in mind, we can make a list of the important features that our site requires. It needs:
- Navigation to the main parts of the site: the tutorial index, information about the site and the people who run it, the contact page, and the sitemap
- A list of the tutorial categories
- A search facility
- A featured tutorials display on the homepage
- A large area for the presentation of article content on individual tutorial pages
Designing the Site
Once you’ve created a list of key elements, you can come up with a page layout either on paper or in a graphics application. To begin the Code Spark project site, let’s take a look at a design created in Fireworks by SitePoint’s Alex Walker, and pictured in Figure 2.1, “Alex’s homepage design, incorporating our requirements”, so we can discuss the implementation of a layout that makes use of graphics, while still adhering to Web standards.
Figure 2.1. Alex’s homepage design, incorporating our requirements.
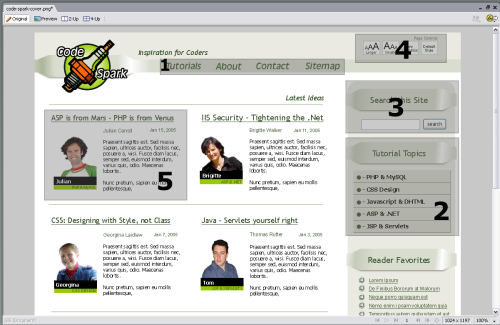
This design incorporates each of the elements we identified as being required on the homepage:
- Our main navigation displays along the top.
- Category links and a “reader favorites” section appear down the right-hand side.
- The search field is also on the right.
- Our accessibility controls appear in the top-right corner.
- The featured tutorials make up the main content area.
This process of thinking through the elements that you want to include before you come up with a layout will save you struggling find space later for extra elements that you hadn’t expected to use.
The site’s tutorial page layout shown in Figure 2.2, “The tutorial page layout, showing the content area.” includes a large content area, allowing us to easily publish articles that contain images and blocks of example code.
Figure 2.2. The tutorial page layout, showing the content area.
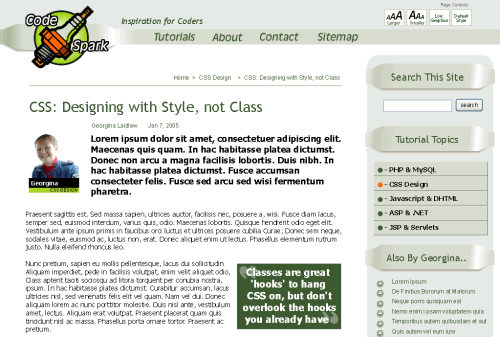
Whether you’re at the homepage, an article page, or any other location on the site, a number of consistent page elements are present: the header, which includes the Code Spark logo, the top navigation, and accessibility features that we’ll discuss later; and the bar to the right of the page, which contains the search box, along with elements that change depending on where you are located within the site. This sidebar provides quick, easy access to tutorial topics.
The content area on the homepage will contain two columns in which we’ll highlight the latest articles and tutorials posted on the site. When users click through from this display to an article page, the article content fills the complete width of this main content area. Ours will be a liquid layout: one that stretches to fill the users’ browser windows, regardless of their screen resolutions.
Note: Liquid or Fixed Width?
A fixed width layout (one that doesn’t grow and shrink with the size of the browser window) needs to be narrow enough to ensure that users with low screen resolutions don’t have to scroll sideways to read the site’s content. In practice, this fact means that we really need to design for users operating at a resolution of 800 x 600 pixels, unless we know that the majority of our target users will have a resolution of at least 1024 x 768 pixels. Designers often use fixed width layouts because they find it easier to position graphically intense designs within a known page width.
For a content rich site, however, using a liquid layout (one that expands and shrinks with the browser window’s size) can be a good design choice. Of course, you should always check your work at a resolution of 800 x 600 pixels to ensure that a horizontal scrollbar doesn’t appear at this resolution, and that the columns are not ridiculously narrow, but users with higher screen resolutions will have greater flexibility in the ways they view the site.
Structuring the Site
Now that we have a site design, we can begin to think about how we’ll put the site together, and the technologies we’ll use to do so. Once again, some time spent planning will help to make the site’s development more streamlined once we begin.
Dealing with Common Elements
We’ve already identified some common page elements in our design; some of these elements are present on every page, while other elements are present on some – but not all – pages. We can use the fact that we have these common elements in the site design to make development easier.
The “Copy, Paste, Copy, Paste” Technique
In developing a site, you might work by creating a new document, writing the XHTML code, applying your CSS, and then, when you’re ready to create a new page, simply copying and pasting into the new document all of the common elements that appeared in the last document. In this way, all of your site’s files contain potentially large amounts of markup – and possibly images – that are duplicated on each page.
This isn’t too much of a problem, until you decide to change a graphic in the header, and have to open up every page of the site to copy and paste in the new logo markup. The use of CSS does reduce the need to copy and paste common elements between files – much of this information can be found in the CSS file that controls the site’s pages – however, there are still many elements that need to appear in the individual page document. As such, when you create pages in this way, some copying and pasting is inevitable. Finally, you must upload all of the altered pages to the Website in order to have the revised logo display.
Dreamweaver Templates
If you have any experience in Dreamweaver, you may be aware of Dreamweaver Templates. A template is basically a normal HTML page that Dreamweaver can use as a basis from which to create new pages. You mark one or more regions of the template as being editable, optional, or repeating. These will be the only areas that Dreamweaver will allow you to update in pages based on that template; the rest are locked by Dreamweaver, as shown in Figure 2.3, “A page based on a Dreamweaver template with a single editable region.”
Figure 2.3. A page based on a Dreamweaver template with a single editable region.
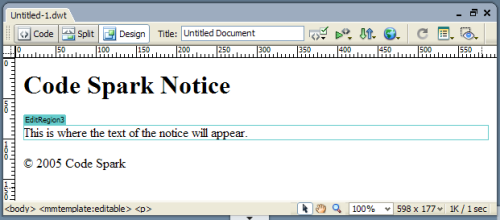
Dreamweaver locks parts of the page by placing special HTML comments in your markup. These comments indicate which areas are locked, and which are editable, as shown below.
<h1>Code Spark Notice</h1>
<!-- TemplateBeginEditable name="EditRegion3" -->
<p>This is where the text of the notice will appear. </p>
<!-- TemplateEndEditable -->
<p>© 2005 Code Spark</p>The really useful aspect of using Dreamweaver Templates is that if you change any part of the main template, Dreamweaver will ask whether or not you want it to update all other pages based on this template, saving you the time and hassle of copying and pasting the changes across your site.
Templates help us avoid copying and pasting common elements, which is great. However, it can’t help us overcome the task of having to re-upload all the changed Website files, which we have to do whether we use Dreamweaver Templates or some other design approach. And of course, Dreamweaver Templates don’t benefit designers who don’t use Dreamweaver: it’s the only program that knows how to handle these templates.
Server Side Includes (SSI)
Our third option for the management of repeated sections of markup is to make use of use Server Side Includes (SSI). SSI allows you to merge two or more files before your page is presented to the browser. The include file, or include, is simply a file into which the repeated section of code has been copied. It isn’t a complete XHTML document in itself: it’s just a part of your complete document.
To create an include, simply copy the repeated content from the original file, and save it as a new file. Then, include that file in the main document using the following line:
<!--#include file="newfile.html" -->As an example, you might have an XHTML document that looks like this:
<!DOCTYPE html PUBLIC "-//W3C//DTD XHTML 1.0 Strict//EN"
"https://www.w3.org/TR/xhtml1/DTD/xhtml1-strict.dtd">
<html xmlns="https://www.w3.org/1999/xhtml">
<head>
<meta http-equiv="Content-Type" content="text/html;
charset=iso-8859-1" />
<title>Code Spark Notice</title>
</head>
<body>
<h1>Code Spark Notice</h1>
<p>This is where the text of the notice will appear.</p>
<p>© 2005 Code Spark</p>
</body>
</html>The content from the top of this document all the way down to the <h1> heading is common to all pages of the Website, as is the content from the copyright notice onwards. We could divide this page into three parts: the top, the bottom and the middle – the middle being the only part that will change.
By copying the top and bottom parts of the document into top.html and bottom.html, respectively, we can replace them in the original document with the include information.
<!--#include file="top.html" -->
<p>This is where the text of the notice will appear.</p>
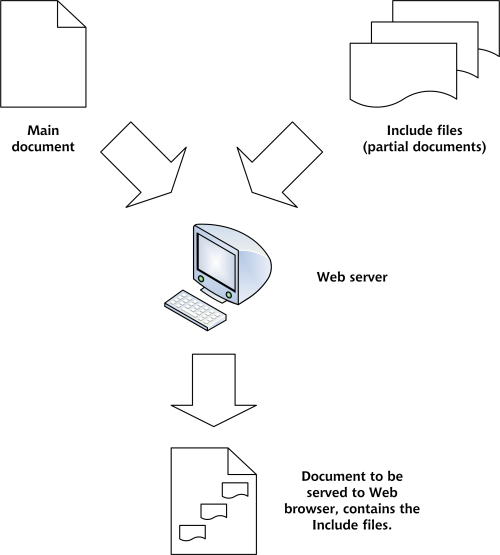
<!--#include file="bottom.html" -->Once this file has been uploaded to a Web server (we’ll set one up later in this chapter), anyone who views the page with a Web browser will see the file exactly as it was before you employed SSI. The Web server intercepts the #include file code in our HTML, and replaces it with the specified file, as shown in Figure 2.4, “Creating a complete document from three files using Server Side Includes.”
Figure 2.4. Creating a complete document from three files using Server Side Includes.
To create new files that contain the same top section, we simply add the appropriate include line to each page on which we want the top section to display. Then, if we want to change the logo, we simply edit it within the top.html file, and re-upload that file. All of the pages that include top.html will automatically show the new logo.
Server Side Includes are an incredibly useful way to create documents that are easy to maintain, and, given that our tutorial site is likely to become quite large as we add new tutorials, SSI represents a good choice for us. After all, we don’t want to have to copy and paste our changes, then re-upload all our files every time we make a change to a section; nor do we want to lock anyone who works on the site into using Dreamweaver. If the site was a brochure site that had only a few pages and wasn’t expected to develop any further than that, you might decide against using SSI. However, having maintained a number of large sites over the years, I know that – in the case of Code Spark, at least – SSI will save us a lot of time and energy later on.
Dreamweaver understands includes: when you load a page that contains an include directive, it will display the part of the document that’s contained in the SSI. However, you need to open the include file directly in order to make any changes to it. We’ll look at how we can work with Dreamweaver and SSI when we move on to build our site.
Note: Using Built-In Functions to Include Files
If you’re building a site using PHP, ASP.NET, or some other server-side language, you may be able to use that language’s built-in functions to include files. These methods tend to offer better error handling features, but you’re unlikely to need these features if your content is static.
In PHP, you can make use of include, require, include_once or require_once. See the relevant discussion in the PHP manual for more information. In ASP, Server.Execute is similar, but not quite the same.
Setting up a Web Server
Since we’re building what could potentially become a large static content site, we’ll employ SSI to reuse the code for the common parts of each page. If we want to test and view the site complete with all the included portions of each page, we’ll need to run a local Web server. In this instance, “Web server” refers to the software that responds to browser requests by sending back Web pages. This software is responsible for the heavy lifting involved in SSI: intercepting #include commands in HTML files, and replacing them with the specified files. The term “Web Server” can also be used to refer to the computer that hosts a Website.
You may already have Apache or IIS installed if you perform any server-side Web development in languages such as PHP, Perl, or ASP. If you’re unsure whether or not you have a Web server installed, try typing http://localhost/ into your Web browser: this will request the default page from your local Web server, if one is running. Both Apache and IIS install a test page; if you see such a page, it will be pretty obvious which Web server you’re running. If you see only an error message complaining that localhost could not be found, you may need to install a Web server.
If you’re running Apache, you may want to skip to the section called “Testing SSI ” below; if you’re using IIS, skip straight to the section called “Using IIS as your Local Web Server”. If you’re not already running a local Web server, we can set up the Apache Web server in order to process our includes. Apache is available for all major platforms, and is free to download and use.
Installing Apache
Apache is used on almost 70% of the Web servers that run sites on the Internet (according to netcraft.com). If you’ve ever used shared hosting on a Linux server, it’s likely that your site was running on Apache. The Apache Web server is an Open Source project that’s free to download and install, with installers provided for most operating systems.
Windows
Figure 2.5. Downloading the Apache installer.
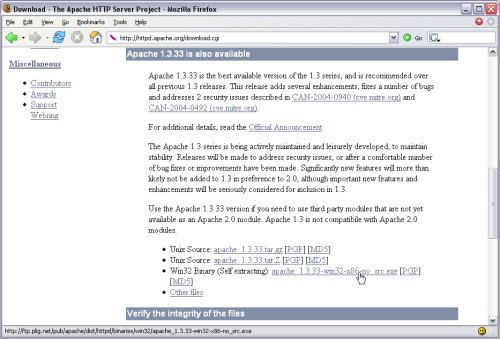
To install Apache on Windows, go to http://httpd.apache.org/, click on Download, and grab the “Win32 Binary (Self Extracting)” version, as shown in Figure 2.5, “Downloading the Apache installer.”. I’ll be using Apache 1.3 throughout this discussion, but the instructions are more or less the same for Apache 2, if you wish to use that instead.
Locate and run the downloaded executable file, and progress through the setup questions by clicking Next. Don’t worry if you don’t understand the options presented; they’re not important in the case of our simple testing server.
Installing Apache Alongside IIS
You can use IIS to serve Web pages with server-side includes – a job it does perfectly well – but if you want to install Apache on a computer that already has IIS, use these instructions to do so.
If you type http://localhost/ into your Web browser following a successful installation, Apache’s test page will display (localhost, as mentioned before, refers to your computer). By default, Apache will look in the directory C:Program FilesApache GroupApachehtdocs to find files to serve. To change this setting, we need to edit httpd.conf, the main Apache configuration file. From the Start menu, select All Programs > Apache HTTP Server > Configure Apache Server > Edit the Apache httpd.conf Configuration File to open this file in Notepad. Find the line that starts with DocumentRoot, as shown in Figure 2.6, “Editing httpd.conf in Notepad”.
Figure 2.6. Editing httpd.conf in Notepad.
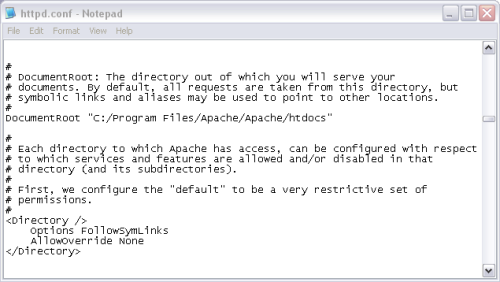
This snippet tells the server where your Website files are stored. Let’s change this location to one that’s more easily accessed. Create a folder on your C: drive called Apache Sites, then change the line in httpd.conf as follows:
#

# DocumentRoot: The directory out of which you will serve your

# documents. By default, all requests are taken from this

# directory, but symbolic links and aliases may be used to point

# to other locations.

#

DocumentRoot "C:/Apache Sites"
Note: Back up Before you Edit!
Before you edit httpd.conf, make a backup copy of the file so that if it all goes wrong, and Apache fails to start, you have a copy of the original file with which you can replace the edited file. httpd.conf can be found in C:Program FilesApache GroupApacheconf.
The original directory will also be referenced later in the file, in a section that looks like this:
#

# This should be changed to whatever you set DocumentRoot to.

#

<Directory "C:/Program Files/Apache Group/Apache/htdocs">


Change this to:


#

# This should be changed to whatever you set DocumentRoot to.

#

<Directory "C:/Apache Sites">
Note: Security Matters!
Resist the temptation to reuse an existing folder to host your Website, or – even worse – to set DocumentRoot to C:/. Remember: the outside world may be able to gain access to the directory you set up for your Website; you don’t want strangers to be able to download or modify your personal files!
In order for Apache to take notice of any changes to httpd.conf, we need to restart it. In Windows XP, you can do so from the Services Management console, which can be opened by selecting Services from the Administrative Tools menu, or by selecting Run… from the Start menu and typing services.msc into the dialog that appears. To restart Apache, locate Apache in the list of services, right-click on it, and select Restart.
Mac OS X
If you’re running Mac OS X, you’re in luck! Apache is already installed: you simply need to start it up. To do so, access System Preferences, select Sharing, and start up Personal Web Sharing. You should then be able to enter http://localhost/ in your browser to view the Apache test page. On the Mac, this page is served from /Library/WebServer/Documents/ – a location to which you may or may not have access, depending on the way your user profile is set up. Fortunately, Apache on the Mac is also configured to give each user his or her own Web space at http://localhost/~username/. The files for this directory are located in the Sites folder of your home directory.
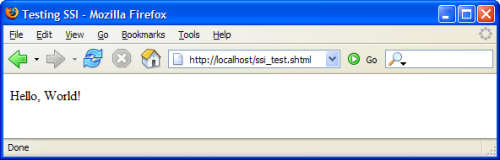
Testing SSI
Before we complete this part of the setup procedure, we need to check that SSI works properly on our system. To do this, we’ll create a very simple Web page that contains an include. Create the following two files in your text editor:
Example 2.1. hello.html
<p>Hello, World!</p>Example 2.2. ssi_test.shtml
<!DOCTYPE html PUBLIC "-//W3C//DTD XHTML 1.0 Transitional//EN"

    "https://www.w3.org/TR/xhtml1/DTD/xhtml1-transitional.dtd">

<html xmlns="https://www.w3.org/1999/xhtml">

<head>

<title>Testing SSI</title>

<meta http-equiv="Content-Type" content="text/html;

    charset=iso-8859-1" />

</head>

<body>

<!--#include file="hello.html" -->

</body>

</html>
You should now be able to open a browser, type
http://localhost/ssi_test.shtmlinto the address bar, and see “Hello, World!” display on the Web page as in Figure 2.7, “Confirming that SSI works correctly.”
Enabling SSI
If you see a blank page, or the code from ssi_test.shtml, you need to tweak your Apache configuration to enable SSI. Open your httpd.conf file, and look to see if the following lines are present and uncommented.
AddType text/html .shtml

AddHandler server-parsed .shtml
Figure 2.7. Confirming that SSI works correctly.
Got a Comment?
In httpd.conf, lines beginning with # are ignored by Apache. These are comments. These lines provide you with the ability to add notes to the file, or disable certain options without deleting them. For example, the following options are disabled in httpd.conf. To re-enable them, we’d remove the # from the start of each line.
# AddType text/html .shtml

# AddHandler server-parsed .shtml
If these lines are not present in the file, add them: they ensure that files with the extension .shtml are parsed by the server. Next, locate the following section:
#

# This should be changed to whatever you set DocumentRoot to.

#

<Directory "C:/Apache Sites">


#

# This may also be "None", "All", or any combination of "Indexes",

# "Includes", "FollowSymLinks", "ExecCGI", or "MultiViews".

#

# Note that "MultiViews" must be named *explicitly* ---

# "Options All" doesn't give it to you.

#

    Options Indexes FollowSymLinks MultiViews
In the Options line, add Includes to the list to enable SSI for that directory:
Options Indexes FollowSymLinks MultiViews IncludesYou should also check that the following line is not commented out:
AddModule mod_include.cYou’ll need to restart Apache in order for the server to take notice of your changes. Once you’ve done so, re-test your page in the browser.
Note: SSI Default on Mac OS X
The default installation of Apache on Mac OS X should have SSI enabled. If it doesn’t, or you need to edit httpd.conf for some other reason, you may need to log in as an administrative user.
Using IIS as your Local Web Server
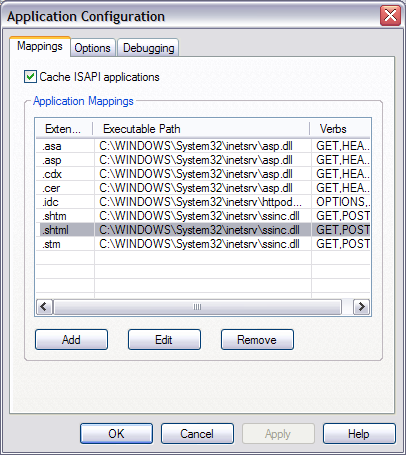
If you already have IIS installed and set up as your local Web server, you should be able to use the .shtml extension to parse files that contain SSI directives. To test SSI, create the hello.html and ssi_test.shtml files as described in the previous section, and save them to the directory C:Inetpubwwwroot. Run the test by loading http://localhost/ssi_test.shtml in your browser.
If your test include page doesn’t work, you’ll need to check that pages with the .shtml extension are being parsed. To do this, open the IIS Management Console (Control Panel > Administrative Tools > Internet Information Services). Right-click on your Website and select Properties. Select the Home Directory tab in the Default Web Site Properties dialog, then click the Configuration button.
Check that .shtml is listed under Extension and that its executable path ends in ssinc.dll, as shown in Figure 2.8, “Checking that .shtml is being parsed to enable includes on IIS.”
Hosting your Site
The site that we’ll create should be able to be hosted on any standard hosting account that allows the use of Server Side Includes. This requirement should be covered by even the most basic packages of most shared hosting accounts. However, if you already have a hosting account and want to check that SSI is available, simply upload the test pages we created earlier to test our own servers. If those pages work, SSI is available to you.
Figure 2.8. Checking that .shtml is being parsed to enable includes on IIvS.
Setting up Dreamweaver
Now that your server is set up and ready, let’s create a directory for the Code Spark Website. Go to the Web server’s root folder (C:Apache Files for Apache; C:Inetpubwwwroot for IIS) and create a folder called codespark. This folder will be accessible as http://localhost/codespark/.
Now, we’re ready to set up Dreamweaver and begin development on the site. Open Dreamweaver, and select Site > New Site…. This should open the Site Definition wizard. In the first screen, name your site codespark and enter its URL: http://localhost/codespark.
After clicking Next, you’ll be asked if you want to work with a server-side language. You do not need to use server-side technology to create the site in this book, as we’re using Server Side Includes, but the server technologies Dreamweaver is asking about here are those it uses to work with database-driven Websites in ASP, PHP, ASP.NET, JSP, and ColdFusion. Select No in this dialog, and move on.
In the next screen, select the radio button labeled Edit directly on server using local network, then browse for the site directory that you have created.
Figure 2.9. The wizard displaying a summary.
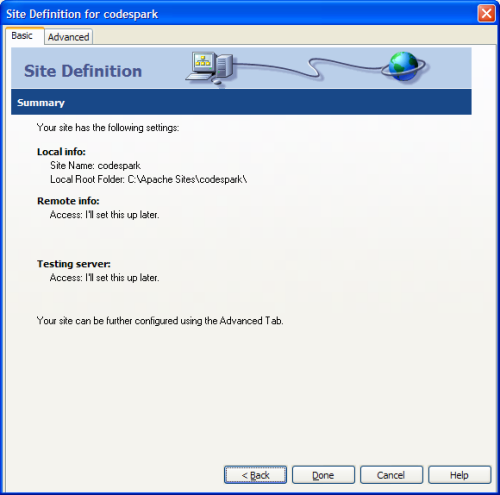
Following this step, the wizard completes, providing a summary of the details of your site’s creation similar to that shown in Figure 2.9, “The wizard displaying a summary.” If it all seems fine, click Done to create the site and open it in Dreamweaver.
Your Workspace
Depending on the selection that you made when you installed Dreamweaver, you should now be presented with a large gray screen with panels positioned either on its left (as shown in Figure 2.10, “The Dreamweaver 8 Workspace.”) or its right.
Figure 2.10. The Dreamweaver 8 Workspace.
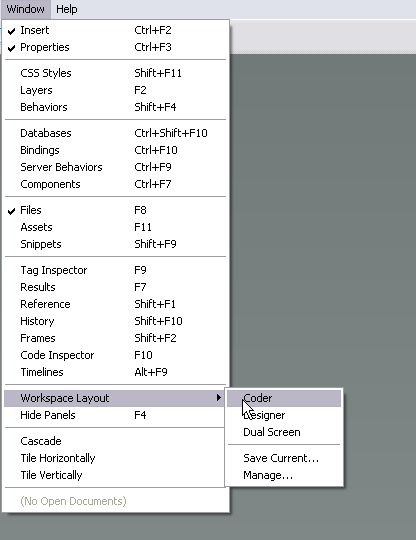
When the panels appear on the right, Dreamweaver is in “Designer” Workspace layout; when the panels are on the left, it’s in “Coder” layout. You can choose whichever view you prefer by selecting Window > Workspace Layout > Coder or Designer. The Dual Screen option can be handy for those with a dual screen setup.
Figure 2.11. Changing the Workspace.
I tend to work with the panels on the left, so the screenshots in this book will show that configuration; however, the way you like to arrange your Workspace is a personal choice: it won’t make any difference to the project.
Note: Dreamweaver Panels Explained
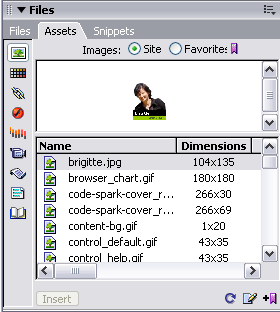
If you’re new to Dreamweaver, you’ll find that you soon pick up the different panel and toolbar purposes as we use them. Each time we use a new panel or tool I’ll explain how to locate it and use its basic functionality. All panels can be opened and closed from the Window menu. Each panel is grouped with other panels that do similar things. You can switch between them using the tabs at the top of the panel group, as shown in Figure 2.12, “The Assets Panel is part of the Files Panel group” below.
Figure 2.12. The Assets Panel is part of the Files Panel group.
Setting Preferences
You can make many changes to the way that Dreamweaver operates by setting your own preferences. There are certain preferences that it’s important to set correctly when you’re developing a site to Web standards, so, before we create our first page, let’s make sure we’re starting out with these essential preferences in place.
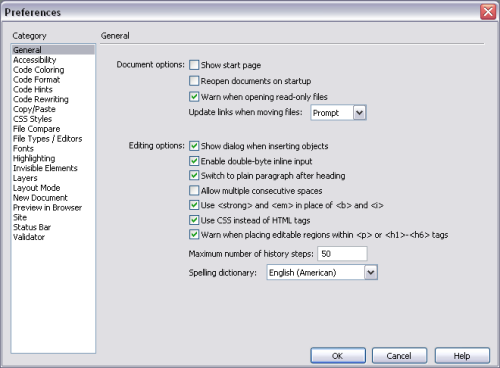
Open the Preferences dialog (Edit > Preferences) and select the General category to display the information shown in Figure 2.13, “Setting General preferences.”. Make sure that:
- Allow Multiple Consecutive Spaces is unchecked. If this option is checked, it will allow you to insert a series of non-breaking spaces ( ) each time you press space more than once. If you need to add more space to your layout, it’s best to do so with CSS, to ensure that Dreamweaver isn’t working against you!
- Use
<strong>and<em>instead of<b>and<i>is checked.<b>and<i>are prime examples of presentational markup: they don’t convey the reason why an element is bold or italicized, just the fact that it is styled as such.<em>and<strong>tell the browser (or Web indexer, screen reader, or any other program that wants to parse the site) that the text is emphasized or strongly emphasized. This is another example of the semantic document structure we discussed in Chapter 1, What are Web Standards? We will discuss screen readers, and the way they read out text, in more detail in Chapter 7, Accessibility and Chapter 8, Building the Site. - Use CSS instead of HTML tags is checked. This one’s fairly self-explanatory: we don’t want Dreamweaver inserting any
<font>tags for us!
Figure 2.13. Setting General preferences.
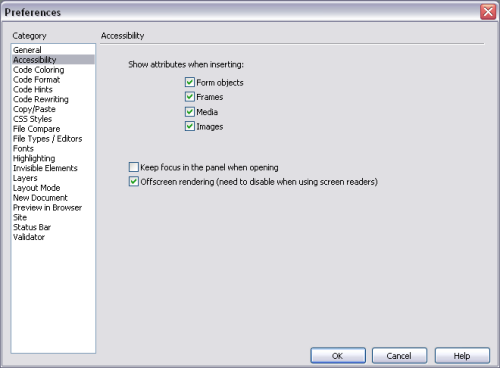
Select the Accessibility category, under Show Attributes when Inserting, and check all four checkboxes, as shown in Figure 2.14, “Setting Accessibility preferences.” This means that, when you enter any of these elements, Dreamweaver will display additional dialogs that prompt you to enter the accessibility attributes for those elements. This makes it less likely that you will forget to enter these important attributes as you create a document.
Figure 2.14. Setting Accessibility preferences.
There are lots of other preferences, but most relate to the way you work with the product: they don’t affect the actual documents that you’re working on in the same way as the preferences we’ve discussed here. If you find that something about the development environment is annoying you, however, check your preferences: there may be a way to modify the program’s behavior to suit you.
Summary
In the course of this chapter we’ve made some key decisions about how we’ll proceed with the development of this site. We’ve decided on the elements that we want to include in our site, and we’ve come up with a layout that contains all those elements. We have considered the best way to build our site in order to manage the common elements that will display on every page of the site, and, because the site could become very large as we add articles and tutorials, we’ve decided to use Server Side Includes (SSI) to manage these common elements. In order to do so – and be able to test the site locally – we installed a Web server and checked that SSI works. Finally, we created the site in Dreamweaver, and set up the preferences we need in order to get a head start on the path to developing a standards compliant Website.
Making these kinds of decisions at the start, and setting our systems up on the basis of these decisions, means that you can begin the development process with a clear understanding of where you’re heading, and what you hope to achieve. It’s important to consider how the site will grow and develop. You can’t preempt everything that might possibly happen, but, when planning the development, if you consider how the site might be likely to evolve over the next year, these expectations can support your decision-making process. For example, we might not have made the decision to use SSI if the site was never going to be any more than a three-page brochure site, as the issues of copying and pasting and re-uploading content would not have existed for that type of project.
In the next chapter, we’ll look at XHTML. We’ll discover how it’s different than the HTML you may already have used, and how Dreamweaver can help you to use XHTML in a site’s development.
Chapter 3. XHTML and Semantics
Dreamweaver MX was the first version of Macromedia Dreamweaver to provide support for those working in XHTML – a development that reflected the fact that many developers have moved from HTML to XHTML. In this chapter, we’ll explore XHTML in some depth. We’ll understand why it’s different from HTML, why we might want to use it in preference to HTML, and how we could go about doing so.
In this chapter, we’ll see not only how valid XHTML is written, but also, how to structure an XHTML document correctly in order that our content is accessible to all users.
What is XHTML?
XHTML is basically the union of two languages: HTML and XML. You’re probably already familiar with HTML, but XML may need a brief introduction.
XML
Extensible Markup Language (XML) is a general-purpose language for structuring data in a way that’s easy for both humans and computers to read, as shown here:
<?xml version="1.0" encoding="iso-8859-1"?>

<orders date="March 31 2006" xmlns="http://myshop.com/orders.dtd">

  <order productID="52478">

    <description>Dreamweaver 8 (OS X)</description>

    <recipient>

      <name>Sally Smith</name>

      <address>

        <street>474 Smith St.</street>

        <city>Collingwood</city>

        <state>Victoria</state>

        <zipCode>3068</zipCode>

        <country>Australia</country>

      </address>

    </recipient>

  </order>

  <order productID="52477">

    <description>Dreamweaver 8 (Windows)</description>

    <recipient>

      <name>John Jameson</name>

      <address>

        <street>Level 5, 142 Park Avenue</street>

        <city>New York</city>

        <state>New York</state>

        <zipCode>10167</zipCode>

        <country>United States</country>

      </address>

    </recipient>

  </order>

</orders>
We can see that this code comprises a list of two orders made on March 31, 2006: one for Dreamweaver 8 for Mac OS X (to be delivered to Sally Smith in Australia), and the other for Dreamweaver 8 for Windows (to be delivered to John Jameson in New York).
The actual tags that are used here aren’t part of XML; XML defines only how the tags are written. It’s up to the entities that create and consume these files to agree on the actual tags that are used. In this way, we can define lots of useful languages within XML; XHTML is one of these.
XHTML
XHTML came into being as a recommendation that was released by the W3C on January 26, 2000. XHTML represented a reformulation of HTML – the original language of Websites – into an XML application designed to meet the future needs of the Web. Indeed, XHTML can be regarded as the latest version of HTML, as no further HTML specifications will be developed or released.
As XHTML is a reformulation of HTML, rather than a completely new markup language, it will seem very familiar to anyone who has already used HTML. There are very few differences between XHTML and HTML, which makes life easy for the Web developer who wishes to work in XHTML. We will discuss these differences in this chapter, and see why we might want to use XHTML over HTML.
What Makes a Valid XHTML Document?
In order to create a valid XHTML document right from the start, we need to include certain elements in that document before we begin marking up content. We’re fortunate in that Dreamweaver will give us a valid XHTML document as a starting point, if we use File > New… to open the New Document dialog, then select Basic Page, HTML, and then select one of the XHTML 1.0 document types from the Document Type (DTD) drop-down list. The default selection is XHTML 1.0 Transitional, which will create a page containing the following markup.
<!DOCTYPE html PUBLIC "-//W3C//DTD XHTML 1.0 Transitional//EN"

    "https://www.w3.org/TR/xhtml1/DTD/xhtml1-transitional.dtd">

<html xmlns="https://www.w3.org/1999/xhtml">

<head>

<title>Untitled Document</title>

<meta http-equiv="Content-Type" content="text/html;

    charset=iso-8859-1" />

</head>


<body>

</body>

</html>
The DOCTYPE
A valid XHTML document must use an XHTML DOCTYPE. We discussed DOCTYPEs in Chapter 1, What are Web Standards?; you’ll remember that this line identifies the specification to which the document is written. The XHTML Transitional DOCTYPE is:
<!DOCTYPE html PUBLIC "-//W3C//DTD XHTML 1.0 Transitional//EN"

    "https://www.w3.org/TR/xhtml1/DTD/xhtml1-transitional.dtd">
Note: Using the XML Declaration
Sometimes, you’ll see an XML Declaration, like the one shown below, as the first line of an XHTML document.
<?xml version="1.0" encoding="UTF-8"?>This XML Declaration, which declares that the document is XML, is recommended but not required. This line was inserted by Dreamweaver MX. However, Dreamweaver 8 doesn’t insert the XML Declaration, as it has the unfortunate effect of switching Internet Explorer 6 into “Quirks Mode” – a special mode that disregards Web standards in favor of Internet Explorer 5’s nonstandard rules.
The html Element
<html xmlns="https://www.w3.org/1999/xhtml">The html element is known as the root element of the document. To be a valid XHTML document, this element needs to include the xmlns="https://www.w3.org/1999/xhtml" part; this attribute, part of XML, states that the elements in the document comply with the XHTML standard, by default.
Note: XML Namespaces
The actual tags used in an XML document can be defined by one or more document type definitions, or DTDs (these are different from the DOCTYPEs, document type declarations, that we discussed earlier). DTDs can be linked into an XML document using the xmlns attribute. (Strictly speaking, xmlns attributes do not need to point to a DTD, as evidenced by the URL used to identify the XHTML namespace (https://www.w3.org/1999/xhtml). XML actually allows any text string to identify an XML namespace. Using the public URL of the relevant DTD is simply a useful convention to use for custom XML document types. None of this really matters for our purposes, however.)
Each DTD is given a “namespace,” which forms a prefix for the tags that are part of that DTD. One DTD may be given the “default namespace” (which has no prefix), but other DTDs used in the document require unique prefixes.
For example, if we wanted to add some XML from our order list to an XHTML document, we could add a namespace to our document like so:
<html xmlns="https://www.w3.org/1999/xhtml"

    xmlns:ord="http://myshop.com/orders.dtd">
Within the XHTML document, we could then use the ord: prefix to indicate that the element is from the order list DTD:
<h2>Orders Placed</h2>

<ord:orders>

  <ord:order productID="52478">

    <ord:description>Dreamweaver 8 (OS X)</description>

    <ord:recipient>

      <ord:name>Sally Smith</ord:name>

      <ord:address>

        <ord:street>474 Smith St.</ord:street>

        <ord:city>Collingwood</ord:city>

        <ord:state>Victoria</ord:state>

        <ord:zipCode>3068</ord:zipCode>

        <ord:country>Australia</ord:country>

      </ord:address>

    </ord:recipient>

  </ord:order>

</ord:orders>
The head Element
<head>

<title>Untitled Document</title>

<meta http-equiv="Content-Type" content="text/html;

    charset=iso-8859-1" />

</head>
The head element contains the title element, which gives the page a title. In the snippet above, you can see that Dreamweaver has inserted “Untitled Document” by default: there are many thousands of documents on the Web titled “Untitled Document” because their authors forgot to change the documents’ titles!
In the head of the document we can also see a <meta> tag. This <meta> tag declares the Content-Type of the document, as well as the character encoding used.
The body Element
<body>

</body>
Here’s the body element, into which you’ll place all of the content that you wish to make available to your site’s visitors.
XHTML and HTML: the Differences
There are only a few rules to keep in mind when using XHTML instead of HTML. Although we’ll use Dreamweaver to write our XHTML – and can rely on the program to do a pretty good job of it – it’s worth understanding the differences between the two languages. It’s inevitable that, sometimes, you’ll need to hand-code markup, or edit markup you’ve copied from other sources in order to make it XHTML compliant.
Quoting Attribute Values
In HTML, it’s perfectly valid not to quote attribute values. For example, the following image markup is valid HTML:
<img src="/img/me.jpg" alt="A picture of me" height=400 width=200>To make this valid XHTML, you need to insert quotes around the attribute values, height=”400″ width=”200″. Dreamweaver writes both HTML and XHTML with quoted attribute values; however, you might find that markup you’ve copied from other sources contains these unquoted HTML values.
Closing all Empty and Non-empty Elements
As you’d probably expect, a non-empty element is any element that contains something – for example, text, scripts or other data content – between a start and end tag. p and li are examples of non-empty elements. In HTML, we aren’t required to close these elements, so the following list is valid HTML.
<ul>

  <li>List item one

  <li>List item two

  <li>List item three

</ul>
However, this would constitute invalid XHTML, as the li element has not been closed. This issue has been rectified in the valid XHTML markup below:
<ul>

  <li>List item one</li>

  <li>List item two</li>

  <li>List item three</li>

</ul>
What about elements such as hr, img, and br? These empty elements must also be closed. In XML, you can do this with <hr></hr>, or by using XML’s shorthand notation, <hr/>. Unfortunately, older browsers would likely balk at such odd markup. As you might have guessed, the clever folks who put together XHTML came up with a solution to this problem: use the shorthand notation, but insert a space between the element’s name and the closing slash (<hr />). This still represents valid XML, so XHTML-aware browsers won’t have a problem with it, and older browsers see the closing slash as an unrecognized attribute.
Avoiding Minimizing Attributes
HTML supported minimizing attributes, or leaving out an attribute’s value when it’s not required. Consider this example of attribute minimization:
<input type="checkbox" checked>Above, the attribute checked indicates that the checkbox should be checked when it displays on the page. XML doesn’t support minimizing attributes in the same way HTML does, so to achieve this using valid XHTML, we need to give these attributes a value:
<input type="checkbox" checked="checked" />Here, the value of the attribute becomes the same as its name. This is the case for several attributes that are minimized in HTML:
selected="selected"disabled="disabled"readonly="readonly"
Writing Elements and Attributes in Lowercase
XHTML requires that all tags and attributes be written in lowercase. HTML is not case-sensitive: we could even use a mixture of upper- and lowercase with that language. Yet XML is case sensitive, so XHTML requires the use of lowercase tags, as illustrated in the below example.
<p>This line is <em class="formal">valid</em> XHTML</p>

<p>This line is <STRONG STYLE="text-transform: uppercase;">

  not</STRONG> valid XHTML</p>
Nesting Elements Properly
Web browsers are generally very tolerant of errors in HTML, but less tolerant of errors in XHTML. The following example constitutes invalid HTML and XHTML, but would generally display as the author (probably) intended:
<p><em>This text is emphasized</p></em>In HTML, tags must be nested correctly; that is, the last tag that was opened must be the first tag that’s closed. This requirement becomes even more important when we start to use XML, and to mark up our document for meaning. Thus, we need to edit the above to nest our tags correctly:
<p><em>This text is emphasized</em></p>Using id Instead of name to Identify Elements
HTML allows us to use the name attribute to identify particular elements on the page. name could be used for a number of purposes: to reference an element using JavaScript, to name a form element so that it could be collected once the form had been submitted, and more. Here’s name in action:
<form method="post" action="/cgi-bin/search.cgi">

  <img src="search.gif" name="Image1" alt="Search ">

  <input type="text" name="searchField">

  <input type="submit" value="Search">

</form>
In XHTML, we must use the id attribute instead:
<form method="post" action="/cgi-bin/search.cgi">

  <img src="search.gif" id="Image1" alt="Search " />

  <input type="text" id="searchField" name="searchField" />

  <input type="submit" value="Search" />

</form>
Have a close look at that, and note that I’ve left the name attribute on the <input> tag. Form fields are the one place where the name attribute is still kosher; however, it isn’t used to identify these elements in the document: it’s used to supply the variable name under which the field’s value will be submitted. In XHTML Strict, that’s the only purpose for which the name attribute may be legally used.
Dreamweaver will add both name and id attributes to a given element (giving both attributes the same values) in an XHTML Transitional document.
Note:The id Must be Unique
Unlike names, elements’ id attributes must be unique: there cannot be more than one element with a particular id in any given document.
Why use XHTML?
We’ve explored the differences between XHTML and HTML, and we now have a clearer understanding of each language. But the fact remains that we can create a standards compliant, accessible and semantic Website that validates to HTML 4.01 if we want to. Why should we consider moving to XHTML?
Creating Clean Markup
HTML allows developers to write markup in a very flexible manner. It isn’t very strict with the application of rules such as closing tags like <p>. For example, consider the following:
<p>This is a paragraph.

<p>This is another.
HTML allows this markup, rather than demanding that the closing </p> tag be used to mark up the end of the paragraph, like so:
<p>This is a paragraph.</p>

<p>This is another.</p>
HTML allows the creation of simpler, but more ambiguous markup, whereas in XHTML every opening tag must be matched by its closing tag. While it might seem like quite a good idea to take a flexible approach to markup, which enables people with little technical expertise to easily create documents for the Web, this approach can also cause a number of problems, particularly where these untidily marked-up documents are to be read by devices that don’t have the processing power of a desktop computer.
Making Code Easier for Machines to Process
XHTML is easier than HTML for a computer to process because XHTML does not permit the flexibility allowed by HTML. This means that documents marked up using XHTML are more easily read or displayed by devices other than a conventional Web browser – devices such as screen readers, Web-enabled phones, Braille readers, and search engines.
Boosting the Portability of Content
The content that you’ve marked up within your Web page is valuable in its own right; in the future, you might want to reuse it in a different format. If that content was marked up using HTML – even valid HTML – it would be more difficult to reuse the content in another application than if it was marked up in XHTML. XHTML’s rigorous conformance to XML rules means that it’s far easier to transform an XHTML document into some other format. This would be very useful if you had decided to rebuild your site with a database-driven back-end, for example, and needed to get all that marked-up content into the new database.
Allowing Integration with other XML Applications
XHTML allows the incorporation of tags from other XML applications such as MathML, SMIL (Synchronized Multimedia Integration Language), and SVG (Scalable Vector Graphics). This might not seem particularly useful right now, unless you have a very specialized requirement, but XHTML’s integration capabilities are likely to become more important in the future.
XHTML in Dreamweaver
Having read through all the do’s and don’ts in the previous sections, you’ll be glad to know that we’ll be letting Dreamweaver write most of the XHTML markup for us. Now, let’s take a look at the tools Dreamweaver provides to help us write valid XHTML documents.
Creating New Pages
We have already seen that Dreamweaver can create new pages either in HTML or XHTML. Once Dreamweaver recognizes that your page has an XHTML DOCTYPE, it will insert elements using the correct XHTML syntax, rather than HTML. You can confirm whether or not Dreamweaver is working in XHTML by looking to see if (XHTML) displays in the title bar, as shown in Figure 3.1, “Dreamweaver displaying XHTML in the title bar.”
Figure 3.1. Dreamweaver displaying XHTML in the title bar.

In Design View, type Shift-Enter to insert a line break. Switch into Code View to have a look at the markup that was entered. Dreamweaver will have inserted the correct <br /> tag instead of HTML’s <br>. Try adding an image: you’ll note that Dreamweaver closes the image tag correctly. There is little difference between the way we work with Dreamweaver in HTML, and in XHTML. As long as Dreamweaver knows which type of document we’re working on, it will write the correct markup for us.
Creating a Frameset
If you need to create a frameset, Dreamweaver will help you to use the correct DOCTYPE.
In your new XHTML document, create a frameset with a top frame using the Insert Frames button – as shown in Figure 3.2, “Creating a frameset in Dreamweaver”, you’ll find it in the Layout panel of the Insert toolbar.
Figure 3.2. Creating a frameset in Dreamweaver.
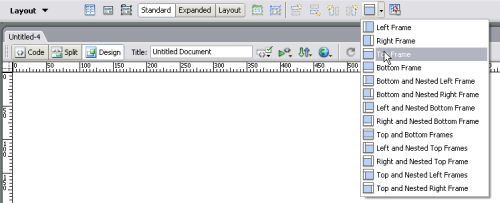
Your existing page will become the bottom frame, while a new top frame is created within a frameset. If you look at the source of the individual frames, they should use an XHTML Transitional DOCTYPE.
<!DOCTYPE html PUBLIC "-//W3C//DTD XHTML 1.0 Transitional//EN"

    "https://www.w3.org/TR/xhtml1/DTD/xhtml1-transitional.dtd">
Now, take a look at the containing frame. This frame should have a XHTML Frameset DOCTYPE, as illustrated in the code below, and in Figure 3.3, “Creating a frameset document in Dreamweaver.”
<!DOCTYPE html PUBLIC "-//W3C//DTD XHTML 1.0 Frameset//EN"

    "https://www.w3.org/TR/xhtml1/DTD/xhtml1-frameset.dtd">
Figure 3.3. Creating a frameset document in Dreamweaver.
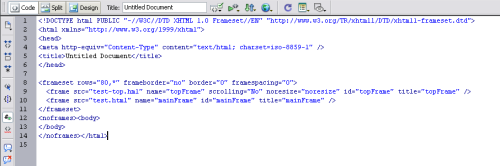
Converting Existing Pages
Once you start working in XHTML, you might like to convert some of your older sites to XHTML. Perhaps you’ll need to convert some content marked up with HTML into XHTML format, in order to integrate it with your site. Dreamweaver has a “Convert to XHTML” capability that can make this process very easy.
To convert a document, first open it in Dreamweaver, then select File > Convert. Finally, select the specification to which you’d like to convert your document. You’ll need to convert framesets and each framed page individually.
Dreamweaver will do its best to apply the rules of XHTML we discussed previously, but there are likely to be some problems if the original markup wasn’t Web standards compliant. You’ll need to step through the document and fix these issues yourself. If this seems like a tedious thing to have to do, remember that avoiding such issues is one of the reasons we’re using Web standards compliant XHTML: we’re very unlikely to have to go through this rigmarole again. You can, of course, have Dreamweaver find these problems using its built-in markup validator.
The Dreamweaver Validator
As we discussed in Chapter 1, What are Web Standards?, the document validation process allows you to confirm that your markup complies with the particular specification you’ve chosen to work to.
Validate your document by selecting File > Check Page > Validate Markup. If the document is constructed using valid XHTML, a message to that effect will display in the Results Panel. If the document is invalid, you’ll see a list of errors and the numbers of the lines on which those errors appear, like the one shown in Figure 3.4, “Displaying errors in the Results Panel after the XHTML document is validated.” These errors are likely to arise from some of the points we discussed above; for example, “Expected end of tag ‘img'” means that an image tag in the document requires a closing /> to make it valid XHTML.
Figure 3.4. Displaying errors in the Results Panel after the XHTML document is validated.
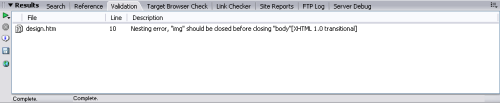
Note: Viewing Line Numbers
When working in Code View, you can turn on line numbering in order to make tracking down any problematic lines of code easier. Line numbering can be turned on and off via the View > Code View Options > Line Numbers menu item. You can also double-click the line in the Results Panel to jump to that line in your document, which will be highlighted.
Semantic Markup
As we’ve already agreed, we’re not concerned simply with writing valid XHTML: we want also to create semantic documents. Semantics is the study of meaning, so a document with semantic markup is a document that contains tags that attempt to convey the meaning of the text. For example, an <h1> tag is used to indicate a top-level heading, while the <ul> and <li> tags are used to mark lists of items in no particular order. If we use semantic markup, the browser can not only read and display (or, in the case of a screen reader, read aloud) the contents of the page, but knows to display or speak the elements in the appropriate format. As we’ve seen, when it comes to writing valid XHTML, Dreamweaver will do most of the hard work for us, but when it comes to creating properly structured documents, we need to take a proactive approach ourselves.
One of the biggest issues I experience when working in a visual environment such as Dreamweaver is that it’s very easy to become engrossed in how things look, and completely forget about the markup that Dreamweaver generates. For example, it’s very easy for me to decide I want to indent some text a few inches from the left-hand side of the screen. The problem is that I can end up with the following markup:
<blockquote>

  <blockquote>

    <blockquote>

      <p>My indented text</p>

    </blockquote>

  </blockquote>

</blockquote>
This obviously isn’t great from a semantic perspective: my indented text is not a quote, and it’s certainly not a quote of a quote of a quote!
Making sure our Website looks great in a Web browser is, of course, very important, but it isn’t the whole story. Some of our users might not be able to see any part of our design because they’re using screen readers or text-only devices. Yet, by taking some care as we create our Web documents, we can give these users an excellent experience without compromising the site’s look and feel for other users.
Note: Removing CSS Style Rendering
Dreamweaver 8 makes it easy to see what your document will look like without styling when you’re working in Design View. The Style Rendering toolbar can be opened by selecting View > Toolbars > Style Rendering. The Toggle Displaying of CSS Styles button switches the CSS in your document on and off, as shown in Figure 3.5, “Toggling CSS style rendering.”
Figure 3.5. Toggling CSS style rendering.
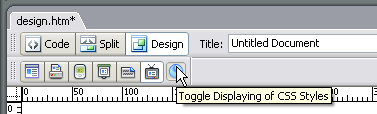
Using Elements Semantically
In this section, we’ll take a look at some of the most common elements in XHTML, and see how to use them in Dreamweaver. This is not an exhaustive list, but aims to provide some examples of the more common mistakes that can be made, particularly when we’re using a tool such as Dreamweaver.
Throughout this chapter, I use the terms “should” and “shouldn’t” in the manner in which they’re used in the W3C specifications, in order to show that these issues affect the Web standards that we’re trying to meet. Each XHTML element should be used in a particular way. Of course, in practice, decisions have to be made as to the types of elements we’ll use and the best way to use them; we’ll be looking closely at these decisions as we build our site. This chapter explains specifically what the standards tell us; using the type of terminology that’s employed by the specifications themselves helps to reinforce the fact that the information provided here isn’t personal opinion – it’s the standard!
Headings
XHTML provides six heading levels. These headings can be thought of as being similar to the headings that might be presented in a book:
<h1>Introduction</h1>

<h1>Starters</h1>

  <h2>Soups</h2>

    <h3>Vegetable Soup</h3>

    <h3>Pea and Ham Soup</h3>

    <h3>Minestrone</h3>

  <h2>Other Starters</h2>

<h1>Mains</h1>

  <h2>Beef</h2>

  <h2>Chicken</h2>

  <h2>Vegetarian</h2>

<h1>Deserts</h1>

  <h2>Cakes</h2>

  <h2>Biscuits</h2>
Using Dreamweaver, we can create a heading by selecting the text we wish to style as a heading, then selecting the desired heading level in the Property Inspector, as shown in Figure 3.6, “Creating a level one heading in Dreamweaver.”
Figure 3.6. Creating a level one heading in Dreamweaver.

We should use a heading style whenever the text in question logically comprises a heading. We shouldn’t use a heading when we simply want large text: use CSS to create that effect.
We should not “fake” headings by styling a paragraph or other element with CSS so that it looks like a heading, but is semantically a paragraph. Pages on which a heading is not distinguished as such can be rendered – or spoken – by the browser in ways that we did not intend, which in turn can cause confusion among users. We’ll discuss this in more detail a little later.
Where possible, we should also avoid using an image at a point at which a heading would logically belong in a document. If we used an image, users with screen readers or other text-only devices would not perceive that heading as intended.
Lists
XHTML places three different types of list at your disposal; lists should be used whenever your content logically comprises a list of items.
The unordered list style usually displays in browsers as a bulleted list; however, you can use CSS to change the bullets’ appearance, or even to change the list to run horizontally across the screen, rather than vertically. You create an unordered list in Dreamweaver using the Property Inspector’s Unordered List icon, shown in Figure 3.7, “Creating an unordered list.”
Figure 3.7. Creating an unordered list.

An unordered list is marked up as follows:
<ul>

  <li>250 grams (9 ounces) Plain Flour</li>

  <li>1 teaspoon Baking Powder</li>

  <li>50 grams (2 ounces) Butter</li>

  <li>1 egg</li>

  <li>Half a Cup of Milk</li>

</ul>
The ordered list format should be used whenever the order of the items in the list is important. You can create an ordered list in Dreamweaver using the Property Inspector’s Ordered List icon, as shown in Figure 3.8, “Creating an ordered list.”
Figure 3.8. Creating an ordered list.

If, after you create an ordered list, you switch into Code View, you’ll see the following markup.
<ol>

  <li>Preheat the oven to 200 degrees Celsius (400 degrees

    Fahrenheit)</li>

  <li>Put the flour, baking powder and sugar in a mixing bowl,

    then rub in the margarine until the mixture resembles

    breadcrumbs.</li>

  <li>Beat the egg and add it, with the milk, to the rest of the

    ingredients. Beat into a dough.</li>

  <li>Turn the dough out onto a floured surface and knead it

    briefly.</li>

  <li>Put into a greased tray and bake for 45 minutes.</li>

</ol>
The <ol> element indicates that this is an ordered list. By default, a browser will display these lists as shown in Figure 3.9, “Displaying an unordered list and an ordered list”, but you can use CSS to change the display of any list.
Figure 3.9. Displaying an unordered list and an ordered list.
Note: Correct Structure for Nested Lists
In both ordered and unordered lists, there is the potential to create nested lists – lists within lists. In such instances, the sublist must be nested inside a list item element of the parent list, as shown in the following example:
<ul>

  <li>List item one</li>

  <li>List item two

    <ul>

      <li>Sub item one</li>

      <li>Sub item two</li>

    </ul>

  </li>

  <li>List item three</li>

</ul>
The last type of list is useful if you have list of terms and definitions to mark up; it’s called a definition list. You can create a definition list in Dreamweaver using the Insert toolbar’s Text panel. To create the list, click the dl button, as shown in Figure 3.10, “Creating a definition list using the Insert toolbar.”
Figure 3.10. Creating a definition list using the Insert toolbar.
![]()
The first item that you type into your definition list will become the first term; hitting Enter will move you forward a line to create the definition for that term. Hitting Enter once more will create the second definition, and so on.
You’ll end up with markup that looks something like this:
<dl>

  <dt>Cardamom</dt>

  <dd>An Indian spice from the ginger family.</dd>

  <dt>Caster Sugar</dt>

  <dd>Super fine sugar.</dd>

</dl>
Figure 3.11. Displaying a definition list.
By default, this markup will display in the browser, and in Dreamweaver, as shown in Figure 3.11, “Displaying a definition list.” Again, you can change this display using CSS.
Creating Paragraphs and Line Breaks
The difference between a line break and a paragraph is a common source of confusion. A tried and true way of discerning the difference involves marking up a couple of verses of lyrics from a favorite song:
<p>

It's time to play the music,<br />

It's time to light the lights,<br />

It's time to meet the Muppets on the Muppet Show tonight!

</p>

<p>

It's time to put on make up,<br />

It's time to dress up right,<br />

It's time to raise the curtain on the Muppet Show tonight!

</p>
The paragraph tags tie the verse together. The line break tags are used to mark the end of each line of the verse.
To create a paragraph in Dreamweaver, hit Enter; to create a <br /> tag, hit Shift-Enter. Whenever you use <br />, consider whether it’s the most appropriate element. Would you perhaps be better to create additional space using CSS, or using a paragraph? Maybe the content should really be marked up as a list, as in the example above.
Make sure you don’t use line breaks within a paragraph to simulate a list! While this markup might display like an ordered list of items in a Web browser, a screen reader would not be able to present the content as intended:
<p>

  1. Preheat the oven to 200 degrees Celsius (400 degrees

  Fahrenheit)<br />

  2. Put the flour, baking powder and sugar in a mixing bowl,

  then rub in the margarine until the mixture resembles

  breadcrumbs.<br />

  3. Beat the egg and add it, with the milk, to the rest of the

  ingredients. Beat into a dough.<br />

  4. Turn the dough out onto a floured surface and knead it

  briefly.<br />

  5. Put into a greased tray and bake for 45 minutes.

</p>
Showing Emphasis
We often show emphasis in printed text by making specific words bold or italic. This approach lets the reader understand the emphasis we’ve placed on particular words: we’re not just making them bold or italic for the sake of it. For example, the first time we’ve used a new or important term in this book, we’ve bolded that term. We use bold formatting to emphasize these new words to the reader: to flag them as words you’ll need to remember.
When we set our preferences back in Chapter 2, Site Planning and Setting up for Development, we set the checkbox “Use <strong> and <em> in place of <b> and <i>” in the preferences dialog. Doing this means that the B (for bold) button in the Property Inspector will insert the strong element, and the I (for italics) button will insert the em element, like so:
<strong>Make sure that you preheat the oven.</strong> Cooking at

the correct temperature is <em>really</em> important.
By default, most Web browsers will display <strong> as bold text and <em> as italicized text. This is why many Web designers incorrectly consider these tags equivalent to <b> and <i>, which are purely presentational and don’t provide much meaning. Like almost all tags, the appearance of <strong> and <em> can be changed using CSS.
Note: What’s the Difference Between <em> and <strong>?
The W3C and most of the HTML documentation describes these elements only as “emphasis” and “strong emphasis,” which isn’t much use. Think of <strong> as a loud, slow voice, and <em> as a raised tone of voice.
Indenting and the blockquote Element
Dreamweaver’s Property Inspector is home to the Text Indent icon shown in Figure 3.12, “Using the Text Indent icon.” The only time you should use this icon is to indent text that’s a quote.
Figure 3.12. Using the Text Indent icon.

This icon inserts a blockquote element, which is why it’s used to mark up quote text. We saw this button’s effects in a previous example. In most browsers, this will indent the text slightly to more clearly differentiate the quote from surrounding text.
If you simply want to create an indentation effect on a section of text, the correct way to do so is to use CSS to create padding to the left and right of the element: don’t use a structural tag such as <blockquote>.
Semantic Markup and Text-Only Devices
In Chapter 1, What are Web Standards?, I marked up a part of this book to demonstrate semantic markup. First, I marked it up in a non-semantic manner, my only concern being how it looked. Then, I took the same document and marked it up semantically so that the content structure made sense without the CSS. To get firsthand experience at how difficult it is to understand a document that’s written in a non-semantic manner, have a look at such a document in a text-only browser. One easily obtainable, text-only browser is Lynx. You can download versions for Mac, Unix/Linux, and Windows at no cost.
Windows Install
To install Lynx on Windows, you need to download a copy of the Lynx installer for Windows. Install Lynx onto your system using the product’s installer, then run it from the Start menu, or from the Lynx icon on the desktop (if you allowed the installer to create one). On launch, a window that looks something like Figure 3.13, “Launching Lynx for Windows” displays.
Figure 3.13. Launching Lynx for Windows.
Mac Install
Figure 3.14. Running Lynx on Mac OS X.
Mac OS X users can also download Lynx: just double-click the downloaded file and follow the instructions. To run Lynx, you may need to open the Terminal application to get access to the command line. Terminal is in the Utilities folder located in your Applications folder. Figure 3.14, “Running Lynx on Mac OS X” shows the browser in action on the Mac platform.
Linux
Most Linux or other UNIX users will probably find that Lynx is already installed on their system. If not, a quick Web search should uncover packages developed for your system.
Using Lynx
Lynx works identically on Windows, Mac, and Linux machines. To use Lynx, you need to learn some simple commands. First of all, to visit a Website, type g.
Lynx will then present a field into which you can type the URL of the site you want to visit, like that shown in Figure 3.15, “Opening a Web page using Lynx.”
Figure 3.15. Opening a Web page using Lynx.

Hit Enter to have Lynx access this URL. If the site you’re trying to visit uses cookies, Lynx will ask if you wish to allow the cookie; type Y for yes, or N for no, A to always accept cookies from the site, or V to never accept cookies from this site. If you press H while in Lynx, the Lynx help system appears. You can navigate this in the same way you’d navigate a Website.
Once you’ve loaded a page in Lynx, you can use the arrow keys to navigate it. The up and down arrow keys will let you jump from link to link, from the left to the right – and from top to bottom – of the page. Hit the right arrow key to follow the link you’re currently on; the left arrow key will take you back to the previous page.
The up and down arrow keys will select any form fields in the page, too. Select a text field by typing into it. Toggle check boxes and radio buttons by hitting Enter when the desired option is selected. To view the options in a drop-down list, select it, hit Enter, then use the up and down arrows to scroll through the listed items. Hit Enter again to use the selected option. Buttons are “clicked” when you hit the Enter key.
You can use Lynx to view local files, which is useful in development. If you’re running a local Web server, such as Apache or IIS, you can point Lynx to internal localhost URLs; however, Lynx will also read an HTML file if you pass it the location, for example, c:webmyfile.html.
Note: Lynx Spacing Snafu
Lynx has trouble with pathnames that contain spaces. Replace any spaces in a file path with %20 to load the file.
If I view my non-semantic document in Lynx, the display for which is shown in Figure 3.16, “Displaying non-semantic markup in Lynx”, I see that every element looks just like a paragraph: it’s readable, but no emphasis is placed on any of the sections, so it’s not obvious that the heading, “What are Web standards?” is in fact a heading. Imagine reading this entire chapter without any structural clues as to which section is which – this is the effect that text browser users have to endure when reading documents that have not been marked up correctly.
Figure 3.16. Displaying non-semantic markup in Lynx.
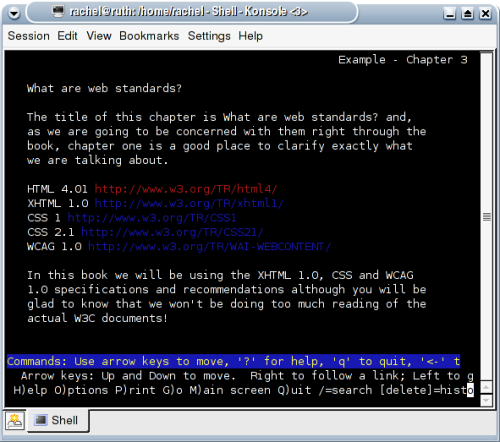
This problem is accentuated for screen reader users. The markup of page headings, lists, and other elements lets the screen reader know to read each section of content in a voice that’s appropriate to those particular elements, just as you would if you were to read a page aloud. You’d normally emphasize a heading, leave appropriate pauses between list items, and so on. A screen reader can do this too, provided it knows what the elements are; the only way it can know is if the page elements have been marked up correctly.
Figure 3.17, “Displaying semantic markup in Lynx.” depicts this same document marked up using a level one heading (<h1>) for the document’s heading, and a list to display the Web links. As you can see, Lynx now understands that the heading is a heading, and deals with it as such; Lynx demonstrates that the list is a list by applying an asterisk to each bullet point.
Figure 3.17. Displaying semantic markup in Lynx.
Note: Lynx Preview
If you don’t have Lynx installed, and you just want a quick preview of a site in a text-only device, use the online Lynx Viewer.
Summary
In this chapter, we discussed XHTML, including what it is, and why we might want to use it. We also explored the basics of working in XHTML using Dreamweaver.
We spent some time discussing semantics, and saw how we could create a document that could be understood by everyone – even those using devices that don’t show the design visually. In the next chapter, we’ll put this theory to practical use as we build a layout for our project Website.
Chapter 4. Constructing the Document
If you’re like most people, you probably design a Website by considering how it should look, then moving graphic elements around – either by hand-coding the HTML and CSS, or using Dreamweaver – until the page “looks” the way you want it to.
In this chapter, we’re going to take a completely different approach to page design. First, we’ll consider how the document should be structured in order to make it valid, accessible, and semantic. Then, in Chapter 6, Constructing the Layout with CSS, we’ll make the document display as we want it to using CSS.
In this chapter, we’ll structure the content of our homepage using XHTML; this will give us a framework for our site.
The New XHTML Document
In this chapter we are going to develop our document using the XHTML Strict DOCTYPE. XHTML Transitional allows you to use deprecated elements and attributes; most of these are presentational in nature. Using XHTML Strict helps us to remember that presentation belongs in CSS, not in the document: it’s a good way to ensure that our site is compliant with Web standards.
There are, however, a few reasons why you might want to use XHTML Transitional:
- The site is going to be maintained by someone who’s using Dreamweaver, but won’t know to remove the presentational attributes inserted by Dreamweaver, which are not valid in XHTML Strict.
- You’re using a Content Management System – or other third-party code – that will validate to the Transitional DOCTYPE, but contains attributes that aren’t permitted in Strict.
- You have a specific need to get the layout working in very old browsers, such as Netscape 4. To do so, you’re going to use certain presentational attributes (such as
border="0"on images), as those browsers provide limited CSS support.
That said, the choice to work to XHTML Strict doesn’t have to be your final decision. If you aim for Strict, then realize that some third-party feature is going to require the Transitional DOCTYPE be used, you can always change the DOCTYPE declaration to suit. Developing to the Strict DOCTYPE wherever possible will ensure that you remember to keep presentation in the CSS, where it belongs!
Create a new XHTML document in Dreamweaver by selecting File > New…. In the New Document dialog, select Basic Page and HTML, then choose XHTML 1.0 Strict from the Document Type drop-down, as shown in Figure 4.1, “Creating a new XHTML page in Dreamweaver.” Click Create to create the new XHTML page, and then save this page to the Code Spark site, as homepage-layout.html.
This should give you a blank page in Design View. If you switch into Code View using the buttons above the document window, you’ll see your basic XHTML document, as illustrated in Figure 4.2, “Viewing the code of our basic XHTML document.”
This page will become our homepage document. But for now, we’re going to concentrate on creating a semantic and standards compliant document that will form a sound basis for the design and structure of the site.
Figure 4.1. Creating a new XHTML page in Dreamweaver.
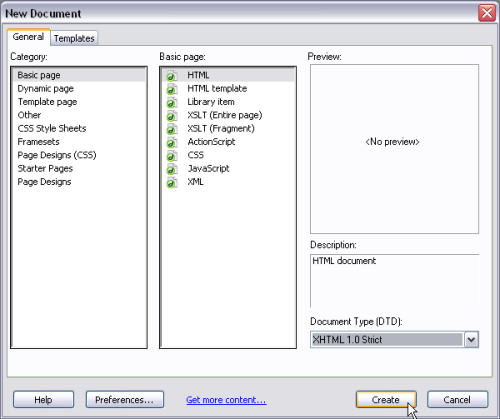
Figure 4.2. Viewing the code of our basic XHTML document.

The Main Content Area
Let’s start by working on the main part of this document: the page content. On the homepage, the content includes the featured tutorial abstracts, recent tutorials, browser statistics, and other content shown in Figure 4.3, “Concentrating on the homepage main content area.” We’ll focus our attention on the area that has not been grayed out in this image.
Figure 4.3. Concentrating on the homepage main content area.
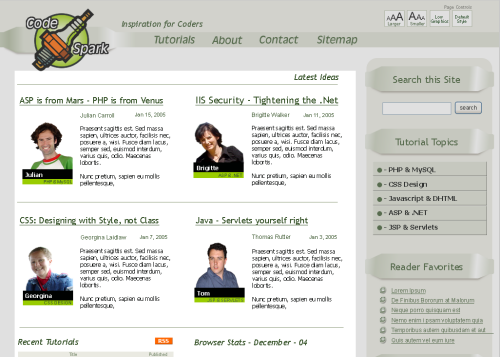
Using Design View in Dreamweaver, type Latest ideas into homepage-layout.html. This will be the main heading on the homepage itself, so it should be marked up as a level one heading. We can do this in Dreamweaver by selecting the heading text, then choosing Heading 1 from the Property Inspector, as illustrated in Figure 4.4, “Creating a level one heading using the Property Inspector.&qvuot;
Figure 4.4. Creating a level one heading using the Property Inspector.
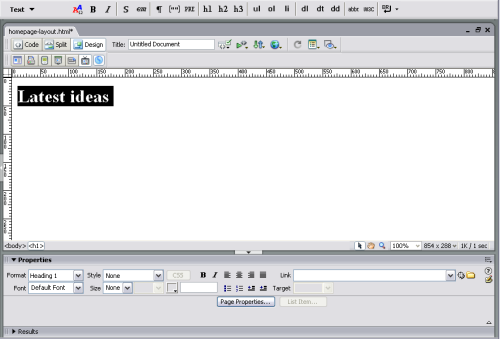
We have six blocks of content on the homepage. The top four contain details of the latest tutorials on the site, and all have the same structure: a heading (which is linked to the tutorial), the author’s name and the tutorial’s date of publication, a picture of the author, and some text about the tutorial itself. We can create these elements now.
In Design View, hit Enter and add the following text:
ASP is from Mars – PHP is from VenusSelect this text, and make it a level two heading by selecting Heading 2 in the Property Inspector. While the text is still selected, type # into the Property Inspector’s Link field. This will turn the text into a link, which you can amend to point to the actual tutorial later. Hit Enter to create a new paragraph and type: Julian Carroll Jan 15, 2005.
The image of the author can now be added. To insert an image using Dreamweaver, click the Images button from the toolbar, as shown in Figure 4.5, “Selecting the Images button on the Common panel of the Insert toolbar.”
Figure 4.5. Selecting the Images button on the Common panel of the Insert toolbar.

When you click the Images button, a dialog will open to allow you to browse your computer for the author image. Once you’ve found it, click OK.
Note: All Images are Provided!
All the images we used to build this site are available as part of this book’s code archive. If you haven’t done so already, go and grab it from sitepoint.com.
At this point, the Accessibility Attributes dialog, shown in Figure 4.6, “Adding the image tag’s accessibility attributes” should open. This dialog appears if you told Dreamweaver to display accessibility attributes for images within your Preferences. We did this when we set up Dreamweaver in Chapter 2, Site Planning and Setting up for Development.
Type some alternate text into the box provided by the Accessibility Attributes dialog. This text should clearly describe the image for users who are browsing the site with images turned off, or with a device that cannot display images. As our image includes some text (“Julian – PHP & MySQL”) we should to add this information to the alternate text attribute, as you can see in Figure 4.6, “Adding the image tag’s accessibility attributes.” I’ve added the following text: Photo of Julian – PHP and MySQL
Figure 4.6. Adding the image tag’s accessibility attributes.
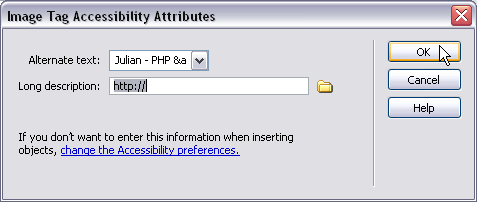
Finally, let’s add a couple of short paragraphs of text to explain the tutorial. At this point, I’ve added some dummy placeholder text to fill the space. Our page now displays in Dreamweaver as shown in Figure 4.7, “Displaying the document in Dreamweaver.”
Figure 4.7. Displaying the document in Dreamweaver.
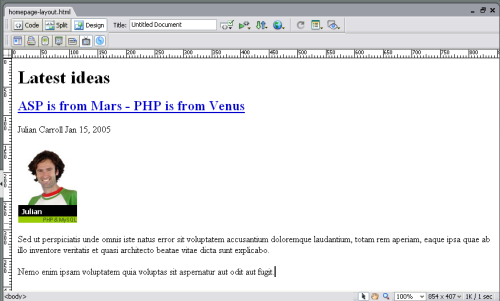
Note: Download Mock Latin Now!
The dummy text we are using is the standard ‘mock Latin’ used by designers to fill out mockups. You can download some mock Latin of your very own.
Switch into Code View to see how our XHTML is shaping up. At this point, the document should contain the following markup and content:
Example 4.1. homepage-layout.html
<!DOCTYPE html PUBLIC "-//W3C//DTD XHTML 1.0 Transitional//EN"

    "https://www.w3.org/TR/xhtml1/DTD/xhtml1-transitional.dtd">

<html xmlns="https://www.w3.org/1999/xhtml">

<head>

<title>Code Spark layout</title>

<meta http-equiv="Content-Type" content="text/html;

    charset=iso-8859-1" />

</head>


<body>

<h1>Latest ideas </h1>

<h2><a href="#">ASP is from Mars - PHP is from Venus</a></h2>

<p>Julian Carroll Jan 15, 2005</p>

<p><img src="img/julian.jpg" alt="Photo of Julian - PHP and MySQL"

      width="104" height="135" /> </p>

<p>Sed ut perspiciatis unde omnis iste natus error sit voluptatem

  accusantium doloremque laudantium, totam rem aperiam, eaque

  ipsa quae ab illo inventore veritatis et quasi architecto beatae

  vitae dicta sunt explicabo.</p>

<p>Nemo enim ipsam voluptatem quia voluptas sit aspernatur aut

  odit aut fugit.</p>

</body>

</html>
Note: Split that Screen!
If you have enough screen real estate, it can be helpful to work in Dreamweaver’s Split Screen View as you create the XHTML document. The Split Screen feature allows you to see the Design and Code Views simultaneously. To switch into Split Screen View, click the Split button above the document window. As shown in Figure 4.8, “Working in Split Screen View”, you’ll be able to watch the creation of your markup in Code View as you add elements to the page in Design View.
Figure 4.8. Working in Split Screen View.

We need to add three sections just like this one for the other featured tutorials. Follow the steps above to add these sections, working from left to right, and top to bottom. Once you’ve done so, your document should contain the following markup:
Example 4.2. homepage-layout.html (excerpt)
<!DOCTYPE html PUBLIC "-//W3C//DTD XHTML 1.0 Transitional//EN"

    "https://www.w3.org/TR/xhtml1/DTD/xhtml1-transitional.dtd">

<html xmlns="https://www.w3.org/1999/xhtml">

<head>

<title>Code Spark layout</title>

<meta http-equiv="Content-Type" content="text/html;

    charset=iso-8859-1" />

</head>


<body>

<h1>Latest ideas </h1>

<h2><a href="#">ASP is from Mars - PHP is from Venus</a></h2>

<p>Julian Carroll Jan 15, 2005</p>

<p><img src="img/julian.jpg" alt="Photo of Julian - PHP and MySQL"

    width="104" height="135" /> </p>

<p>Sed ut perspiciatis unde omnis iste natus error sit voluptatem

  accusantium doloremque laudantium, totam rem aperiam, eaque

  ipsa quae ab illo inventore veritatis et quasi architecto beatae

  vitae dicta sunt explicabo.</p>

<p>Nemo enim ipsam voluptatem quia voluptas sit aspernatur aut

  odit aut fugit.</p>

<h2><a href="#">IIS Security - Tightening the .NET</a></h2>

<p>Brigitte Walker Jan 11,2005</p>

<p><img src="img/brigitte.jpg" alt="Photo of Brigitte - ASP and

    .NET" width="104" height="135" />  </p>

<p>Sed ut perspiciatis unde omnis iste natus error sit voluptatem

  accusantium doloremque laudantium, totam rem aperiam, eaque ipsa

  quae ab illo inventore veritatis et quasi architecto beatae

  vitae dicta sunt explicabo.</p>

<p>Nemo enim ipsam voluptatem quia voluptas sit aspernatur aut

  odit aut fugit.</p>

<h2><a href="#">CSS: Designing with Style, not class</a></h2>

<p>Georgina Laidlaw Jan 7, 2005</p>

<p><img src="img/georgina.jpg" alt="Photo of Georgina -

    CSS Design" width="104" height="135" /> </p>

<p>Sed ut perspiciatis unde omnis iste natus error sit voluptatem

  accusantium doloremque laudantium, totam rem aperiam, eaque ipsa

  quae ab illo inventore veritatis et quasi architecto beatae

  vitae dicta sunt explicabo.</p>

<p>Nemo enim ipsam voluptatem quia voluptas sit aspernatur aut

  odit aut fugit.</p>

<h2><a href="#">Java - Servlets yourself right</a></h2>

<p>Thomas Rutter Jan 3, 2005</p>

<p><img src="img/tom.jpg" alt="Photo of Tom - JSP and Servlets"

    width="104" height="135" /> </p>

<p>Sed ut perspiciatis unde omnis iste natus error sit voluptatem

  accusantium doloremque laudantium, totam rem aperiam, eaque ipsa

  quae ab illo inventore veritatis et quasi architecto beatae

  vitae dicta sunt explicabo.</p>

<p>Nemo enim ipsam voluptatem quia voluptas sit aspernatur aut

  odit aut fugit.</p>

</body>

</html>
Linking to Other Tutorials
The bottom two sections of the homepage contain slightly different content. They too have headings, but one contains links to other tutorials on the site, while the other displays the latest information about the Web browsers that visitors are using to view the site. First, let’s consider the section that contains links to tutorials. The layout for this section is shown in Figure 4.9, “Viewing the layout for the links section.”
Figure 4.9. Viewing the layout for the links section.
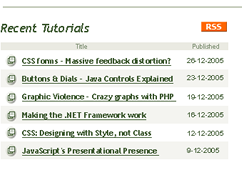
The “Recent Tutorials” section is laid out in a tabular format, with headings at the top of each column, and the data arranged in the cells that follow. As this is tabular data, it’s appropriate to use a table to structure this information in a semantic manner.
First, in Design View, add the RSS button image with the alternative text, RSS. Hit Enter, and type Recent Tutorials; make this into a level two heading using the Property Inspector, and hit Enter once again.
Now, let’s insert a table. To do this in Dreamweaver, open the Layout Panel of the Insert toolbar, and click the Table button, as shown in Figure 4.10, “Clicking the Table button on the Insert toolbar.”
Figure 4.10. Clicking the Table button on the Insert toolbar.
![]()
Note: Dreamweaver’s Insert Toolbar
You probably already noticed the drop-down list on the Insert toolbar: this lets you switch between different sets of tools. Dreamweaver calls these sets of tools “panels.” You can instead display the different panels as tabs by selecting Show as tabs from this drop-down list.
The Table dialog, shown in Figure 4.11, “The Table dialog”, will open. This enables you to set the features of the table that you are about to insert. Give your table seven rows and two columns. Under the Header section, select Top to convert the cells in the top row of the table into th elements: table headings.
Figure 4.11. The Table dialog.
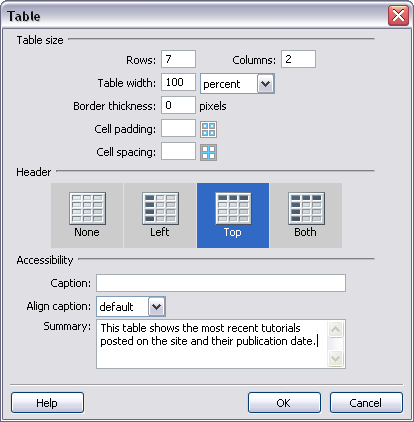
We can also add a summary here. The summary will not display on-screen in a regular graphical browser, but provides screen reader users with additional information about the table, to help them put it into context. This and the caption fields are particularly important if the context of the table is vague because of the way the page has been laid out. In our document, however, it should be easy to understand the content of the table.
Click the OK button in this dialog to insert a table into your document. Now, enter the tabular data into the cells: start with the headings “Title” and “Published” in the top row, then fill in the rest of the tutorials and their publication dates, as shown in Figure 4.12, “Viewing the table in Design View.”
Figure 4.12. Viewing the table in Design View.
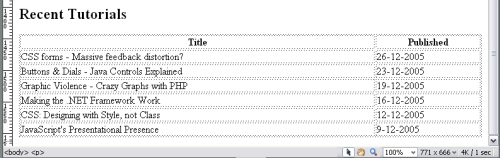
Make each of the tutorial titles into a link by selecting the title and entering a # into the Link field of the Property Inspector, just as you did for the tutorial headings. Once you’ve done this, switch into Code View to review the markup for this section. It should look like this:
<h2>Recent Tutorials</h2>
<table width="100%" border="0" summary="This table shows the most
recent tutorials posted on the site and their publication
date.">
<tr>
<th scope="col">Title</th>
<th scope="col">Published</th>
</tr>
<tr>
<td><a href="#">CSS forms - Massive feedback distortion?
</a></td>
<td>26-12-2005</td>
</tr>
<tr>
<td><a href="#">Buttons & Dials - Java Controls Explained
</a></td>
<td>23-12-2005</td>
</tr>
<tr>
<td><a href="#">Graphic Violence - Crazy Graphs with PHP
</a></td>
<td>19-12-2005</td>
</tr>
<tr>
<td><a href="#">Making the .NET Framework Work</a></td>
<td>16-12-2005</td>
</tr>
<tr>
<td><a href="#">CSS: Designing with Style, not Class
</a></td>
<td>12-12-2005</td>
</tr>
<tr>
<td><a href="#">JavaScript's Presentational Presence</a></td>
<td>9-12-2005</td>
</tr>
</table>Displaying Browser Statistics
The final section of this main content area displays browser statistics. This content is shown in the Fireworks design in Figure 4.13, “Designing the browser statistics display for the homepage.”
Figure 4.13, “Designing the browser statistics display for the homepage” comprises a heading and a pie chart, and illustrates market share for different types of browsers. A text description is provided, along with a legend for the diagram.
To start, add the heading. Then, insert the image; don’t forget to add an alt attribute that clearly explains what the image is. There’s no need to describe the data in the chart: the text below the chart helps with that.
Note: Making Table Data Accessible
A chart is a great way to display a lot of data succinctly, but it isn’t very accessible. To rectify this, you can present the chart’s data on a separate page, and use the img element’s longdesc attribute to link to it. We’ll take a look at longdesc in more detail in Chapter 7, Accessibility.
Figure 4.13. Designing the browser statistics display for the homepage.
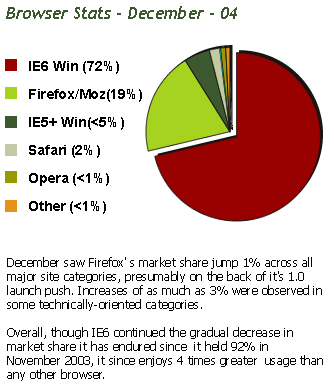
We can now add the list. We create lists using the Unordered List button in Dreamweaver’s Property Inspector, shown in Figure 4.14, “Creating an unordered list.” Type the first list item into the document as if you were entering a new paragraph, then click the Unordered List button on the Property Inspector. When you hit Enter, a new list item will be created.
Figure 4.14. Creating an unordered list.

Once you’ve created all the items in the list, hit Enter twice to close the list and create a new paragraph. Now, enter the two paragraphs of text that accompany this section. That’s it! The code for this final section of the homepage’s content area is now complete:
<h2>Browser Stats - December - 04</h2>
<p><img src="img/browser_chart.gif" alt="Pie chart showing
browser statistics for Dec 2004" width="180" height="180" />
</p>
<ul>
<li>IE6 Win (72%)</li>
<li>Firefox/Moz (19%)</li>
<li>IE5+ Win (<5%)</li>
<li>Safari (2%)</li>
<li>Opera (<1%)</li>
<li>Other (<1%)</li>
</ul>
<p>December saw Firefox's market share jump 1% across all major
site categories presumably on the back of it's 1.0 launch push.
Increases of as much as 3% were observed in some
technically-oriented categories.</p>
<p>Overall, though IE6 continued the gradual decrease in market
share it has endured since it held 92% in November 2003, it
still enjoys 4 times greater usage than any other browser.</p>If you view the page in a browser, you’ll see all of the content displayed as in Figure 4.15, “Displaying the document in Firefox 1.0” below: our logical headings, paragraphs, tables, and lists are presented in the browser’s default display style.
Figure 4.15. Displaying the document in Firefox 1.0.
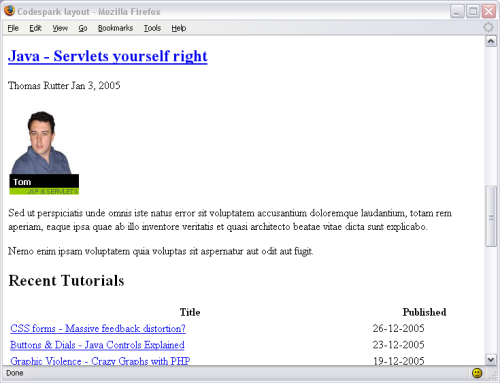
Other Page Elements
Now that we’ve completed the structure of the main content area of the homepage, it’s time to move on to consider the rest of the page. We have the heading area, which contains the logo and tagline, site controls that help users to change the text size, and the main navigation. We must also consider the content that displays in our layout’s sidebar: a search form, as well as quick links to the various topics and other items of interest on the site.
Before we decide where to place these elements within our document, let’s take a moment to think about how site visitors are going to use these pages. Users who have a regular Web browser will see the full layout and, using CSS, we will be able to position all the page elements to make the site as usable as possible. It doesn’t really matter to these users just where in the document the page elements are located, as they will see the full page design. However, for users of text-only devices, the locations of the various content elements within the actual XHTML document is very important.
Our homepage will be displayed or read aloud by a text-only browser or screen reader in the order in which the content appears in the actual XHTML document, starting with the title. Currently, our document contains only the page content, so, after the title, a screen reader would start to read the first element on the page: our “Latest ideas” heading, as depicted in Figure 4.16, “Displaying the document in the text-only Lynx browser.”
Figure 4.16. Displaying the document in the text-only Lynx browser.
The page’s heading section helps orient users by providing information about the site itself – the logo and tagline – as well as quick access to the site’s main navigation, including the sitemap, as shown in Figure 4.17, “The heading area, including main navigation.”
Figure 4.17. The heading area, including main navigation.

Note: Easing Text-only Navigation
A sitemap is very useful to visitors who use text-only browsers: it gives them a quick way to jump from page to page without having to follow the complicated navigational structures that, while easy to use in a graphical browser, can be much slower to use via other methods. Remember: to users of screen readers, or those who must tab through Web documents using their keyboard, Web pages are linear documents. A visitor using a screen reader, for example, has to wait for the Web page to be read aloud in order to get to the link they want. A sitemap can save time and frustration for these visitors – as well as those using regular browsers.
As the heading area contains information that will help users to understand the site – and to get around it – it seems logical that we should place this element at the top of the document, before the homepage’s main content.
The information that appears in the sidebar, depicted in Figure 4.18, “The sidebar”, is less important in terms of its ability to help users immediately understand and access the site. As a list of tutorials and information, it could also become quite lengthy.
If we placed this element before the homepage’s main content, users of screen readers would need to listen to all this information before they reached the main content; this would start to get rather dull after the first page! For this reason, let’s add this section after the page’s main content, at the bottom of the current document. We can then position it alongside our main content using CSS.
Figure 4.18. The sidebar.

The Heading and Main Navigation
Now that we’ve decided where in the document we’re going to place the rest of the page elements, we can start to add our heading area.
Return to your document and, in Dreamweaver’s Design View, place your cursor just before the “Latest ideas” heading. Switch to Code View to make sure the cursor is outside the h1 element. Switch back to Design View and insert the Code Spark logo (logo.gif), remembering to add appropriate alternate text. Beside the image, type the tagline Inspiration for Coders; this should sit beside the bottom of the Code Spark logo.
Next, we’ll add our accessibility controls. Hit Enter and type Page Controls. Our page controls are no more than a list of links, so we’ll add them to the page as an unordered list. Click the Unordered list button to insert the first list item, then insert the first accessibility control image, control_larger.gif. Next, make the image into a link: select the image and type # into the Link field in the Property Inspector. Hit Enter to insert the next item, and repeat the process for the other controls (control_smaller.gif, control_low_graphics.gif and control_default_style.gif).
Figure 4.19. Creating the heading area of the page.
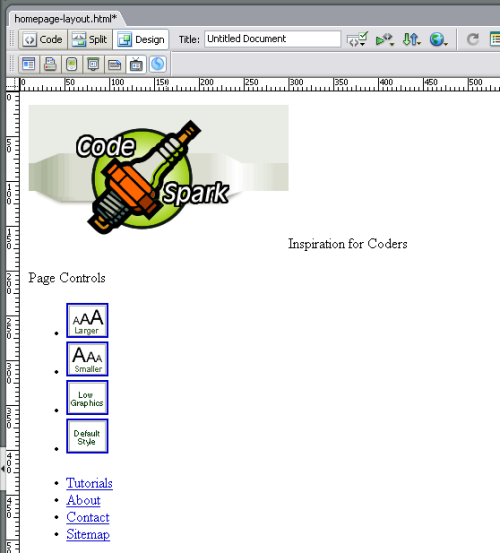
When you peruse your document in Design View, it should look like the display shown in Figure 4.19, “Creating the heading area of the page.” Don’t worry that it looks a bit untidy right now; we’ll use CSS to transform this content later on.
Our final task is to add to this heading area the main navigation, which will link to the Tutorials, About, Contact and Sitemap pages. Once again, the navigation comprises an unordered list of links, so go ahead and add them to the document. Switching into Code View, we can see the markup that constitutes the heading section:
Example 4.3. homepage-layout.html (excerpt)
<p><img src="img/logo.gif" alt="Code Spark" width="290"

    height="160" />Inspiration for Coders </p>

<p>Page Controls</p>

<ul>

  <li> <a href="#"><img src="img/control_larger.gif"

      alt="Increase Text Size" width="43" height="35"

      border="0" /></a></li>

  <li><a href="#"><img src="img/control_smaller.gif"

      alt="Decrease Text Size" width="43" height="35"

      border="0" /></a></li>

  <li><a href="#"><img src="img/control_low_graphics.gif"

      alt="Low Graphics" width="43" height="35"

      border="0" /></a></li>

  <li><a href="#"><img src="img/control_default_style.gif"

      alt="Default Style" width="43" height="35"

      border="0" /></a></li>

</ul>

<ul>

  <li><a href="">Tutorials</a></li>

  <li><a href="">About</a></li>

  <li><a href="">Contact</a></li>

  <li><a href="">Sitemap</a></li>

</ul>
The Sidebar
The final section that we’ll add to the document is the sidebar, which, as we’ve already decided, will be placed beneath the main content in the structure of our document.
In Design View, place your cursor at the bottom of your main content text, beneath the section about browser statistics. The first part of the sidebar is a search box, so add a level three heading that reads “Search this Site.”
To create the search box, add a form element using the Forms Panel of the Insert toolbar, as shown in Figure 4.20, “Adding a form.” The form will appear as a dotted red outline.
Figure 4.20. Adding a form.

Insert a text field into your form. When you do so, the Input Tag Accessibility Attributes dialog shown in Figure 4.21, “The Input Tag Accessibility Attributes dialog” will open, to help you add the correct attributes to the element.
Figure 4.21. The Input Tag Accessibility Attributes dialog.
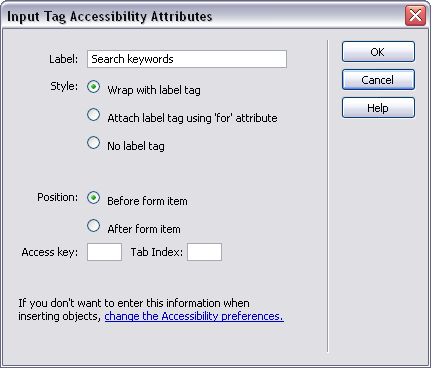
Our original design didn’t include a label for the search field, but I’m going to throw one in: it’ll help when we come to validate our site for accessibility purposes. In Figure 4.21, “The Input Tag Accessibility Attributes dialog” above, I added the label Search keywords and selected the “Wrap with label tag” option.
Click OK to insert your text input and label. In the Property Inspector, change the name of the input field to keywords. I also added a <br /> after the label Search Keywords, and before the search box. Shift-Enter creates a <br /> in Dreamweaver.
Now, insert a button using the Insert toolbar. This button doesn’t need a label, so select the No label tag option before you click OK. Select the button, then use the Property Inspector to change the value to Search, as shown in Figure 4.22, “Changing the value of the button to “Search.””
Figure 4.22. Changing the value of the button to “Search.”
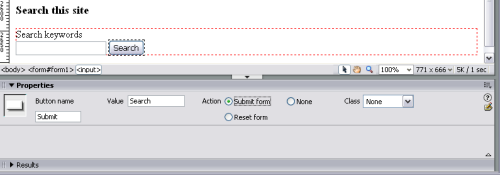
If you check Code View, the markup for the form we just added should look something like this:
Example 4.4. homepage-layout.html (excerpt)
<h3>Search this Site</h3>

<form name="form1" id="form1" method="post" action="">

  <label>Search keywords<br />

  <input name="keywords" type="text" id="keywords" />

  </label>

  <input type="submit" name="Submit" value="Search" />

</form>
Add another heading – “Tutorial Topics” – as a level three heading, and mark up the main sections of the site using an unordered list. Make the text in the list items into dummy links, as these will eventually link to the actual sections of the site:
- PHP & MySQL
- CSS Design
- JavaScript & DHTML
- ASP & .NET
- JSP & Servlets
Figure 4.23. Viewing the sidebar section after the search feature and three lists are added.
We can now add another heading. Insert “Reader Favorites” as a level three heading and, again, use a list with dummy links to mark up the favorite tutorials presented on the site. Figure 4.23, “Viewing the sidebar section after the search feature and three lists are added.” shows this section in Design View after the three lists are added.
Validating your XHTML
We’ve completed our basic XHTML document. Later, we’ll need to add to this document some grouping elements that will enable us to style the document. However, by first considering how the content should be structured, we’ve done a lot to ensure that our document is semantically structured, and accessible at its most basic level. The final task we should undertake is to validate our document to ensure that it constitutes correct XHTML.
Validation in Dreamweaver
To validate your document, click the Validate markup button at the top of the document window, and select Validate Current Document, as shown in Figure 4.24, “Validating the current document.”
Figure 4.24. Validating the current document.

If you’re lucky, the message “No Errors or Warnings Found” will display in the panel. However, while Dreamweaver will let you create a document with an XHTML Strict DOCTYPE, it sometimes misses required elements, or adds attributes that are not allowed by this DOCTYPE. Luckily, these are pretty easy to find and remove: any problems are listed in the Results Panel after Dreamweaver’s validator is run, as shown in Figure 4.25, “Reviewing errors presented in the Results panel.”
Figure 4.25. Reviewing errors presented in the Results panel.
One of the errors you’re likely to see reads as follows:
The tag:”label” is not allowed within: “form” It is only allowed within: a, abbr, acronym, address, b, …
This error indicates that the label element needs to be contained within some other element (not just form). XHTML Strict – as the name implies – is very strict about which elements can be contained within which other elements. We can address this issue by wrapping the whole section in <p> and </p> tags, like so:
Example 4.5. homepage-layout-strict.html (excerpt)
<p><label>Search keywords<br />

  <input name="keywords" type="text" id="keywords" />

  <input type="submit" name="Submit" value="Search" />

  </label></p>
Now, revalidate your document to see if it’s error-free. If not, step through the list of errors, and fix them one by one. Pretty soon, your work should be free of errors, and ready to roll! Save the file as homepage-layout-strict.html.
The more you work with Dreamweaver, the more you’ll start to understand its eccentricities, and the better you’ll become at correcting its markup. XHTML can become quite complex at times, and Dreamweaver 8 does a fairly good job of getting the markup right most of the time, so do try and cut it some slack.
Summary
In this chapter, we’ve taken what might be seen as a slightly unconventional way of beginning our page layout. We concentrated almost solely on the structure of the document, and how the actual content is to be marked up, bearing in mind our goal of standards compliance.
In the next two chapters, we’ll move on to look at CSS. We’ll see how we can take this structured, valid document and use CSS to create a visually attractive layout without compromising its accessibility or semantic structure.
That’s it for this excerpt of Build Your Own Standards Compliant Website Using Dreamweaver 8. What’s next?
Download these chapters in PDF format, and you’ll have a copy you can refer to at any time.
Review the book’s table of contents to find out exactly what’s included.
Buy your own copy of the book now, right here at SitePoint.com.
We hope you enjoy Build Your Own Database Driven Website Using Dreamweaver 8.
Frequently Asked Questions about Dreamweaver 8 Standards
How can I make my Dreamweaver site more search engine friendly?
To make your Dreamweaver site more search engine friendly, you need to focus on SEO (Search Engine Optimization). This involves using relevant keywords in your content, meta tags, and alt tags. Also, ensure your website has a clear, logical structure with easy navigation. Use header tags (H1, H2, H3) to structure your content and make it easier for search engines to understand. Lastly, make sure your website loads quickly, as this is a factor that search engines consider when ranking websites.
How can I build search results pages in Dreamweaver?
Building search results pages in Dreamweaver involves creating a search form and a results page. The search form is where users input their search query, and the results page displays the results of the search. You can use Dreamweaver’s built-in server behaviors to create these pages. The server behaviors panel allows you to add functionality to your pages without having to write any code.
How can I add search engine keywords to my Dreamweaver site?
To add search engine keywords to your Dreamweaver site, you can use the ‘Keywords’ meta tag. This tag should be placed in the head section of your HTML document. The content attribute of the meta tag should contain a comma-separated list of your keywords. However, keep in mind that modern search engines place less emphasis on meta keywords and more on the actual content of your site.
How can I make my Dreamweaver site more accessible?
Making your Dreamweaver site more accessible involves ensuring that it can be used by as many people as possible, including those with disabilities. This can be achieved by using clear, simple language, providing alternative text for images, and ensuring your site can be navigated using only a keyboard. Dreamweaver has built-in tools to help you check and improve the accessibility of your site.
How can I use Dreamweaver to create a website?
Dreamweaver is a powerful tool for creating websites. You can start by creating a new HTML document and then adding elements such as text, images, and links using the Insert panel. You can also use Dreamweaver’s CSS Designer to create and manage your CSS styles. Once your site is complete, you can use Dreamweaver’s built-in FTP client to upload your site to a web server.
How can I optimize images for my Dreamweaver site?
Optimizing images for your Dreamweaver site involves reducing their file size without significantly reducing their quality. This can be done using image editing software such as Photoshop. Once your images are optimized, you can add them to your site using the Insert Image dialog box in Dreamweaver.
How can I add a navigation menu to my Dreamweaver site?
Adding a navigation menu to your Dreamweaver site can be done using the Insert Navbar dialog box. This allows you to create a basic navigation menu with links to your other pages. You can customize the appearance of your menu using CSS.
How can I add a contact form to my Dreamweaver site?
Adding a contact form to your Dreamweaver site involves creating a new HTML document and adding form elements such as text fields, checkboxes, and submit buttons. You can then use Dreamweaver’s server behaviors to process the form data.
How can I add a slideshow to my Dreamweaver site?
Adding a slideshow to your Dreamweaver site can be done using the Insert Slideshow dialog box. This allows you to create a slideshow of images with optional captions and navigation buttons. You can customize the appearance of your slideshow using CSS.
How can I add a blog to my Dreamweaver site?
Adding a blog to your Dreamweaver site involves creating a new HTML document for each blog post. You can then add text, images, and links to your post using the Insert panel. To display your posts in chronological order, you can use Dreamweaver’s server behaviors to retrieve the posts from your database.
Rachel Andrew is a front and back-end web developer, author and speaker. Her books include the recent Get Ready for CSS Grid Layout and she is a regular contributor to a number of publications both on and offline. Rachel is co-founder of the CMS Perch, a Google Developer Expert and an Invited Expert to the CSS Working Group. She writes about business and technology on her own site at rachelandrew.co.uk.