Ruby? Rails? Ajax? Is this cluster of confusing buzzwords swarming around your head like a mob of angry bees? Then fear not, gentle padawan — Jedi help is at hand! For I, too, was just like you once: confused, jumping at shadows, sinking into the depths of yet another custom Python web framework while softly weeping behind a stack of dog-eared PHP books. But not anymore. Today I build my applications in Ruby on Rails.
Key Takeaways
- Ruby on Rails combines the Ruby programming language with the Rails web framework to create a powerful tool for building web applications.
- Ruby is an object-oriented scripting language, where everything is treated as an object, simplifying code structure and making programming more intuitive.
- Rails, a full-stack framework, facilitates web application development by following the Model-View-Controller (MVC) pattern, streamlining the creation of database-backed applications.
- Rails originated from the Basecamp application developed by 37 Signals, demonstrating its practical application in real-world projects.
- The installation of Ruby and Rails can be adjusted for different operating systems, with specific tools recommended for Windows (Instant Rails) and OS X (Locomotive).
- Rails enables rapid development and testing of web applications through features like scaffolding, which automatically generates the basic CRUD (Create, Read, Update, Delete) interfaces for database interaction.
Rubbing the Rails
So what exactly is this Ruby on Rails thing? We’re talking He-man and Battle Cat … well, almost. Ruby on Rails combines two separate elements — Ruby, the object-oriented scripting language, and Rails, the popular web framework built on top of Ruby — to form a powerful new whole.
Ruby?
Ruby is an interpreted scripting language, just like Python and PHP. The code you write, break and swear over is converted into machine code as it’s processed. Invented in Japan (hai!), the object-oriented language has become increasingly popular for building web-based applications and useful script utilities.
OOP is a Good Thing (TM) when it’s done right, and Ruby nails it. This language is about as object-oriented as it gets: in Ruby, everything is an object.
Here’s a little sample Ruby code to whet your appetite:
class MyClass


  def initialize

    @message = "My name is I.P. Freelyn"

  end


  def be_witty

    print @message

  end


end


my_joke = MyClass.new

my_joke.be_witty
As you can see, Ruby terminates code with a line break instead of a semicolon. Like seriously dude, colons are soooooo 90’s! The above snippet introduces a whole bag of Ruby syntax: we’re creating a new class (MyClass) and defining two methods, initialize, which is called automatically upon object creation, and be_witty, which prints (to standard output) the value of @message — a classic of childhood prank calls.
Variables in Ruby can take different prefixes depending on where you want to use them:
@@variableis a class variable, available across every instance of that particular class@variableis an instance variable, available only to one particular instance of the classvariableis a local variable, available only to the context in which it’s created and used
To use our class, we must first instantiate it. We do this with the MyClass.new statement. Thus, my_joke is now an instance of MyClass, and we can use our freshly hatched object to call any of the methods we’ve stuck inside our oh-so-funny class.
Can you guess what happens next? Hilarity ensues, of course! Attractive members of the opposite sex shower us with praise!
From this simple overview, we’ve grown together and learnt that:
- A class in Ruby is defined by the
classkeyword, with a CamelCase’d name - Methods begin with
defand are completed by anendkeyword - Classes are also completed using an
endkeyword - Method names, by convention (though it’s one that’s not enforced), have words separated by underscores
- An instance of a class is created with the
[class name].newmethod - The author needs to grow up
Rails?
So where does Rails fit into the picture, and why should you give a darn?
You should give a darn because, without Rails, Ruby is nothing! What was He-man without Battle cat? What’s an engine without wheels? If Ruby is the engine, Rails is the body and the wheels — a souped-up web framework nestled lovingly around a fuel-injected gem of a core. You don’t need me to tell you that a good web framework can make all the difference between shipping 1.0 of your Web 2.0 app, and shipping a steaming pile of hot vapourware. In fact, Rails itself springs from the former: a nice little application called Basecamp, by 37 Signals.
Okay, now you know where it hailed from, but what does it actually do? The official Rails description reads:
Rails is a full-stack framework for developing database-backed web applications according to the Model-View-Control pattern, From the Ajax in the view, to the request and response in the controller, to the domain model wrapping the database, Rails gives you a pure-Ruby development environment. To go live, all you need to add is a database and a web server.
“Wait a minute,” I hear you cry. “Model-View-Controller? Domain model? My rash is getting worse! HELP!”. Calm down. Take a few deep breaths and down another swig of that ÃœberJolt, because we’re going to get through this together. We’re a team.
Model-View-Controller (or MVC) is a neat, tried-and-tested design approach. A Model represents one particular object (say, a Picture, a Person, a Folder, or Claudia Schiffer), a View is some sort of output from a given Model, and a Controller ties the previous two together by acting as a mediator.
In Rails, a Model and a Controller are Ruby classes, and Views are usually XHTML files. Rails runs through a dispatcher via your web server. Controllers take requested URLs (say, /list/1) and turn them into method calls: Controller.list(1).
As for that mention of a “domain model wrapping the database”, this involves neither .com or Marshall Mathers (at the time of writing, anyhow). Rails has magical database object modeling powers that link tables to models, and allow you to manipulate table contents without needing to write a lick of SQL.
Installation
Let’s go ahead and get this beast installed.
A number of installation options are available for both Ruby and Rails on various platforms. Windows users would do well to check out Instant Rails.
For OS X, I’d recommend Locomotive. As for you hardcore *nix and BSD users, I’m sure you’re savvy enough with RPMs and ports to get yourself up and running.
If you’ve decided on Instant Rails, or you’re installing things manually, you’ll also need to grab hold of the SQLite database (Locomotive includes this for you). Pre-compiled binaries are available for download — make sure you get version 3. You’ll also need the Ruby bindings for SQLite 3.If you get stuck, be sure to check out the official Rails wiki for installation instructions.
It’s one thing to tell you what Ruby on Rails is all about, but it’s another to actually show you. Now that you’ve got both Ruby and Rails installed, why don’t we jump in the deep end and build ourselves a no-nonsense, almost useful application?
Learn by Doing
A shopping list — programming really doesn’t get any more serious or useful than that! Remember that attractive member of the opposite sex, the one who laughed so heartily at our joke earlier? Imagine if we invited that person home for dinner, and forgot to buy the necessary groceries for our meal!
To prevent this catastrophe, we’re going to be building a simple little shopping list — nothing too fancypants, but hopefully it will be enough to give you some idea of how things in Rails are put together, and ensure that you cook a drop-dead delicious dinner.
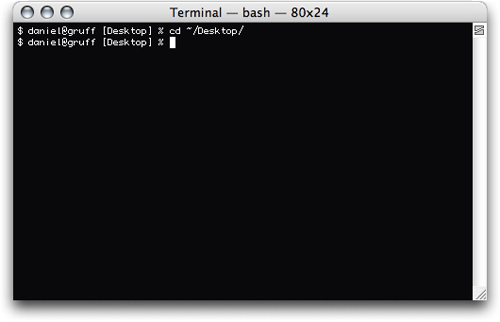
Let’s start by opening up a terminal window and moving into a directory of your choosing. The exact location isn’t important, so long as you remember where it is. Me, I’m going to be working on my Desktop:
And now the fun begins! Type in:
> rails ShoppingListIf everything goes according to plan, you’ll see a bunch of text go flying past and be thrown back to your prompt — Rails magic is happening! If this didn’t work, you might want to kick me in the face and check the installation instructions again.
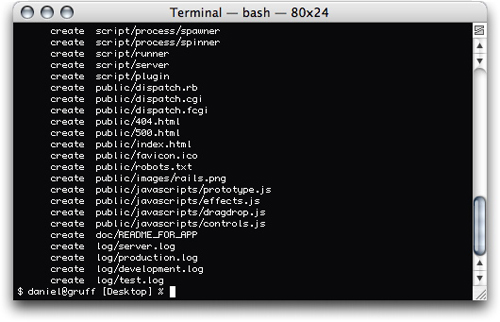
So what just happened? The rails command created the skeleton of our app: we now have a folder called ShoppingList (hereafter SL), populated with all of the sub-folders Rails needs to function. The most important ones we’ll be dealing with in this article are:
app– Models, views and controllers specific to our application will live heredb– We’ll be storing our database in hereconfig– Our database and environment settingspublic– Files that are visible via a web browser – our stylesheets, Javascript files, etc. – live herescript– Handy tools to make our Rails life easier
Let’s get busy.
Model
Since we’re building a Shopping List, we’ll need some sort of Model to represent the individual items in the list. Let’s call it List Item. To make this Model useful, it’s going to need some data, so let’s go ahead and assume that each of these items is going to have its own id, name, cost, and quantity. In pseudocode, that might look something like this:
model ListItem


  id (integer)


  name (string)


  cost (float)


  quantity (integer)
Cool. Now let’s go ahead and build the Model! Making sure you’re still inside the SL, type in:
> ./script/generate model ListItemThe generate script is a nifty workhorse, and you’ll use it a fair bit in your Rails coding. It creates models, controllers and anything else you tell it to, and you can download and install new generators to extend it. Personally, I’m still waiting for it to make me coffee. In the command above, we’ve instructed it to build all the necessary files and folders for our Model called ListItem (there’s that CamelCase again):
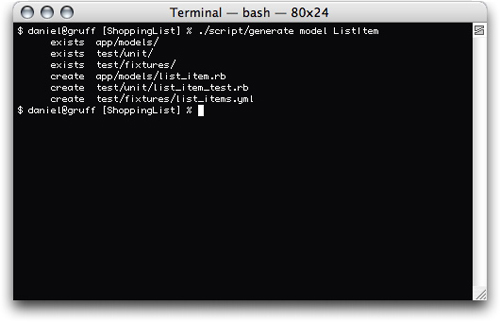
Open up the list_item.rb file inside the app/models/ folder — this is our Model’s class file — and you’ll see that the script has also built the necessary skeleton code to make things work:
 class ListItem < ActiveRecord::Base


end
This class definition looks a little different from our first example, doesn’t it? That’s because ListItem is a subclass of another class. A subclass is identified by the ‘<‘ character. Our parent class is ActiveRecord::Base, and ListItem inherits everything ActiveReacord::Base can do. Remember that I said Rails has magical database modeling powers?
That power is ActiveRecord.
Database
Of course, that’s only the code side of our Model. What about its mysterious underbelly? Time to slit it open and set up our database! As we’re already covering a swath of potentially confusing topics as it is, I’ve elected to use the lightweight and simple SQLite for this lil’ app.
In your terminal window, move into the ‘db’ folder inside SL and type:
> sqlite3 storage.dbWe’ve just opened up a SQLite console and created a blank database file called storage.db. Let’s go ahead and populate this with hot, juicy table action by turning our pseudocode into real SQL gravy. In your console, enter the following:
> create table list_items (id integer primary key, name text, cost float, quantity integer);We now have a table ready for ActiveRecord to play with. You’ll notice that I made the name of the table a plural. ActiveRecord ties your model to its table by comparing the names of the classes to that of the table; thus, our class ListItem becomes our table list_items (plural, lowercased, underscore-separated). You can, of course, change this name if you so desire. For example, you might need to do so if you were moving a legacy application across to Rails and already had a populated database.
To quit out of the SQLite console, type:
> .quitWe’ve now built a happy little database and furnished it with a brand-new table. But for it to be of any use, we need to let Rails know its particulars. Using your favourite text editor, open up the database.yml file inside the config folder in SL. Delete all of the existing example text and replace it with the following:
development:


  adapter: sqlite3

  database: db/storage.db


test:


  adapter: sqlite3

  database: db/storage-test.db


production:


  adapter: sqlite3

  database: db/storage.db
Rails works in three different modes: development, test, and production. Various settings are optimised for each particular mode. We’ll focus only on the first and last ones for now — testing is a whole new article.
Controller
Let’s move on and complete the MVC triangle by creating a controller and building Views to present the ListItem Model via the web. Again, we turn to our trusty steed, the generate script. Making sure you’re still in the main SL folder, type:
> ./script/generate controller ListItemsAs with the ListItem model, this creates all the necessary files and folders to bring our new controller to life:
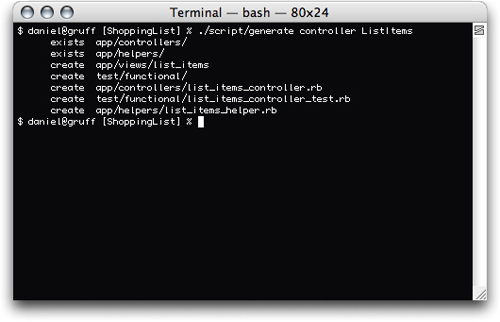
Open up the new list_items_controller.rb file inside app/controllers, and you’ll see another skeleton class:
class ListItemsController < ApplicationController


end
In this particular case, our ListItemsController (along with any other controller we create) is a subclass of ApplicationController, which Rails created when it built our application’s skeleton. Open up the application.rb file and you’ll see:
class ApplicationController < ActionController::Base


end
As with the ActionRecord::Base class for our Model, ActionController::Base is where the magic happens. The base controller handles all the conversion from URLs to a controller’s methods. By default, the name of the controller will govern the URLs that your Rails application is going to use. Because our controller is called ListItemsController, we’ll be able to interact with it automatically via /list_items/.
Thus, if we had a method called create_boring_rails_article, hitting up /list_items/create_boring_rails_article/ would work.
Before we go fleshing out the controller and building our Views, let’s take advantage of another built-in Rails feature called scaffolding. Scaffolding can automatically generate, on the fly, all of the CRUD methods — Create, Retrieve, Update, Delete — that we need to play with our Model.
We’re going to edit our Controller, so open up the list_items_controller.rb file again and modify the class to look like this:
class ListItemsController < ApplicationController

  scaffold :list_item

end
The scaffold command tells Rails we want to enable scaffolding for the list_item Model inside this Controller.
But hang on — why is there a colon in front of the list_item? Because it’s a Ruby symbol, an object that’s used to reference other objects, regardless of context. You’ll see a lot of these used in both Ruby and Rails.
Running on Rails
Keen to see the scaffolding in action? Me too! In your terminal window, move into SL and type:
> ./script/server webrickThis instructs Rails to launch WEBrick (a lightweight Ruby web server) and boot up our ShoppingList application (squeal!):
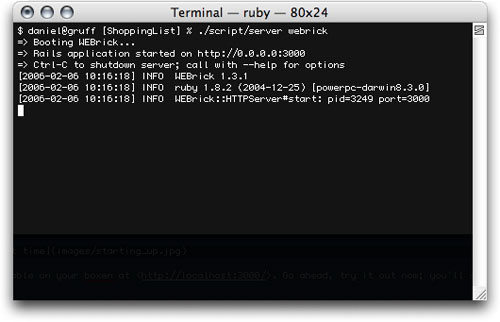
Our application is now running! It’s available on your box at:
<http://localhost:3000/>Don’t believe me? Go ahead and try it out now. You’ll see a default welcome page, which we’re going to change later.
CRUD: C is Create
Let’s check out this so-called CRUD, shall we? Don’t get ready to wash your hands of it just yet! Visit:
<http://localhost:3000/list_items/>You’ll be presented with a page like this:
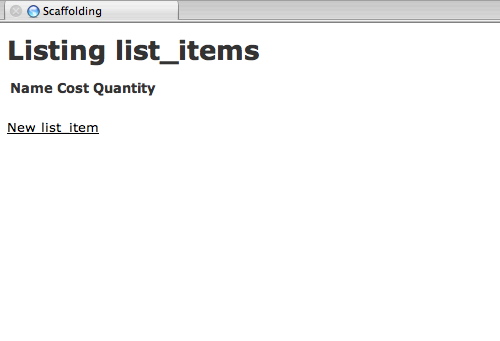
Click that New list_item link. The following form was generated for you by Rails, based on the table we created earlier. Cool, huh? Fill the form out! Add something to your shopping list! I’ll do it too.
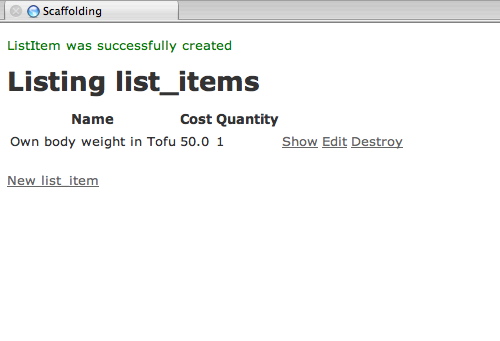
See that? It’s that easy to Create something.
CRUD: R is for Retrieve
The object you just created now lives inside SQLite, and we didn’t even have to lift a cruddy finger! Want proof? Get back into the SQLite console, and type in:
> select * from list_itemsOur little database has been magically populated!
You’ll see a bunch of links alongside our newly created item — Show, Edit and Destroy. Go on, click Show: You know you want to!
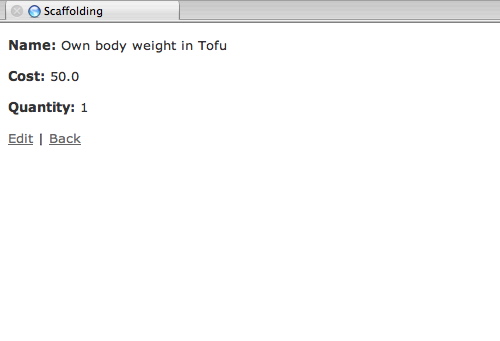
Rails is pulling the information from our database and displaying it for us — now that’s what I call Retrieval!
CRUD: U is for Update
Now, click the Edit link at the bottom of the page there, and change around some of the values in your item:
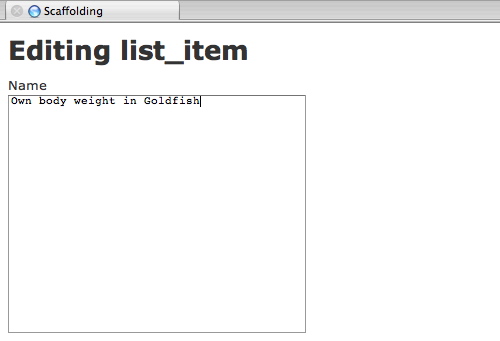
Click Update once you’re done, and yes, just as you expected, voilá! Instant database updating at work!
Getting excited by the possibilities? You should be!
CRUD: D is for Delete, Destroy, Deprive of Life, Destination: Deadsville
Now we come to the hardest part of all — letting go. We’re going to pull the plug on our list item without so much as a second thought. No, no, don’t cry! It’s for the best, really. How else can I demonstrate Delete?
Fight back your tears and click the Destroy link on the main list_items page. Because Rails is so polite, you’ll be prompted to confirm your choice first. Go on, do it. Trust me, it will be worth it.
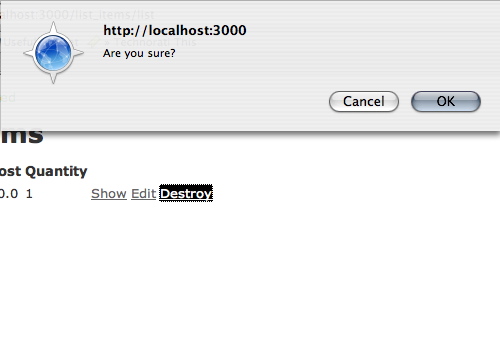
BOOYA! Just like that, your item is wiped from the face of the Earth. Go back and run the select * from list_items query in SQLite, if you want proof.
Moving Along the Rails
So you have some idea of what CRUD is, and how it works via your browser. But what about the actual code that makes it go? Let’s take our relationship one step further by building our own scaffolding and Views, rather than have Rails generate these for us! In the main SL folder, type:
> ./script/generate scaffold ListItemWhen asked, hit “Y” (Yes) to overwrite our existing files:

We’ve just asked the generate script to flesh out our Controller with the methods that are needed to perform CRUD operations, and the Views to display those methods in action. If you open up the list_items_controller.rb once again, you’ll see that it’s been stuffed full of chewy Ruby goodness. There are now eight new methods in our Controller:
- index
- list
- show
- new
- create
- edit
- update
- destroy
Let’s take a quick peek at each of those:
index
The method is simply making a call to the list method, and requesting that the list View be rendered.
All Views in Rails are “rendered” (displayed, usually in a web browser) either explicitly, as is the case here, or automatically. If you don’t specify a method to render, and your method isn’t redirecting to another URL, Rails will try to find a file that has the same name as the current method. It looks for a file that ends in rhtml or rxml, in the app/views folder named after the Controller.
So, if the index method wasn’t rendering the list View, Rails would look for a file called index.rhtml or index.rxml inside app/views/list_items/.
list
Here’s a weird-looking method! We’re calling the paginate method, which takes the name of a Model and a bunch of optional settings, and splits the results so that you can easily view long lists across multiple pages. In this case, we’re asking the method to split up all of our list_items into pages with a maxiumum of ten items per page. Notice that the result of the method call is being passed to not one, but two variables?
This is because the paginate methods returns an Array object — one of many built-in objects in Ruby — and Ruby lets us assign the result inline. Thus, our first instance variable (@list_item_pages) is assigned the value of the first item from the resulting Array, and our @list_items variable is assigned the second item.
Handy!
We’re not using a ‘return’ keyworld, because in Ruby, they’re optional — Ruby will just return the last statement in a method by default. You’ll also see that we’re not requesting a View to render. Remember, Rails is going to look for a list.rhtml or list.rxml file, as noted above.
show
Now we get to play with ActiveRecord and our ListItem Model. One of ActiveRecord’s many methods is find.
Pass it an ID or a bunch of SQL conditions, and it will split back either a single ListItem (if only one is found) or an Array of ListItem (if a whole bunch of them match your criteria). Here, we’re asking it check for a particular ID passed in via the params Hash.
A Hash in Ruby is like a Dictionary in other languages. You set a value for a particular key, each key needing to be unique. Here, the params Hash is filled out by Rails’ dispatcher whenever a request comes in. If we were to view /list_items/show/1, by default, params would contain useful information like:
action: show

id: "1"

controller: list_items
Again, no View is specified, so Rails will use the show.rhtml file that lives inside app/views/list_items/.
new
This one is fairly simple — it creates a new ListItem object and returns it. However, it does not exist in the database. Until you save or update an ActiveRecord object, it’s nothing but a puff of logic floating around the ether.
create
Any guesses on this one? Creating an object, you say? Correct — have a cookie. If you’re thinking that’s what new is for, you’re right: it is. And, like the new method, where we create an object with ListItem new, we create an object here by passing in values sent via our new friends, the params hash. This pre-fills the object with any values that match those belonging to our class. If you were to take a peek inside params when we call this method, you’d see something similar to the following:
name: Giant slab of Tofu

cost: 25

quantity: 10
You know our Model has this, since you and I built it together.
Here you can see that, this time around, we’re actually calling the save method, which does commit our new object into the database. If we’re successful, we’ make a note of it into the flash value, and redirect to an action.
Flash?! Relax, I’m not talking about .SWF files. A “flash” in Rails is a way of displaying a one-shot message to the viewer. In this case, we’re letting them know whether or not the save worked. If it did, we tell Rails to redirect to our list method, which calls it just as if we’d done so ourselves.
And if it didn’t, because the database suddenly ate itself or a glitch in the Matrix set your hard drive to randomly nuke a few sectors, then we’re just going to render the new action and pretend that we took the blue pill and nothing ever happened.
edit
While essentially they’re the same, the edit and show methods render different views, which means that you end up with very different results, even with the same code.
update
This one is almost identical to the save method, except that it calls the update_attributes method in place of save to update an existing item in our database with new values (or create a new one if the particular item doesn’t actually exist — Rails is smart like that).
destroy
Kill, kill, kill. Find the requested item, remove it from the database, and redirect back to the list View.
Enough said, really.
Views
So, how about these Views I keep mentioning? Well, I was just getting to that. Rails works around the concept of Layouts, Partials and assorted sundries to make up the V in MVC. Think of a Layout as a skeleton into which you inject the meat of your application — if you’re familiar with the concept of a header and footer template that you wrap around your generated content, you’re on the right track.
Open up the list_items.rhtml file inside app/views/layouts/:
<html>


  <head>

   <title>ListItems: <%= controller.action_name %></title>

   <%= stylesheet_link_tag 'scaffold' %>

  </head>


  <body>

   <p style="color: green"><%= flash[:notice] %></p>

   <%= @content_for_layout %>

  </body>


</html>
Looks like normal HTML with a few weird extras, right? That’s exactly what it is! The <%= %> stuff is what’s called ERB — Embedded Ruby. If you’ve used PHP at all, you’ll feel right at home.
ERB lets you stick chunks of Ruby code anywhere you like inside your .rhtml (Ruby HTML) files. There are two types of ERB tags we need be concerned with:
<%= ... %>– The result of any code put between these tags (note the equals sign) will be output to the page.<% ... %>– What happens inside these tags stays inside these tags.
Thus, the line <%= controller.action_name %> is going to spit out the name of the current action the Controller is processing. If you’d put it inside <% %> tags, nothing would appear. Note the <%= flash[:notice] %> call? Ahhh, you say nodding your head. Now it’s all falling into place!
And the meat in this markup skeleton? <%= @content_for_layout %> fills in the blanks, attaching whatever we’ve requested to be rendered.
Now what?
Why wouldn’t you just use the default scaffolding in Rails, instead of having your own methods and View files?
Because scaffolding is only one small part of the Rails framework — a powerful one, yes, but relatively minor nonetheless. There’s a lot left for you to explore yet!
And since you now have your own .rhtml files, you’re free to go and put your personal touches into this application. However, given the length of this article, I’m going to spare you of any more embarrassing anecdotes and leave you to take the reigns. By now you should have enough of an idea to sit down, pour over the Rails API documentation, and start out on your own little web applications.
Thanks for playing! You’ve been a great audience.
Frequently Asked Questions (FAQs) about Ruby on Rails
What is the MVC framework in Ruby on Rails?
The MVC (Model-View-Controller) framework is a design pattern that separates an application into three interconnected components. This separation allows for efficient code organization and division of responsibilities within the application. The ‘Model’ corresponds to all the data-related logic that the user works with. The ‘View’ part is used for all the UI logic of the application. The ‘Controller’ serves as an interface between Model and View components to process all the business logic and incoming requests.
How does Ruby on Rails support web standards?
Ruby on Rails is built to encourage the use of web standards for long-term maintainability and compatibility. It promotes the use of RESTful application design and provides built-in support for XML, JSON, and HTML for data transfer. Rails also emphasizes the use of the HTTP protocol to perform CRUD operations.
What is Active Record in Ruby on Rails?
Active Record is the M in MVC – the layer of the system responsible for representing business data and logic. It facilitates the creation and use of objects whose data requires persistent storage to a database. Active Record provides an abstraction of databases and SQL queries, making it easier to create, retrieve, update and delete records on a relational database.
How does Ruby on Rails handle security?
Ruby on Rails has several built-in mechanisms to handle security. It includes features to prevent SQL Injection, Cross-Site Scripting (XSS), and Cross-Site Request Forgery (CSRF). Rails also provides a secure way to deal with user authentication and session management.
What is the asset pipeline in Ruby on Rails?
The asset pipeline is a feature in Rails that concatenates and minifies or compresses JavaScript and CSS assets. It also adds the ability to write these assets in other languages such as CoffeeScript, SCSS, and ERB.
How does Ruby on Rails handle migrations?
Migrations in Ruby on Rails are a convenient way to alter your database schema over time in a consistent and easy way. They use a Ruby DSL so that you don’t have to write SQL by hand, allowing your schema and changes to be database independent.
What is the role of routing in Ruby on Rails?
Routing in Ruby on Rails is the process of mapping HTTP URLs to the corresponding controller actions. It handles the incoming requests and forwards them to the appropriate controller action, passing parameters as needed.
How does Ruby on Rails support testing?
Ruby on Rails encourages test-driven development (TDD) and has integrated testing support. Rails creates simple test stubs when generating new models, controllers, etc. It also integrates with testing frameworks like RSpec and provides built-in test helpers.
What is the convention over configuration in Ruby on Rails?
Convention over Configuration (CoC) is a software design paradigm used by Ruby on Rails. It means that Rails makes assumptions about what you want to do and how you’re going to do it, rather than requiring you to specify every little thing through endless configuration files.
How does Ruby on Rails handle sessions?
A session in Ruby on Rails is a place to store data during a user session. This data is stored between requests and can be used to persist data across the life of the session. Rails provides several storage mechanisms for sessions, including cookies and database storage.