Build Your Own Database Driven Web Site Using PHP & MySQL, Part 1: Installation

This article was written in 2009 and remains one of our most popular posts. If you’re keen to learn more about PHP, you may find this recent article on CakePHP of great interest.
In this book, I’ll guide you as you take your first steps beyond the static world of building web pages with pure HTML. Together, we’ll explore the world of database driven web sites and discover the dizzying array of dynamic tools, concepts, and possibilities that they open up. Whatever you do, don’t look down!
Okay, maybe you should look down. After all, that’s where the rest of this book is. But remember, you were warned!
Before you build your first dynamic website, you must gather together the tools you’ll need for the job. In this chapter, I’ll show you how to download and set up the two software packages you’ll need. Can you guess what they are? I’ll give you a hint: their names feature prominently on the cover of this book! They are, of course, PHP and MySQL.
If you’re used to building web sites with HTML, CSS, and perhaps even a smattering of JavaScript, you’re probably used to uploading to another location the files that make up your site. Maybe this is a web hosting service that you’ve paid for; maybe it’s a free service provided by your Internet Service Provider (ISP); or maybe it’s a web server set up by the IT department of the company that you work for. In any case, once you copy your files to their destination, a software program called a web server is able to find and serve up copies of those files whenever they are requested by a web browser like Internet Explorer or Firefox. Common web server software programs you may have heard of include Apache and Internet Information Services (IIS).
PHP is a server-side scripting language. You can think of it as a plugin for your web server that enables it to do more than just send exact copies of the files that web browsers ask for. With PHP installed, your web server will be able to run little programs (called PHP scripts) that can do tasks like retrieve up-to-the-minute information from a database and use it to generate a web page on the fly before sending it to the browser that requested it. Much of this book will focus on writing PHP scripts to do exactly that. PHP is completely free to download and use.
For your PHP scripts to retrieve information from a database, you must first have a database. That’s where MySQL comes in. MySQL is a relational database management system, or RDBMS. We’ll discuss the exact role it plays and how it works later, but briefly it’s a software program that’s able to organize and manage many pieces of information efficiently while keeping track of how all of those pieces of information are related to each other. MySQL also makes that information really easy to access with server-side scripting languages like PHP. MySQL, like PHP, is completely free for most uses.
The goal of this first chapter is to set you up with a web server equipped with PHP and MySQL. I’ll provide step-by-step instructions that work on recent Windows, Mac OS X, and Linux computers, so no matter what flavor of computer you’re using, the instructions you need should be right here.
Your Own Web Server
If you’re lucky, your current web host’s web server already has PHP and MySQL installed. Most do – that’s one of the reasons why PHP and MySQL are so popular. If your web host is so equipped, the good news is that you’ll be able to publish your first database driven web site without having to shop for a web host that supports the right technologies.
The bad news is that you’re still going to need to install PHP and MySQL yourself. That’s because you need your own PHP-and-MySQL-equipped web server to test your database driven web site on before you publish it for all the world to see.
When developing static web sites, you can often load your HTML files directly from your hard disk into your browser to see how they look. There’s no web server software involved when you do this, which is fine, because web browsers can understand HTML code all by themselves.
When it comes to dynamic web sites built using PHP and MySQL, however, your web browser needs some help! Web browsers are unable to understand PHP scripts; rather, PHP scripts contain instructions for a PHP-savvy web server to execute in order to generate the HTML code that browsers can understand. So in addition to the web server that will host your site publicly, you also need your own private web server to use in the development of your site.
If you work for a company that has an especially helpful IT department, you may find that there’s already a development web server provided for you. The typical setup is that you must work on your site’s files on a network drive that’s hosted by an internal web server that can be safely used for development. When you’re ready to deploy the site to the public, your files are copied from that network drive to the public web server.
If you’re lucky enough to work in this kind of environment, you can skip most of this chapter. However, you’ll want to ask the IT boffins responsible for the development server the same questions I’ve covered in the section called “What to Ask Your Web Host”. That’s because you’ll need to have that critical information handy when you start using the PHP and MySQL support they’ve so helpfully provided.
Windows Installation
In this section, I’ll show you how to start running a PHP-and-MySQL-equipped web server on a Windows XP, Windows Vista, or Windows 7 computer. If you’re using an operating system other than Windows, you can safely skip this section.
All-in-one Installation
I normally recommend that you install and set up your web server, PHP, and MySQL individually, using the official installation packages for each. This is especially useful for beginners, because it gives you a strong sense of how these pieces all fit together. If you’re in a rush, however, or if you need to set up a temporary development environment to use just for a day or two, the following quick-and-dirty solution may be preferable.
You can skip ahead to the section called “Installing Individual Packages” if you want to take the time to install each piece of the puzzle separately.
WampServer (where Wamp stands for Windows, Apache, MySQL, and PHP) is a free, all-in-one program that includes built-in copies of recent versions of the Apache web server, PHP, and MySQL. Let me take you through the process of installing it:
-
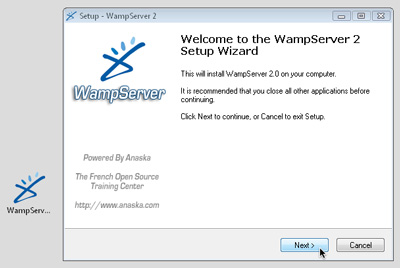
Download the latest version from the WampServer web site. After downloading the file (as of this writing, WampServer 2.0g is about 16MB in size), double-click it to launch the installer, as shown in the figure below.
-
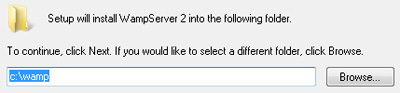
The installer will prompt you for a location to install WampServer. The default of c:wamp shown in Figure 1.2, “The default installation directory is a good choice” is an ideal choice for most purposes, but if you have strong feelings about where it’s installed, feel free to specify your preferred location.
-
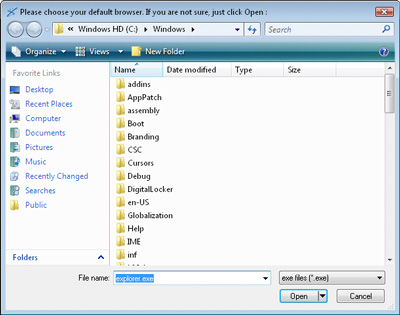
At the end of the installation, WampServer will ask you to choose your default browser. This is the web browser it will launch when you use the included system tray icon tool to launch your browser. If you have Firefox installed it will ask if you’d like to use it as your default browser. If you answer No, or have a different browser installed, it will ask you to select the executable file for the browser you want to use. As shown in Figure 1.3, “The default choice of Internet Explorer is fine”, it selects Internet Explorer (explorer.exe) for you, which is fine. If you’re using an alternative browser such as Safari or Opera, you can browse to find the .exe file for your browser if you want to.
-
As WampServer is installed, it fires up its built-in copy of the Apache HTTP Server, a popular web server for PHP development. Windows will likely display a security alert at this point, like the one in Figure 1.4, “This security alert tells you Apache is doing its job”, since the web server attempts to start listening for browser requests from the outside world.
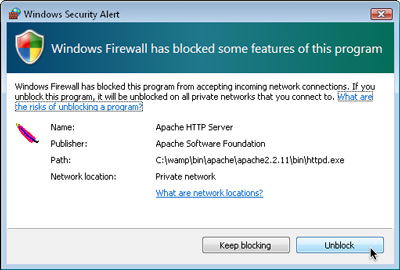
If you want to make absolutely sure that Apache rejects connections from the outside world, and that only a web browser running on your own computer can view web pages hosted on your development server, feel free to click Keep blocking. WampServer has its own built-in option to block connections from the outside world when you want to, however, so I recommend clicking Unblock in order to have the flexibility to grant access to your development server if and when you need to.
-
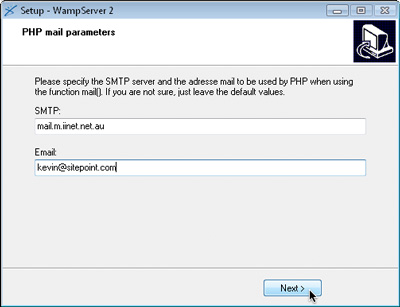
Next, as shown in Figure 1.5, “Fill in your Internet Service Provider’s SMTP server address if you know it”, the WampServer installer will prompt you for your SMTP server and email address. A PHP script can send an email message, and these settings tell it the outgoing email server, and the default “from” address to use. Type in your email address, and if you can remember your Internet Service Provider’s SMTP server address, type it in too. You can always leave the default value for the time being, though, and set it manually if and when you need to send email using a PHP script.
Once the installation is complete, you can fire up WampServer. An icon will appear in your Windows System Tray. Click on it to see the WampServer menu shown below.
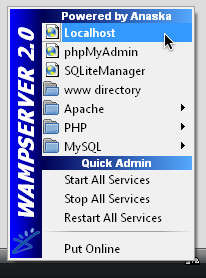
By default, your server can only be accessed by web browsers running on your own computer. If you click the Put Online menu item, your server will become accessible to the outside world.
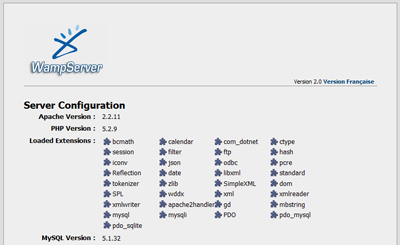
To test that WampServer is working properly, click the Localhost menu item at the top of the WampServer menu. Your web browser will open to display your server’s home page, shown below.
When you’re done working with WampServer, you can shut it down (along with its built-in servers) by right-clicking the System Tray icon and choosing Exit. When you’re next ready to do some work on a database driven web site, just fire it up again!
Later in this book, you’ll need to use some of the programs that come with the MySQL server built into WampServer. To work properly, these programs must be added to your Windows system path.
To add the MySQL command prompt programs that come with WampServer to your Windows system path, follow these instructions:
- Open the Windows Control Panel. Locate and double-click the System icon.
- Take the appropriate step for your version of Windows:
- In Windows XP, switch to the Advanced tab of the System Properties window.
- In Windows Vista or Windows 7, click the Advanced system settings link in the sidebar.
- Click the Environment Variables… button.
- In the list labeled User variables for user, look for a variable named PATH.
- If it exists, select it and click the Edit… button.
- If there’s no variable, click the New… button and fill in the Variable name by typing PATH.
- Add the path to WampServer’s MySQL bin directory (The exact path will depend on where you’ve installed WampServer and which version of MySQL it contains. On my system, the path is
C:wampbinmysqlmysql5.1.34bin. Use Explorer to take a look inside your WampServer installation’s files to figure out the exact path on your system.) as the Variable value:- If the Variable value is empty, just type in the path.
- If there is already text in the Variable value field, add a semicolon (;) to the end of the value, then type the path after that.
- Click the OK button in each of the open windows to apply your changes.
Installing Individual Packages
Installing each individual package separately is really the way to go if you can afford to take the time. That way you learn how all the pieces fit together, but have the freedom to update each of the packages independently of the others. Ultimately, it’s always worthwhile becoming familiar with the inner workings of any software with which you’ll be spending a lot of time.
Installing MySQL
As I mentioned above, you can download MySQL free of charge. Simply proceed to the MySQL Downloads page and click the Download link for the free MySQL Community Server. This will take you to a page with a long list of download links for the current recommended version of MySQL (as of this writing, it’s MySQL 5.1).
At the top of the list you’ll see links for Windows and Windows x64. If you’re positive you’re running a 64-bit version of Windows, go ahead and follow the Windows x64 link to download the Windows Essentials (AMD64 / Intel EM64T) package (about 28MB in size). If you know you’re running a 32-bit version of Windows, or if you’re at all unsure, follow the Windows link and download the Windows Essentials (x86) package (about 35MB) – it’ll work even if it turns out you’re running a 64-bit version of Windows. Although a little obscure, the Pick a mirror link shown below is the one you need to click to download the file.

Once you’ve downloaded the file, double-click it and go through the installation as you would for any other program. Choose the Typical option when prompted for the setup type, unless you have a particular preference for the directory in which MySQL is installed. When you reach the end, you’ll be prompted to choose whether you want to Configure the MySQL Server now. Select this to launch the configuration wizard (In my testing, I found that the configuration wizard failed to actually launch automatically, even with this option checked. If you run into the same problem, just launch the MySQL Server Instance Config Wizard from the Start Menu after the installation has completed), and choose Detailed Configuration, which we’ll use to specify a number of options that are vital to ensuring compatibility with PHP. For each step in the wizard, select the options indicated here:
- Server Type
Assuming you’re setting up MySQL for development purposes on your desktop computer, choose Developer Machine.
Unless you know for a fact that you will need support for transactions (as such support is usually superfluous for most PHP applications), choose Non-Transactional Database Only.
Select Decision Support (DSS)/OLAP to optimize MySQL for a relatively modest number of connections.
Uncheck the Enable Strict Mode option to ensure MySQL’s compatibility with older PHP code that you might need to use in your own work.
Select Best Support For Multilingualism to tell MySQL to assume you want to use UTF-8 encoded text, which supports the full range of characters that are in use on the Web today.
Allow MySQL to be installed as a Windows Service that’s launched automatically; also select Include Bin Directory in Windows PATH to make it easier to run MySQL’s administration tools from the command prompt.
Uncheck the Modify Security Settings option. It’s best to learn how to set the root password mentioned at this juncture without the assistance of the wizard, so I’ll show you how to do this yourself in the section called “Post-Installation Set-up Tasks”.
Once the wizard has completed, your system should now be fully equipped with a running MySQL server!
To verify that the MySQL server is running properly, type Ctrl+Alt+Del and choose the option to open the Task Manager. Click the Show processes from all users button unless it’s already selected. If all is well, the server program (mysqld.exe) should be listed on the Processes tab. It will also start up automatically whenever you restart your system.
Installing PHP
The next step is to install PHP. Head over to the PHP Downloads page and choose the PHP 5.2.x zip package under Windows Binaries; avoid the installer version, which is easier to install, but lacks the same flexibility attained by installing PHP manually.
Update for PHP 5.3: As of PHP 5.3, there are now four different versions of PHP to choose from. You want the one labelled VC6 x86 Thread Safe.
What about PHP 4?
At the time of writing, PHP 5 is firmly entrenched as the preferred version of PHP. For several years after PHP 5’s initial release, many developers chose to stick with PHP 4 due to its track record of stability and performance, and indeed today many bargain-basement web hosts have yet to upgrade to PHP 5. There’s no longer any excuse for this, however; PHP 5 is by far the better choice, and development of PHP 4 has been completely discontinued. If your web host is still living in the PHP 4 past, you’re better off finding a new web host!
PHP was designed to run as a plugin for existing web server software such as Apache or Internet Information Services, so before you can install PHP, you must first set up a web server.
Many versions of Windows come with Microsoft’s powerful Internet Information Services (IIS) web server, but not all do. Windows XP Home, Windows Vista Home, and Windows 7 Home Basic (among others) are without IIS, so you need to install your own web server on these versions of Windows if you want to develop database driven web sites. On top of that, assorted versions of Windows come with different versions of IIS, some of which vary dramatically in how you configure them to work with PHP.
With that in mind, if you’re still considering IIS, you should know it’s also relatively uncommon to host web sites built using PHP with IIS in the real world. It’s generally less expensive and more reliable to host PHP-powered sites on servers running some flavor of the Linux operating system, with the free Apache web server installed. About the only reason for hosting a PHP site on IIS is if your company has already invested in Windows servers to run applications built using ASP.NET (a Microsoft technology built into IIS), and you want to reuse that existing infrastructure to host a PHP application as well.
Although it’s by no means a requirement, it’s generally easiest to set up your development server to match the environment in which your web site will be deployed publicly as closely as possible. For this reason, I recommend using the Apache web server – even for development on a Windows computer. If you insist (or your boss insists) on hosting your PHP-based site using IIS, you will find the necessary installation instructions in the install.txt file contained in the PHP zip package you downloaded from the PHP web site.
If you need to install Apache on your computer, surf on over to The Apache HTTP Server Project and look for the version of Apache described as the best available (as of writing it’s version 2.2.11, as shown below).
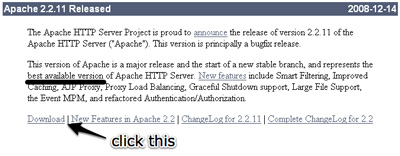
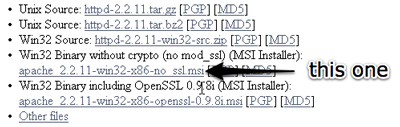
Once you get to the Download page, scroll down to find the links to the various versions available. The one you’ll want is Win32 Binary without crypto, shown below.
Once the file has downloaded, double-click on it as usual to start the installation wizard. After a few steps, you’ll arrive at the Server Information screen.
If you were setting up a web server to be accessed publicly on the Web, the options on this screen would be important. For the purposes of setting up a development server, you can type whatever you like. If you know your computer’s network name, type that in for the Server Name. Feel free to put in your correct email address if, like me, you’re a stickler for the details. If you already have a web server running on your computer (for example, if you have also set up IIS to do some ASP.NET development on the same computer), you may need to select the only for the Current User, on Port 8080, when started Manually option on this screen, so as to avoid a conflict with the existing web server running on port 80.
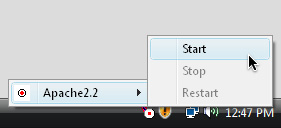
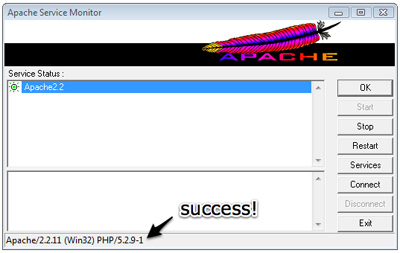
On the next screen, choose the Typical option for the Setup Type, and follow the wizard from there to complete the installation. When it’s done, you should see a new icon for the Apache Service Monitor running in your System Tray. If you chose the default option to have Apache start up automatically, the status indicator should be green, as shown below.

Otherwise, you’ll need to start Apache manually as shown here before you can use it.
You can also use the Apache Service Monitor icon to stop Apache running, once you’ve finished your web development work for the day.
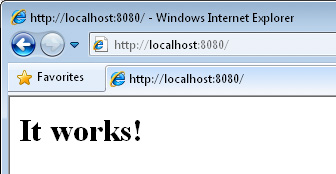
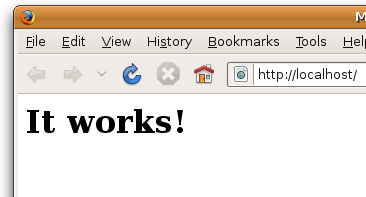
When you have Apache up and running, open your web browser of choice and type http://localhost into the location bar. If you chose the option to run Apache on port 8080, you will need to type http://localhost:8080 instead. Hit Enter, and you should see a page like that shown below that confirms Apache is working correctly.
With Apache standing on its own two feet, you can now install PHP. Follow these steps:
- Unzip the file you downloaded from the PHP web site into a directory of your choice. I recommend
C:PHPand will refer to this directory from this point forward, but feel free to choose another directory if you like. - Find the file called
php.ini-distin the PHP folder and make a duplicate copy of it. The easiest way to do it is to right-click and drag the file’s icon a short distance, drop it in the same Explorer window, and choose Copy Here from the pop-up menu. This will leave you with a new file named along the lines ofphp - Copy.ini-dist(depending on the version of Windows you’re using). Find this new file and rename it tophp.ini. Windows will ask if you’re sure about changing the filename extension (from.ini-distto.ini); click Yes.
Windows Hides Known Filename Extensions by Default
When you rename the file to php.ini, you might notice that the new filename that appears next to the icon is actually just php. If this happens, it’s because your copy of Windows is set up to hide the filename extension if it recognizes it. Since Windows knows that .ini files are Configuration Settings files, it hides this filename extension.
As you can imagine, this feature can cause a certain amount of confusion. When you return to edit the php.ini file in the future, it would help to be able to see its full filename so you could tell it apart from the php.gif and php.exe files in the same folder.
To switch off filename extension hiding, open the Windows Control Panel and search for Folder Options. Open the Folder Options window and switch to the View tab. Under Files and Folders, uncheck the Hide extensions for known file types checkbox, as shown below.

php.ini file in your favorite text editor. If you have no particular preference, just double-click the file to open it in Notepad. It’s a large file with a lot of confusing options, but look for the line that begins with doc_root (Notepad’s Edit > Find… feature will help). Out of the box, this line looks like this: doc_root =
To the end of this line, add the path to your web server’s document root directory. For the Apache server, this is the htdocs folder in the main Apache web server directory. If you installed Apache in the default location, the path should be "C:Program FilesApache Software FoundationApache2.2htdocs". If you installed it elsewhere, find the htdocs folder and type its path:
doc_root = "C:Program FilesApache Software FoundationApache2.2htdocs"
Just a little further down in the file, look for the line that begins with extension_dir, and set it so that it points to the ext subfolder of your PHP folder:
extension_dir = "C:PHPext"
Scroll further down in the file, and you’ll see a bunch of lines beginning with ;extension=. These are optional extensions to PHP, disabled by default. We want to enable the MySQL extension so that PHP can communicate with MySQL. To do this, remove the semicolon from the start of the php_mysqli.dll line:
extension=php_mysqli.dll
php_mysqli, not php_mysql
Just above the line for php_mysqli.dll there is a line for php_mysql.dll. The i in php_mysqli stands for improved. You want to enable the new improved MySQL extension. The one without the i is obsolete, and some of its features are incompatible with current versions of MySQL.
Keep scrolling even further down in the file, and look for a line that starts with ;session.save_path. Once again, remove the semicolon to enable this line, and set it to your Windows Temp folder:
session.save_path = "C:WindowsTemp"
Save the changes you made and close your text editor.
That takes care of setting up PHP. Now you can set up your Apache server to use it as a plugin:
- Run Notepad as Administrator. This is necessary because the Apache configuration file, by default, can only be edited by an administrator. To do this, find the Notepad icon in your Start Menu (under All Programs > Accessories) and right-click on it. Click the Run as administrator menu item.
- Choose File > Open… in Notepad. Browse to the conf subfolder in your Apache installation folder (by default,
C:Program FilesApache Software FoundationApache2.2conf), and select thehttpd.conffile located there. In order to make this file visible for selection, you’ll need to select All Files (*.*) from the file type drop-down menu at the bottom of the Open window. - Look for the existing line in this file that begins with
DirectoryIndex, shown here:
      <IfModule dir_module>
        DirectoryIndex index.html
      </IfModule>
This line tells Apache which filenames to use when it looks for the default page for a given directory. Add index.php to the end of this line:
      <IfModule dir_module>
        DirectoryIndex index.html index.php
</IfModule> LoadModule php5_module "C:/PHP/php5apache2_2.dll"
AddType application/x-httpd-php .php
PHPIniDir "C:/PHP" Make sure the LoadModule and PHPIniDir lines point to your PHP installation directory, and note the use of forward slashes (/) instead of backslashes () in the paths.
PHP and Future Apache Versions
Historically, major new versions of the Apache server have required new versions of the .dll file you see referenced in the LoadModule line above. If you take another look in your PHP installation directory, for example, you’ll see there are also php5apache.dll and php5apache2.dll files there. These files were provided for use with Apache 1.3 and Apache 2.0, respectively.
By the time you read this, it’s possible that Apache has undergone another major release (for instance, Apache 2.3), which might need yet another new .dll file. For example, Apache 2.3 might require you to use a new file named php5apache2_3.dll.
If you are using a subsequent version of Apache, and if you do see a .dll file that looks like it might correspond to your Apache version, try adjusting the LoadModule line accordingly. You can always return and edit this file again later if Apache fails to load PHP correctly.
With MySQL, Apache, and PHP installed, you’re ready to proceed to the section called “Post-Installation Set-up Tasks”.
Mac OS X Installation
Mac OS X distinguishes itself by being the only consumer OS to install both Apache and PHP as components of every standard installation. That said, these take a few tweaks to switch on, and you’ll need to install the MySQL database as well.
In this section, I’ll show you how to start running a PHP-and-MySQL-equipped web server on a Mac computer running Mac OS X version 10.5 (Leopard). If you’re using an alternative to a Mac, you can safely skip this section.
All-in-one Installation
I normally recommend that you install and set up your web server, PHP, and MySQL individually, using the official installation packages for each. This process is especially useful for beginners, because it gives you a strong sense of how these pieces all fit together. If you’re in a rush, however, or if you need to set up a temporary development environment to use just for a day or two, a quick-and-dirty solution may be preferable.
You can skip ahead to the section called “Installing Individual Packages” if you want to take the time to install each piece of the puzzle separately.
MAMP (which stands for Mac, Apache, MySQL, and PHP) is a free, all-in-one program that includes built-in copies of recent versions of the Apache web server, PHP, and MySQL. Let me take you through the process of installing it:
- Download the latest version from the MAMP web site. After downloading the file (as of this writing, MAMP 1.7.2 is about 130MB in size), double-click it to unzip the disk image (
MAMP_1.7.2.dmg), then double-click the disk image to mount it, as shown below.

.zip file you downloaded.Browse to your Applications folder and find the new MAMP folder there. Open it, and double-click the MAMP icon inside to launch MAMP. As MAMP starts up, the following will happen. First, the MAMP window shown below.
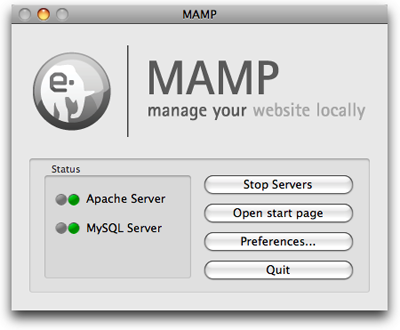
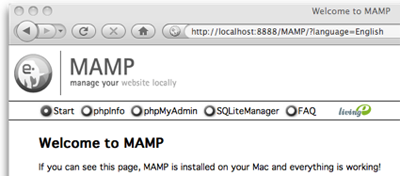
The two status indicators will switch from red to green as the built-in Apache and MySQL servers start up. Next, MAMP will open your default web browser and load the MAMP welcome page, shown below.
When you’re done working with MAMP, you can shut it down (along with its built-in servers) by clicking the Quit button in the MAMP window. When you’re next ready to do some work on a database driven web site, just fire it up again!
Later in this book, you’ll need to use some of the programs that come with the MySQL server built into MAMP. To work properly, these programs must be added to your Mac OS X system path.
To add the MySQL command prompt programs that come with MAMP to your Mac OS X system path, follow these instructions:
- Open a Terminal window. (To open a Terminal window, launch the Terminal application, which you can find in the Utilities folder in the Applications folder.)
If you’re running Mac OS X 10.5 (Leopard) or later, type these commands:
            Machine:~ user$ sudo su
            Password: (type your password)
            sh-3.2# echo '/Applications/MAMP/Library/bin' >> /etc/paths.d/MAMP
            sh-3.2# exit
What to Type
The Machine:~ user$ portion (where Machine is your computer’s name) represents the prompt that’s already displayed. You only need to type the command.
If you’re running Mac OS X 10.4 (Tiger) or earlier, type these commands:
            Machine:~ user$ touch .profile
            Machine:~ user$ open .profile
This should open the hidden .profile file in TextEdit. This file contains a list of Terminal commands that are executed automatically whenever you open a new Terminal window. If you’ve never installed command prompt programs on your system before, this file will be completely empty. In any case, add this line to the end of the file:
export PATH=$PATH:/Applications/MAMP/Library/binSave your changes, and quit TextEdit.
Installing Individual Packages
Installing each individual package separately is really the way to go if you can afford to take the time. You gain the opportunity to learn how all the pieces fit together, and you have the freedom to update each of the packages independently of the others. Besides, it’s always worthwhile being familiar with the inner workings of any software with which you’ll be spending a lot of time.
The following instructions assume you’re running Mac OS X 10.5 (Leopard) or later. If you’re running an earlier version of Mac OS OX, you should stick with the all-in-one option.
Installing MySQL
Apple maintains a fairly comprehensive guide to installing MySQL on Mac OS X on its Mac OS X Internet Developer site if you want to compile MySQL yourself. It’s much easier, however, to obtain the precompiled binary version directly from the MySQL web site.
Start by visiting the The MySQL Downloads page
. Click the Download link for the free MySQL Community Server. This will take you to a page with a long list of download links for the current recommended version of MySQL (as of this writing, it’s MySQL 5.1).
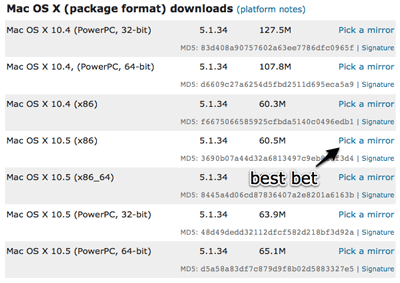
Click the Mac OS X (package format) link. You will be presented with the list of downloads shown in the figure below. Which one you need to choose depends on your operating system version and platform architecture. If your system is running Mac OS X version 10.5 (Leopard), you can ignore the Mac OS X 10.4 links. If you know your Mac has a 64-bit processor, you can safely pick the Mac OS X 10.5 (x86_64) version. If you’re at all unsure, your best bet is the Mac OS X 10.5 (x86) version – all it requires is that you have an Intel-based Mac (to be sure, check the processor information in the About This Mac window, which you can access from the Apple menu). If you have an older, PowerPC-based Mac, you’ll need one of the PowerPC versions. The 32-bit version is the safe bet, since it will run on 64-bit systems too.
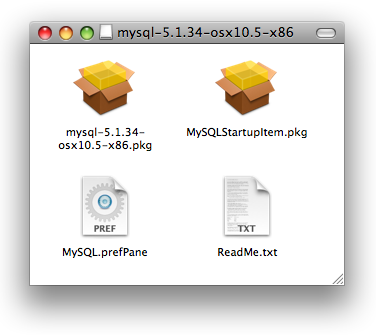
Once you’ve downloaded the mysql-version-osxversion-platform.dmg file, double-click it to mount the disk image. As shown below, it contains the installer in .pkg format, as well as a MySQLStartupItem.pkg file. Double-click the installer, which will guide you through the installation of MySQL.
Once MySQL is installed, you can launch the MySQL server. Open a Terminal window (To open a Terminal window, launch the Terminal application, which you can find in the Utilities folder in the Applications folder) and type this command:
Machine:~ user$ sudo /usr/local/mysql/bin/mysqld_safeWhat to Type
The Machine:~ user$ portion (where Machine is your computer’s name) represents the prompt that’s already displayed. You only need to type the command, which is shown in bold.
Once you have typed the command, hit Enter.
This command runs the mysqld_safe script with administrator privileges. You’ll be prompted to input your password to do this, then a status message will confirm that MySQL is running.
Once MySQL is running, you can switch it to background execution by typing Ctrl+Z to stop the process, and then typing this command to let it continue running in the background:
Machine:~ user$ bgYou can then quit the Terminal application and MySQL will continue to run as a server on your system. When you want to shut down the MySQL server, open a new Terminal window and type this command:
Machine:~ user$ sudo /usr/local/mysql/bin/mysqladmin shutdownThough you’ll gain plenty of geek cred for memorizing these commands, there’s a much less tedious way to control your MySQL server. Back in the installation disk image shown previously, you’ll notice a file named MySQL.prefPane. Double-click this to install a new pane in Mac OS X’s System Preferences, and the window shown below will open.
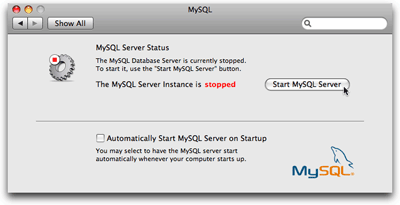
This window will tell you if your MySQL server is running or not, and lets you start it up and shut it down with the click of a button!
Presumably, you’ll want your system to launch the MySQL server at startup automatically so that you can avoid having to repeat the above process whenever you restart your system. The system preferences pane has a checkbox that does this, but for this checkbox to do anything you must first install the MySQLStartupItem.pkg from the installation disk image.
When you have everything set up the way you want it, you can safely drag the MySQL installation disk icon on your desktop to the trash, then delete the .dmg file you downloaded.
One last task you’ll want to do is add the /usr/local/mysql/bin directory to your system path. Doing this enables you to run programs like mysqladmin and mysql (for which we’ll have plenty of use later in this book) in the Terminal without typing out their full paths. Pop open a new Terminal window and type these commands:
Machine:~ user$ sudo su
Password: (type your password)
sh-3.2# echo '/usr/local/mysql/bin' >> /etc/paths.d/mysql
sh-3.2# exit
Close the Terminal window and open a new one to allow this change to take effect. Then, with your MySQL server running, try running the mysqladmin program from your home directory:
Machine:~ user$ mysqladmin statusIf everything worked the way it’s supposed to, you should see a brief list of statistics about your MySQL server.
Installing PHP
Mac OS X 10.5 (Leopard) comes with Apache 2.2 and PHP 5 built right in! All you need to do to use them for development is switch them on:
- Open System Preferences (System Preferences… on the Apple menu).
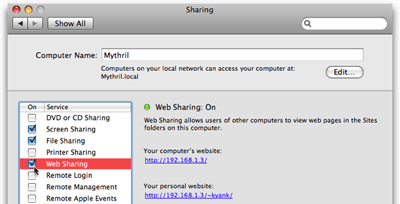
- In the main System Preferences menu, click Sharing under Internet & Network.
- Make sure that Web Sharing is checked, as shown below.
http://localhost into the address bar, and hit Enter. Your browser should display the standard Apache welcome message shown below.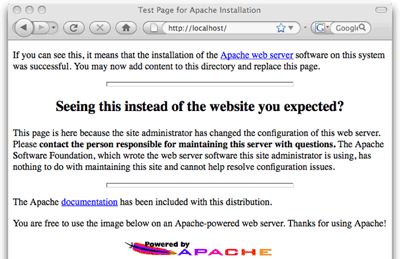
With this procedure complete, Apache will be run at startup automatically on your system. You’re now ready to enhance this server by enabling PHP support:
- In the Finder menu bar, choose Go > Go to folder (?+?+G), and type
/private/etc/apache2/before clicking Go. - In the Finder window that opens, there should be a file named
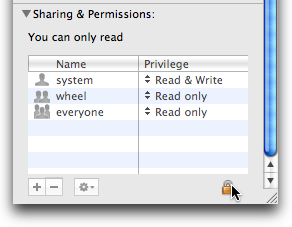
httpd.conf. This is the Apache configuration file. By default, it’s read-only. Right-click the file and choose Get Info (?+I) to open the file’s properties. Scroll down to the bottom of thehttpd.confInfo window to find the Sharing & Permissions setting.
By default, the settings in this section are disabled. Click the little lock icon shown in the figure below to enable them. Enter your password when prompted.
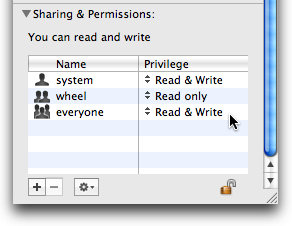
To make this file editable, change the value in the Privilege column for everyone to Read & Write, as shown in below.
httpd.conf file to open it in TextEdit.httpd.conf file, search for this line: #LoadModule php5_module libexec/apache2/libphp5.soEnable this command by deleting the hash (#) character at the start of the line.
httpd.conf file and the apache2 folder. This will keep other users of your computer from making changes to the Apache configuration. Machine:~ user$ sudo /usr/sbin/apachectl restartType your password when prompted.
http://localhost in your browser again to make sure that Apache is still running.Your computer is now equipped with an Apache web server with PHP support. If you need to make changes to Apache’s configuration, you know how to edit its httpd.conf file using the instructions above. The PHP plugin, however, has its own configuration file, named php.ini, and you need to edit that file to tell PHP how to connect to your MySQL server.
With the version of PHP built into Mac OS X, there is no php.ini file by default – PHP just runs with the default settings. In order to modify those settings, you’ll need to open Terminal and copy the /private/etc/php.ini.default file to /private/etc/php.ini:
Machine:~ user$ cd /private/etc
Machine:etc user$ sudo cp php.ini.default php.ini
Password: (type your password)
To make this new php.ini file editable by users like yourself, use the same procedure described above for editing httpd.conf: in Finder use Go > Go to folder to open /private/etc, modify the permissions of both the php.ini file and the folder that contains it, then open the file with TextEdit.
Scroll down through the file or use Edit > Find > Find… (?+F) to locate the mysql.default_socket option. Edit this line of the php.ini file so that it looks like this:
mysql.default_socket = /tmp/mysql.sockScroll down further to locate the mysqli.default_socket option (mysqli, not mysql), and make the same change:
mysqli.default_socket = /tmp/mysql.sockSave your changes, quit TextEdit, and restore the file and directory permissions if you want to. Finally, open a Terminal window and type this command to restart Apache once more:
Machine:~ user$ sudo /usr/sbin/apachectl restartType your password when prompted. Once Apache is up and running again, load http://localhost in your browser once more to make sure that all is well.
That’s it! With MySQL, Apache, and PHP installed, you’re ready to proceed to the section called “Post-Installation Set-up Tasks”.
Linux Installation
This section will show you the procedure for manually installing Apache, PHP, and MySQL under most current distributions of Linux. These instructions were tested under Ubuntu 8.10; however, they should work on other distributions such as Fedora, Debian, openSUSE, and Gentoo without much trouble. The steps involved will be very similar, almost identical.
Most Linux distributions come with a package manager of one kind or another. Ubuntu’s Synaptic Package Manager is a graphical front end to APT, the Debian package manager. Other distributions use the older RPM package manager. Regardless of which distribution you use, prepackaged versions of Apache, PHP, and MySQL should be readily available. These prepackaged versions of software are really easy to install; unfortunately, they also limit the software configuration options available to you. For this reason – and because any attempt to document the procedures for installing the packaged versions across all popular Linux distributions would be doomed to failure – I will instead show you how to install them manually.
If you already have Apache, PHP, and MySQL installed in packaged form, feel free to use those versions, and skip forward to the section called “Post-Installation Set-up Tasks”. If you encounter any problems, you can always uninstall the packaged versions and return here to install them by by hand.
Installing MySQL
Start by downloading MySQL. Simply proceed to the MySQL Downloads page and click the Download link for the free MySQL Community Server. This will take you to a page with a long list of download links for the current recommended version of MySQL (as of this writing, it’s MySQL 5.1).
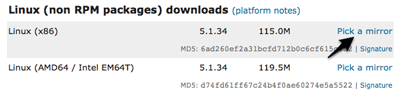
Click the link near the top of the list to go to the Linux (non RPM packages). Now you need to choose the package that corresponds to your system architecture. If you’re positive you’re running a 64-bit version of Linux, go ahead and download the Linux (AMD64/Intel EM64T) package (about 120MB in size). If you’re running a 32-bit version of Linux, download the Linux (x86) package (about 115MB) – it’ll work even if it turns out you’re running a 64-bit version of Linux. It may be a little unclear, but the Pick a mirror link shown in the figure below is the one you need to click to download the file.
Once you’ve downloaded the file, open a Terminal and log in as the root user:
user@machine:~$ sudo suYou will, of course, be prompted for your password.
Change directories to /usr/local and unpack the downloaded file:
root@machine:/home/user# cd /usr/local
root@machine:/usr/local# tar xfz ~user/Desktop/mysql-version-linux-platform.tar.gz
The second command assumes you left the downloaded file on your desktop, which is the Desktop directory in your home directory. You’ll need to replace user with your username, version with the MySQL version you downloaded, and platform with the architecture and compiler version of the release you downloaded; this is so that the command exactly matches the path and filename of the file you downloaded. On my computer, for example, the exact command looks like this:
root@mythril:/usr/local# tar xfz ~kyank/Desktop/mysql-5.1.34-linux-x86_64-glibc23.tar.gzAfter a minute or two, you’ll be returned to the command prompt. A quick ls will confirm that you now have a directory named mysql-version-linux-platform. This is what it looks like on my computer:
root@mythril:/usr/local# ls
bin  games    lib  mysql-5.1.34-linux-x86_64-glibc23  share
etc  include  man  sbin                               src
Next, create a symbolic link to the new directory with the name mysql to make accessing the directory easier. Then enter the directory:
root@machine:/usr/local# ln -s mysql-version-linux-platform mysql
root@machine:/usr/local# cd mysql
While you can run the server as the root user, or even as yourself (if, for example, you were to install the server in your home directory), you should normally set up on the system a special user whose sole purpose is to run the MySQL server. This will remove any possibility of an attacker using the MySQL server as a way to break into the rest of your system. To create a special MySQL user, type the following commands (still logged in as root):
root@machine:/usr/local/mysql# groupadd mysql
root@machine:/usr/local/mysql# useradd -g mysql mysql
Now give ownership of your MySQL directory to this new user:
root@machine:/usr/local/mysql# chown -R mysql .
root@machine:/usr/local/mysql# chgrp -R mysql .
MySQL is now installed, but before it can do anything useful, its database files need to be installed, too. Still in the new mysql directory, type the following command:
root@machine:/usr/local/mysql# scripts/mysql_install_db --user=mysqlNow everything’s prepared for you to launch the MySQL server for the first time. From the same directory, type the following command:
root@machine:/usr/local/mysql# bin/mysqld_safe --user=mysql &If you see the message mysql daemon ended, then the MySQL server was prevented from starting. The error message should have been written to a file called hostname.err (where hostname is your machine’s host name) in MySQL’s data directory. You’ll usually find that this happens because another MySQL server is already running on your computer.
If the MySQL server was launched without complaint, the server will run (just like your web or FTP server) until your computer is shut down. To test that the server is running properly, type the following command:
root@machine:/usr/local/mysql# bin/mysqladmin -u root statusA little blurb with some statistics about the MySQL server should be displayed. If you receive an error message, check the hostname.err file to see if the fault lies with the MySQL server upon starting up. If you retrace your steps to make sure you followed the process described above, and this fails to solve the problem, a post to the SitePoint Forums will help you pin it down in little time.
If you want your MySQL server to run automatically whenever the system is running, you’ll have to set it up to do so. In the support-files subdirectory of the mysql directory, you’ll find a script called mysql.server that can be added to your system startup routines to do this. For most versions of Linux, you can do this by creating a link to the mysql.server script in the /etc/init.d directory, then create two links to that: /etc/rc2.d/S99mysql and /etc/rc0.d/K01mysql. Here are the commands to type:
root@machine:/usr/local/mysql# cd /etc
root@machine:/etc# ln -s /usr/local/mysql/support-files/mysql.server init.d/
root@machine:/etc# ln -s /etc/init.d/mysql.server rc2.d/S99mysql
root@machine:/etc# ln -s /etc/init.d/mysql.server rc0.d/K01mysql
That’s it! To test that this works, reboot your system, and request the status of the server with mysqladmin as you did above.
One final thing you might like to do for the sake of convenience is to place the MySQL client programs – which you’ll use to administer your MySQL server later on – in the system path. To this end, you can place symbolic links to mysql, mysqladmin, and mysqldump in your /usr/local/bin directory:
root@machine:/etc# cd /usr/local/bin
root@machine:/usr/local/bin# ln -s /usr/local/mysql/bin/mysql .
root@machine:/usr/local/bin# ln -s /usr/local/mysql/bin/mysqladmin .
root@machine:/usr/local/bin# ln -s /usr/local/mysql/bin/mysqldump .
Once you’ve done this, you can log out of the root account. From this point on, you can administer MySQL from any directory on your system:
root@machine:/usr/local/bin# exit
user@machine:~$ mysqladmin -u root status
Installing PHP
As mentioned above, PHP is more a web server plugin module than a program. There are actually three ways to install the PHP plugin for Apache:
- as a CGI program that Apache runs every time it needs to process a PHP-enhanced web page
- as an Apache module compiled right into the Apache program
- as an Apache module loaded by Apache each time it starts up
The first option is the easiest to install and set up, but it requires Apache to launch PHP as a program on your computer every time a PHP page is requested. This activity can really slow down the response time of your web server, especially if more than one request needs to be processed at a time.
The second and third options are almost identical in terms of performance, but the third option is the most flexible, since you can add and remove Apache modules without having to recompile it each time. For this reason, we’ll use the third option.
Assuming you don’t already have Apache running on your computer, surf on over to the Apache HTTP Server Project and look for the version of Apache described as “the best available version” (as of this writing it’s version 2.2.11, as shown below).
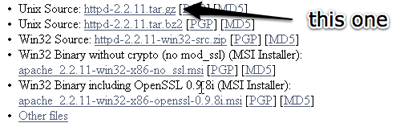
Once you get to the Download page, scroll down to find the links to the various versions available. The one you want is Unix Source, shown in the figure below. Both the .tar.gz or the .tar.bz2 are the same; just grab whichever archive format you’re used to extracting.
What you’ve just downloaded is actually the source code for the Apache server. The first step, then, is to compile it into an executable binary installation. Pop open a Terminal, navigate to the directory where the downloaded file is located, then extract it, and navigate into the resulting directory:
user@machine:~$ cd Desktop
user@machine:~/Desktop$ tar xfz httpd-version.tar.gz
user@machine:~/Desktop$ cd httpd-version
The first step in compiling Apache is to configure it to your requirements. Most of the defaults will be fine for your purposes, but you’ll need to enable dynamic loading of Apache modules (like PHP), which is off by default. Additionally, you should probably enable the URL rewriting feature, upon which many PHP applications rely (although it’s unnecessary for the examples in this book). To make these configuration changes, type this command:
user@machine:~/Desktop/httpd-version$ ./configure --enable-so --enable-rewriteA long stream of status messages will parade up your screen. If the process stops with an error message, your system may be missing some critical piece of software that’s required to compile Apache. Some Linux distributions lack the essential development libraries or even a C compiler installed by default. Installing these should enable you to return and run this command successfully. Current versions of Ubuntu, however, should come with everything that’s needed.
After several minutes, the stream of messages should come to an end:
...
config.status: creating build/rules.mk
config.status: creating build/pkg/pkginfo
config.status: creating build/config_vars.sh
config.status: creating include/ap_config_auto.h
config.status: executing default commands
user@machine:~/Desktop/httpd-version$
You’re now ready to compile Apache. The one-word command make is all it takes:
user@machine:~/Desktop/httpd-version$ makeAgain, this process will take several minutes to complete, and should end with the following message:
...
make[1]: Leaving directory `/home/user/Desktop/httpd-version'
user@machine:~/Desktop/httpd-version$
To install your newly-compiled copy of Apache, type sudo make install (the sudo is required, since you need root access to write to the installation directory).
user@machine:~/Desktop/httpd-version$ sudo make installEnter your password when prompted.
As soon as this command has finished copying files, your installation of Apache is complete. Navigate to the installation directory and launch Apache using the apachectl script:
user@machine:~/Desktop/httpd-version$ cd /usr/local/apache2
user@machine:/usr/local/apache2$ sudo bin/apachectl -k start
You’ll likely see a warning message from Apache complaining that it was unable to determine the server’s fully qualified domain name. That’s because most personal computers are without one. Don’t sweat it.
Fire up your browser and type http://localhost into the address bar. If Apache is up and running, you should see a welcome message like the one below.
As with your MySQL server, you’ll probably want to configure Apache to start automatically when your system boots. The procedure to do this is similar; just copy and link the apachectl script from your Apache installation:
user@machine:/usr/local/apache2$ sudo su
root@machine:/usr/local/apache2# cd /etc
root@machine:/etc# ln -s /usr/local/apache2/bin/apachectl init.d/
root@machine:/etc# ln -s /etc/init.d/apachectl rc2.d/S99httpd
root@machine:/etc# ln -s /etc/init.d/apachectl rc0.d/K01httpd
To test that this works, restart your computer and then hit the http://localhost page in your browser again.
With a shiny new Apache installation up and running, you’re now ready to add PHP support to it. To start, download the PHP Complete Source Code package from the PHP Downloads page. Again, the .tar.gz and .tar.bz2 versions are identical; just download whichever you’re used to extracting.
The file you downloaded should be called php-version.tar.gz (or .bz2). Pop open a new Terminal window, navigate to the directory containing the downloaded file, extract it, and move into the resulting directory:
user@machine:~$ cd Desktop
user@machine:~/Desktop$ tar xfz php-version.tar.gz
user@machine:~/Desktop$ cd php-version
To install PHP as an Apache module, you’ll need to use the Apache apxs program. This will have been installed along with the Apache server if you followed the instructions above to compile it yourself; but if you’re using the copy that was installed with your distribution of Linux, you may need to install the Apache development package to access Apache apxs. You should be able to install this package by using the package manager included with your Linux distribution. For example, on Debian Linux, you can use apt-get to install it as follows:
user@machine:~$ sudo apt-get install apache-devNow, to install PHP, you must be logged in as root:
user@machine:~/Desktop/php-version$ sudo su
[sudo] password for user: (type your password)
root@machine:/home/user/Desktop/php-version#
The first step is to configure the PHP installation program by telling it which options you want to enable, and where it should find the programs it needs to know about (such as Apache apxs and MySQL). The command should look like this (all on one line):
root@machine:/home/user/Desktop/php-version# ./configure --prefix=/usr/local/php --with-apxs2=/usr/local/apache2/bin/apxs --with-mysqli=/usr/local/mysql/bin/mysql_configThe --prefix option tells the installer where you want PHP to be installed (/usr/local/php is a good choice).
The --with-apxs2 option tells the installer where to find the Apache apxs program mentioned above. When installed using your Linux distribution’s package manager, the program is usually found at /usr/sbin/apxs. If you compiled and installed Apache yourself as described above, however, it will be in the Apache binary directory, at /usr/local/apache2/bin/apxs.
The --with-mysqli option tells the installer where to find your MySQL installation. More specifically, it must point to the mysql_config program in your MySQL installation’s bin directory (/usr/local/mysql/bin/mysql_config).
Again, a parade of status messages will appear on your screen. When it stops, check for any error messages and install any files it identifies as missing. On a default Ubuntu 8.10 installation, for example, you’re likely to see an error complaining about an incomplete libxml2 installation. To correct this particular error, open Synaptic Package Manager, then locate and install the libxml2-dev package (libxml2 should already be installed). Once it’s installed, try the configure command again.
After you watch several screens of tests scroll by, you’ll be returned to the command prompt with the comforting message “Thank you for using PHP.” The following two commands will compile and then install PHP:
root@machine:/home/user/Desktop/php-version# make
root@machine:/home/user/Desktop/php-version# make install
Take a coffee break: this will take some time.
Upon completion of the make install command, PHP will be installed in /usr/local/php (unless you specified a different directory with the --prefix option of the configure script above). Now you just need to configure it!
The PHP configuration file is called php.ini. PHP comes with two sample php.ini files called php.ini-dist and php.ini-recommended. Copy these files from your installation work directory to the /usr/local/php/lib directory, then make a copy of the php.ini-dist file and call it php.ini:
root@machine:/home/user/Desktop/php-version# cp php.ini* /usr/local/ php/lib/
root@machine:/home/user/Desktop/php-version# cd /usr/local/php/lib
root@machine:/usr/local/php/lib# cp php.ini-dist php.ini
You may now delete the directory from which you compiled PHP – it’s no longer needed.
We’ll worry about fine-tuning php.ini shortly. For now, we need to tweak Apache’s configuration to make it more PHP-friendly. Locate your Apache httpd.conf configuration file. This file can usually be found in the conf subdirectory of your Apache installation (/usr/local/apache2/conf/httpd.conf).
To edit this file you must be logged in as root, so launch your text editor from the Terminal window where you’re still logged in as root:
root@machine:/usr/local/php/lib# cd /usr/local/apache2/conf
root@machine:/usr/local/apache2/conf# gedit httpd.conf
In this file, look for the line that begins with DirectoryIndex. This line tells Apache which filenames to use when it looks for the default page for a given directory. You’ll see the usual index.html, but you need to add index.php to the list:
<IfModule dir_module>
  DirectoryIndex index.html index.php
</IfModule>
Finally, go right to the bottom of the file and add these lines to tell Apache that files with names ending in .php should be treated as PHP scripts:
<FilesMatch .php$>
  SetHandler application/x-httpd-php
</FilesMatch>
That should do it! Save your changes and restart your Apache server with this command:
root@machine:/usr/local/apache2/conf# /usr/local/apache2/bin/apachectl -k restartIf it all goes according to plan, Apache should start up without any error messages. If you run into any trouble, the helpful individuals in the SitePoint Forums (myself included) will be happy to help.
Post-Installation Set-up Tasks
Regardless of which operating system you’re running, or how you set up your web server – once PHP is installed and the MySQL server is functioning, the very first action you need to perform is assign a root password for MySQL.
MySQL only allows authorized users to view and manipulate the information stored in its databases, so you’ll need to tell MySQL who’s authorized and who’s unauthorized. When MySQL is first installed, it’s configured with a user named root that has access to do most tasks without even entering a password. Your first task should be to assign a password to the root user so that unauthorized users are prohibited from tampering with your databases.
Why Bother?
It’s important to realize that MySQL, just like a web server, can be accessed from any computer on the same network. If you’re working on a computer connected to the Internet, then, depending on the security measures you’ve taken, anyone in the world could connect to your MySQL server. The need to pick a difficult-to-guess password should be immediately obvious!
To set a root password for MySQL, you can use the mysqladmin program that comes with MySQL. If you followed the instructions to install MySQL separately (as explained earlier in this chapter), the mysqladmin program should be on your system path. This means you can pop open a Terminal window (or in Windows, a Command Prompt) and type the name of the program without having to remember where it’s installed on your computer.
Go ahead and try this now, if you’ve yet to already. Open a Terminal or Command Prompt and type this command: (If you’re using Windows and are unfamiliar with the Command Prompt, check out my article Kev’s Command Prompt Cheat Sheet for a quick crash course.)
mysqladmin -u root statusWhen you hit Enter you should see a line or two of basic statistics about your MySQL server, like this:
Uptime: 102261  Threads: 1  Questions: 1  Slow queries: 0  Opens: 15
 Flush tables: 1  Open tables: 0  Queries per second avg: 0.0
If you’re seeing a different message entirely, it’s probably one of two options. First, you might see an error message telling you that the mysqladmin program was unable to connect to your MySQL server:
mysqladmin: connect to server at 'localhost' failed
error: 'Can't connect to MySQL server on 'localhost' (10061)'
Check that mysqld is running on localhost and that the port is 3306.
You can check this by doing 'telnet localhost 3306'
This message normally means that your MySQL server simply isn’t running. If you have it set up to run automatically when your system boots, double-check that the setup is working. If you normally launch your MySQL server manually, go ahead and do that before trying the command again.
Second, if you’re using MAMP on the Mac, you’ll probably see this error message instead:
mysqladmin: connect to server at 'localhost' failed
error: 'Access denied for user 'root'@'localhost' (using password: NO)'
This error message means that the root user on your MySQL server already has a password set. It turns out that, with your security in mind, MAMP comes with a root password already set on its built-in MySQL server. That password, however, is root – so you’re probably still going to want to change it using the instructions below.
One way or the other, you should now be able to run the mysqladmin program. Now you can use it to set the root password for your MySQL server:
mysqladmin -u root -p password "newpassword"Replace newpassword with whatever password you’d like to use for your MySQL server. Make sure it’s one you can remember, because if you forget your MySQL root password, you might need to erase your entire MySQL installation and start over from scratch! As we’ll see in Chapter 10, MySQL Administration, it’s usually possible to recover from such a mishap, but it’s definitely a pain in the neck.
When you hit Enter, you’ll be prompted to enter the current password for the root MySQL user. Just hit Enter again, since the root user has no password at this point, unless you’ve used MAMP to set up MySQL on your Mac; in this case you should type root, the default root MySQL password on MAMP.
Let me break this command down for you, so you can understand what each part means:
mysqladminThis, of course, is the name of the program you wish to run.
-u rootThis specifies the MySQL user account you wish to use to connect to your MySQL server. On a brand new server, there is only one user account: root.
-pThis tells the program to prompt you for the current password of the user account. On a brand new MySQL server, the root account has no password, so you can just hit Enter when prompted. It’s a good idea, however, to make a habit of including this option, since most of the time you will need to provide a password to connect to your MySQL server.
password "newpassword"
This instructs the mysqladmin program to change the password of the user account to newpassword. In this example, whatever password you specify will become the new password for the root MySQL user.
Now, to try out your new password, request once again that the MySQL server tell you its current status at the system command prompt, but this time include the -p option:
mysqladmin -u root -p statusEnter your new password when prompted. As before, you should see a line or two of statistics about your MySQL server.
Since the root account is now password-protected, attempting to run this command without the -p switch will give you an “Access Denied” error.
You’re done! With everything set up and running, you’re ready to write your first PHP script. Before we do that, however, you might want to write a short email to your web host.
What to Ask Your Web Host
While you tinker with PHP and MySQL on your own computer, it might be good to start collecting the information you’ll need when it comes time to deploy your first database driven web site to the public. Here’s a rundown of the details you should be asking your web host for.
First, you’ll need to know how to transfer files to your web host. You’ll upload PHP scripts to your host the same way you normally send the HTML files, CSS files, and images that make up a static web site, so if you already know how to do that, it’s unnecessary to bother your host. If you’re just starting with a new host, however, you’ll need to be aware of what file transfer protocol it supports (FTP or SFTP), as well as knowing what username and password to use when connecting with your (S)FTP program. You also have to know what directory to put files into so they’re accessible to web browsers.
In addition to these, you’ll also need to find out a few details about the MySQL server your host has set up for you. It’s important to know the host name to use to connect to it (possibly localhost), and your MySQL username and password, which may or may not be the same as your (S)FTP credentials. Your web host will probably also have provided an empty database for you to use, which prevents you from interfering with other users’ databases who may share the same MySQL server with you. If they have provided this, you should establish the name of that database.
Your First PHP Script
It would be unfair of me to help you install everything – but stop short of giving you a taste of what a PHP script looks like until Chapter 3: Introducing PHP. So here’s a little morsel to whet your appetite.
Open your favorite text or HTML editor and create a new file called today.php. Type this into the file:
<!DOCTYPE html PUBLIC "-//W3C//DTD XHTML 1.0 Strict//EN"
"https://www.w3.org/TR/xhtml1/DTD/xhtml1-strict.dtd">
<html xmlns="https://www.w3.org/1999/xhtml" xml:lang="en" lang="en">
<head>
<title>Today’s Date</title>
<meta http-equiv="content-type"
content="text/html; charset=utf-8"/>
</head>
<body>
<p>Today’s date (according to this web server) is
<?php
echo date('l, F dS Y.');
?>
</p>
</body>
</html>Editing PHP Scripts in Windows with Notepad
Windows users should note that, to save a file with a .php extension in Notepad, you’ll need to either select All Files as the file type, or surround the filename with quotes in the Save As dialog box; otherwise, Notepad will unhelpfully save the file as today.php.txt, which will fail to work.
Editing PHP Scripts in Mac OS X with TextEdit
Mac OS X users are advised to be careful when using TextEdit to edit .php files, as it saves them in Rich Text Format, with an invisible .rtf filename extension by default. To save a new .php file, you must first remember to convert the file to plain text by selecting Format > Make Plain Text (?+?+T) from the TextEdit menu.
TextEdit also has a nasty habit of mistaking existing .php files for HTML documents when opening them, and attempting to display them as formatted text. To avoid this, you must select the Ignore rich text commands checkbox in the Open dialog box.
Try a Free IDE!
As you can tell from the preceding warnings, the text editors provided with current operating systems are a little unsuitable for editing PHP scripts. There are a number of solid text editors and Integrated Development Environments (IDEs) with rich support for editing PHP scripts that you can download for free. Here are a few that work on Windows, Mac OS X, and Linux:
If you’d prefer to avoid typing out all the code, you can download this file – along with the rest of the code in this book – from the code archive. See the Preface for details on how to download the code archive.
Save the file, and move it to the web root directory of your local web server.
Where’s My Server’s Web Root Directory?
If you’re using an Apache server you installed manually, the web root directory is the htdocs directory within your Apache installation (that is, C:Program FilesApache Software FoundationApache2.2htdocs on Windows, /usr/local/apache2/htdocs on Linux).
For Apache servers built into WampServer, the web root directory is the www directory within your WampServer directory. You can reach it quickly by selecting the www directory menu item from the WampServer menu in your Windows System Tray.
If the Apache server you’re using is built into Mac OS X, the web root directory is /Library/WebServer/Documents.
The Apache server built into MAMP has a web root directory in the htdocs folder inside the MAMP folder (/Applications/MAMP/htdocs). If you prefer using a different folder as your web root, you can change it on the Apache tab of the MAMP application’s Preferences.
Open your web browser of choice, and type http://localhost/today.php (or http://localhost:port/today.php if Apache is configured to run on a port other than the default of 80) into the address bar to view the file you just created. (If you installed Apache on Windows, you may have selected the option to run it on port 8080. If you’re using MAMP, it’s configured by default to run Apache on port 8888.)
You Must Type the URL
You might be used to previewing your web pages by double-clicking on them, or by using the File > Open… feature of your browser. These methods tell your browser to load the file directly from your computer’s hard drive, and so they’ll fail to work with PHP files.
As previously mentioned, PHP scripts require your web server to read and execute the PHP code they contain before sending the HTML code that’s generated to the browser. Only if you type the URL (http://localhost/today.php) will your browser request the file from your web server so that this can happen.
The figure below shows what the web page generated by your first PHP script should look like.
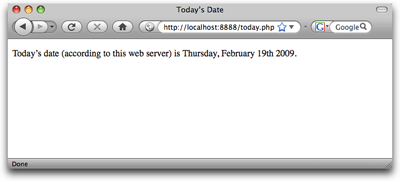
Neat, huh? If you use the View Source feature in your browser, all you’ll see is a regular HTML file with the date in it. The PHP code (everything between <?php and ?> in the code above) was interpreted by the web server and converted to normal text before it was sent to your browser. The beauty of PHP, and other server-side scripting languages, is that the web browser can remain ignorant – the web server does all the work!
Be reassured also that before too long you’ll know code (like this example) as well as the back of your hand.
If the date is missing, or if your browser prompts you to download the PHP file instead of displaying it, then something is wrong with your web server’s PHP support. If you can, use View Source in your browser to look at the code of the page. You’ll probably see the PHP code right there in the page. Since the browser fails to understand PHP, it just sees <?php ... ?> as one long, invalid HTML tag, which it ignores. Double-check that you have requested the file from your web server rather than your hard disk (that is, make sure the location bar in your browser shows a URL beginning with http://localhost), and make sure that PHP support has been properly installed on your web server using the instructions provided earlier in this chapter.
Full Toolbox, Dirty Hands
You should now be fully equipped with a web server that supports PHP scripts, a MySQL database server, and a basic understanding of how to use each of these. You should even have dirtied your hands by writing and successfully testing your first PHP script!
If the today.php script was unsuccessful for you, drop by the SitePoint Forums and we’ll be glad to help you figure out the problem.
In Chapter 2: Introducing MySQL, you’ll learn the basics of relational databases and start working with MySQL. I’ll also introduce you to the language of database: Structured Query Language. If you’ve never worked with a database before, it’ll be a real eye-opener!
reating build/rules.mk
config.status: creating build/pkg/pkginfo
config.status: creating build/config_vars.sh
config.status: creating include/ap_config_auto.h
config.status: executing default commands
user@machine:~/Desktop/httpd-version$
You’re now ready to compile Apache. The one-word command make is all it takes:
user@machine:~/Desktop/httpd-version$ makeAgain, this process will take several minutes to complete, and should end with the following message:
...
make[1]: Leaving directory `/home/user/Desktop/httpd-version'
user@machine:~/Desktop/httpd-version$
To install your newly-compiled copy of Apache, type sudo make install (the sudo is required, since you need root access to write to the installation directory).
user@machine:~/Desktop/httpd-version$ sudo make installEnter your password when prompted.
As soon as this command has finished copying files, your installation of Apache is complete. Navigate to the installation directory and launch Apache using the apachectl script:
user@machine:~/Desktop/httpd-version$ cd /usr/local/apache2
user@machine:/usr/local/apache2$ sudo bin/apachectl -k start
You’ll likely see a warning message from Apache complaining that it was unable to determine the server’s fully qualified domain name. That’s because most personal computers are without one. Don’t sweat it.
Fire up your browser and type http://localhost into the address bar. If Apache is up and running, you should see a welcome message like the one below.
As with your MySQL server, you’ll probably want to configure Apache to start automatically when your system boots. The procedure to do this is similar; just copy and link the apachectl script from your Apache installation:
user@machine:/usr/local/apache2$ sudo su
root@machine:/usr/local/apache2# cd /etc
root@machine:/etc# ln -s /usr/local/apache2/bin/apachectl init.d/
root@machine:/etc# ln -s /etc/init.d/apachectl rc2.d/S99httpd
root@machine:/etc# ln -s /etc/init.d/apachectl rc0.d/K01httpd
To test that this works, restart your computer and then hit the http://localhost page in your browser again.
With a shiny new Apache installation up and running, you’re now ready to add PHP support to it. To start, download the PHP Complete Source Code package from the PHP Downloads page. Again, the .tar.gz and .tar.bz2 versions are identical; just download whichever you’re used to extracting.
The file you downloaded should be called php-version.tar.gz (or .bz2). Pop open a new Terminal window, navigate to the directory containing the downloaded file, extract it, and move into the resulting directory:
user@machine:~$ cd Desktop
user@machine:~/Desktop$ tar xfz php-version.tar.gz
user@machine:~/Desktop$ cd php-version
To install PHP as an Apache module, you’ll need to use the Apache apxs program. This will have been installed along with the Apache server if you followed the instructions above to compile it yourself; but if you’re using the copy that was installed with your distribution of Linux, you may need to install the Apache development package to access Apache apxs. You should be able to install this package by using the package manager included with your Linux distribution. For example, on Debian Linux, you can use apt-get to install it as follows:
user@machine:~$ sudo apt-get install apache-devNow, to install PHP, you must be logged in as root:
user@machine:~/Desktop/php-version$ sudo su
[sudo] password for user: (type your password)
root@machine:/home/user/Desktop/php-version#
The first step is to configure the PHP installation program by telling it which options you want to enable, and where it should find the programs it needs to know about (such as Apache apxs and MySQL). The command should look like this (all on one line):
root@machine:/home/user/Desktop/php-version# ./configure --prefix=/usr/local/php --with-apxs2=/usr/local/apache2/bin/apxs --with-mysqli=/usr/local/mysql/bin/mysql_configThe --prefix option tells the installer where you want PHP to be installed (/usr/local/php is a good choice).
The --with-apxs2 option tells the installer where to find the Apache apxs program mentioned above. When installed using your Linux distribution’s package manager, the program is usually found at /usr/sbin/apxs. If you compiled and installed Apache yourself as described above, however, it will be in the Apache binary directory, at /usr/local/apache2/bin/apxs.
The --with-mysqli option tells the installer where to find your MySQL installation. More specifically, it must point to the mysql_config program in your MySQL installation’s bin directory (/usr/local/mysql/bin/mysql_config).
Again, a parade of status messages will appear on your screen. When it stops, check for any error messages and install any files it identifies as missing. On a default Ubuntu 8.10 installation, for example, you’re likely to see an error complaining about an incomplete libxml2 installation. To correct this particular error, open Synaptic Package Manager, then locate and install the libxml2-dev package (libxml2 should already be installed). Once it’s installed, try the configure command again.
After you watch several screens of tests scroll by, you’ll be returned to the command prompt with the comforting message “Thank you for using PHP.” The following two commands will compile and then install PHP:
root@machine:/home/user/Desktop/php-version# make
root@machine:/home/user/Desktop/php-version# make install
Take a coffee break: this will take some time.
Upon completion of the make install command, PHP will be installed in /usr/local/php (unless you specified a different directory with the --prefix option of the configure script above). Now you just need to configure it!
The PHP configuration file is called php.ini. PHP comes with two sample php.ini files called php.ini-dist and php.ini-recommended. Copy these files from your installation work directory to the /usr/local/php/lib directory, then make a copy of the php.ini-dist file and call it php.ini:
root@machine:/home/user/Desktop/php-version# cp php.ini* /usr/local/ php/lib/
root@machine:/home/user/Desktop/php-version# cd /usr/local/php/lib
root@machine:/usr/local/php/lib# cp php.ini-dist php.ini
You may now delete the directory from which you compiled PHP – it’s no longer needed.
We’ll worry about fine-tuning php.ini shortly. For now, we need to tweak Apache’s configuration to make it more PHP-friendly. Locate your Apache httpd.conf configuration file. This file can usually be found in the conf subdirectory of your Apache installation (/usr/local/apache2/conf/httpd.conf).
To edit this file you must be logged in as root, so launch your text editor from the Terminal window where you’re still logged in as root:
root@machine:/usr/local/php/lib# cd /usr/local/apache2/conf
root@machine:/usr/local/apache2/conf# gedit httpd.conf
In this file, look for the line that begins with DirectoryIndex. This line tells Apache which filenames to use when it looks for the default page for a given directory. You’ll see the usual index.html, but you need to add index.php to the list:
<IfModule dir_module>
  DirectoryIndex index.html index.php
</IfModule>
Finally, go right to the bottom of the file and add these lines to tell Apache that files with names ending in .php should be treated as PHP scripts:
<FilesMatch .php$>
  SetHandler application/x-httpd-php
</FilesMatch>
That should do it! Save your changes and restart your Apache server with this command:
root@machine:/usr/local/apache2/conf# /usr/local/apache2/bin/apachectl -k restartIf it all goes according to plan, Apache should start up without any error messages. If you run into any trouble, the helpful individuals in the SitePoint Forums (myself included) will be happy to help.
Post-Installation Set-up Tasks
Regardless of which operating system you’re running, or how you set up your web server – once PHP is installed and the MySQL server is functioning, the very first action you need to perform is assign a root password for MySQL.
MySQL only allows authorized users to view and manipulate the information stored in its databases, so you’ll need to tell MySQL who’s authorized and who’s unauthorized. When MySQL is first installed, it’s configured with a user named root that has access to do most tasks without even entering a password. Your first task should be to assign a password to the root user so that unauthorized users are prohibited from tampering with your databases.
Why Bother?
It’s important to realize that MySQL, just like a web server, can be accessed from any computer on the same network. If you’re working on a computer connected to the Internet, then, depending on the security measures you’ve taken, anyone in the world could connect to your MySQL server. The need to pick a difficult-to-guess password should be immediately obvious!
To set a root password for MySQL, you can use the mysqladmin program that comes with MySQL. If you followed the instructions to install MySQL separately (as explained earlier in this chapter), the mysqladmin program should be on your system path. This means you can pop open a Terminal window (or in Windows, a Command Prompt) and type the name of the program without having to remember where it’s installed on your computer.
Go ahead and try this now, if you’ve yet to already. Open a Terminal or Command Prompt and type this command: (If you’re using Windows and are unfamiliar with the Command Prompt, check out my article Kev’s Command Prompt Cheat Sheet for a quick crash course.)
mysqladmin -u root statusWhen you hit Enter you should see a line or two of basic statistics about your MySQL server, like this:
Uptime: 102261  Threads: 1  Questions: 1  Slow queries: 0  Opens: 15
 Flush tables: 1  Open tables: 0  Queries per second avg: 0.0
If you’re seeing a different message entirely, it’s probably one of two options. First, you might see an error message telling you that the mysqladmin program was unable to connect to your MySQL server:
mysqladmin: connect to server at 'localhost' failed
error: 'Can't connect to MySQL server on 'localhost' (10061)'
Check that mysqld is running on localhost and that the port is 3306.
You can check this by doing 'telnet localhost 3306'
This message normally means that your MySQL server simply isn’t running. If you have it set up to run automatically when your system boots, double-check that the setup is working. If you normally launch your MySQL server manually, go ahead and do that before trying the command again.
Second, if you’re using MAMP on the Mac, you’ll probably see this error message instead:
mysqladmin: connect to server at 'localhost' failed
error: 'Access denied for user 'root'@'localhost' (using password: NO)'
This error message means that the root user on your MySQL server already has a password set. It turns out that, with your security in mind, MAMP comes with a root password already set on its built-in MySQL server. That password, however, is root – so you’re probably still going to want to change it using the instructions below.
One way or the other, you should now be able to run the mysqladmin program. Now you can use it to set the root password for your MySQL server:
mysqladmin -u root -p password "newpassword"Replace newpassword with whatever password you’d like to use for your MySQL server. Make sure it’s one you can remember, because if you forget your MySQL root password, you might need to erase your entire MySQL installation and start over from scratch! As we’ll see in Chapter 10, MySQL Administration, it’s usually possible to recover from such a mishap, but it’s definitely a pain in the neck.
When you hit Enter, you’ll be prompted to enter the current password for the root MySQL user. Just hit Enter again, since the root user has no password at this point, unless you’ve used MAMP to set up MySQL on your Mac; in this case you should type root, the default root MySQL password on MAMP.
Let me break this command down for you, so you can understand what each part means:
mysqladminThis, of course, is the name of the program you wish to run.
-u rootThis specifies the MySQL user account you wish to use to connect to your MySQL server. On a brand new server, there is only one user account: root.
-pThis tells the program to prompt you for the current password of the user account. On a brand new MySQL server, the root account has no password, so you can just hit Enter when prompted. It’s a good idea, however, to make a habit of including this option, since most of the time you will need to provide a password to connect to your MySQL server.
password "newpassword"
This instructs the mysqladmin program to change the password of the user account to newpassword. In this example, whatever password you specify will become the new password for the root MySQL user.
Now, to try out your new password, request once again that the MySQL server tell you its current status at the system command prompt, but this time include the -p option:
mysqladmin -u root -p statusEnter your new password when prompted. As before, you should see a line or two of statistics about your MySQL server.
Since the root account is now password-protected, attempting to run this command without the -p switch will give you an “Access Denied” error.
You’re done! With everything set up and running, you’re ready to write your first PHP script. Before we do that, however, you might want to write a short email to your web host.
What to Ask Your Web Host
While you tinker with PHP and MySQL on your own computer, it might be good to start collecting the information you’ll need when it comes time to deploy your first database driven web site to the public. Here’s a rundown of the details you should be asking your web host for.
First, you’ll need to know how to transfer files to your web host. You’ll upload PHP scripts to your host the same way you normally send the HTML files, CSS files, and images that make up a static web site, so if you already know how to do that, it’s unnecessary to bother your host. If you’re just starting with a new host, however, you’ll need to be aware of what file transfer protocol it supports (FTP or SFTP), as well as knowing what username and password to use when connecting with your (S)FTP program. You also have to know what directory to put files into so they’re accessible to web browsers.
In addition to these, you’ll also need to find out a few details about the MySQL server your host has set up for you. It’s important to know the host name to use to connect to it (possibly localhost), and your MySQL username and password, which may or may not be the same as your (S)FTP credentials. Your web host will probably also have provided an empty database for you to use, which prevents you from interfering with other users’ databases who may share the same MySQL server with you. If they have provided this, you should establish the name of that database.
Your First PHP Script
It would be unfair of me to help you install everything – but stop short of giving you a taste of what a PHP script looks like until Chapter 3: Introducing PHP. So here’s a little morsel to whet your appetite.
Open your favorite text or HTML editor and create a new file called today.php. Type this into the file:
<!DOCTYPE html PUBLIC "-//W3C//DTD XHTML 1.0 Strict//EN"
"https://www.w3.org/TR/xhtml1/DTD/xhtml1-strict.dtd">
<html xmlns="https://www.w3.org/1999/xhtml" xml:lang="en" lang="en">
<head>
<title>Today’s Date</title>
<meta http-equiv="content-type"
content="text/html; charset=utf-8"/>
</head>
<body>
<p>Today’s date (according to this web server) is
<?php
echo date('l, F dS Y.');
?>
</p>
</body>
</html>Editing PHP Scripts in Windows with Notepad
Windows users should note that, to save a file with a .php extension in Notepad, you’ll need to either select All Files as the file type, or surround the filename with quotes in the Save As dialog box; otherwise, Notepad will unhelpfully save the file as today.php.txt, which will fail to work.
Editing PHP Scripts in Mac OS X with TextEdit
Mac OS X users are advised to be careful when using TextEdit to edit .php files, as it saves them in Rich Text Format, with an invisible .rtf filename extension by default. To save a new .php file, you must first remember to convert the file to plain text by selecting Format > Make Plain Text (?+?+T) from the TextEdit menu.
TextEdit also has a nasty habit of mistaking existing .php files for HTML documents when opening them, and attempting to display them as formatted text. To avoid this, you must select the Ignore rich text commands checkbox in the Open dialog box.
Try a Free IDE!
As you can tell from the preceding warnings, the text editors provided with current operating systems are a little unsuitable for editing PHP scripts. There are a number of solid text editors and Integrated Development Environments (IDEs) with rich support for editing PHP scripts that you can download for free. Here are a few that work on Windows, Mac OS X, and Linux:
If you’d prefer to avoid typing out all the code, you can download this file – along with the rest of the code in this book – from the code archive. See the Preface for details on how to download the code archive.
Save the file, and move it to the web root directory of your local web server.
Where’s My Server’s Web Root Directory?
If you’re using an Apache server you installed manually, the web root directory is the htdocs directory within your Apache installation (that is, C:Program FilesApache Software FoundationApache2.2htdocs on Windows, /usr/local/apache2/htdocs on Linux).
For Apache servers built into WampServer, the web root directory is the www directory within your WampServer directory. You can reach it quickly by selecting the www directory menu item from the WampServer menu in your Windows System Tray.
If the Apache server you’re using is built into Mac OS X, the web root directory is /Library/WebServer/Documents.
The Apache server built into MAMP has a web root directory in the htdocs folder inside the MAMP folder (/Applications/MAMP/htdocs). If you prefer using a different folder as your web root, you can change it on the Apache tab of the MAMP application’s Preferences.
Open your web browser of choice, and type http://localhost/today.php (or http://localhost:port/today.php if Apache is configured to run on a port other than the default of 80) into the address bar to view the file you just created. (If you installed Apache on Windows, you may have selected the option to run it on port 8080. If you’re using MAMP, it’s configured by default to run Apache on port 8888.)
You Must Type the URL
You might be used to previewing your web pages by double-clicking on them, or by using the File > Open… feature of your browser. These methods tell your browser to load the file directly from your computer’s hard drive, and so they’ll fail to work with PHP files.
As previously mentioned, PHP scripts require your web server to read and execute the PHP code they contain before sending the HTML code that’s generated to the browser. Only if you type the URL (http://localhost/today.php) will your browser request the file from your web server so that this can happen.
The figure below shows what the web page generated by your first PHP script should look like.
Neat, huh? If you use the View Source feature in your browser, all you’ll see is a regular HTML file with the date in it. The PHP code (everything between <?php and ?> in the code above) was interpreted by the web server and converted to normal text before it was sent to your browser. The beauty of PHP, and other server-side scripting languages, is that the web browser can remain ignorant – the web server does all the work!
Be reassured also that before too long you’ll know code (like this example) as well as the back of your hand.
If the date is missing, or if your browser prompts you to download the PHP file instead of displaying it, then something is wrong with your web server’s PHP support. If you can, use View Source in your browser to look at the code of the page. You’ll probably see the PHP code right there in the page. Since the browser fails to understand PHP, it just sees <?php ... ?> as one long, invalid HTML tag, which it ignores. Double-check that you have requested the file from your web server rather than your hard disk (that is, make sure the location bar in your browser shows a URL beginning with http://localhost), and make sure that PHP support has been properly installed on your web server using the instructions provided earlier in this chapter.
Full Toolbox, Dirty Hands
You should now be fully equipped with a web server that supports PHP scripts, a MySQL database server, and a basic understanding of how to use each of these. You should even have dirtied your hands by writing and successfully testing your first PHP script!
If the today.php script was unsuccessful for you, drop by the SitePoint Forums and we’ll be glad to help you figure out the problem.
In Chapter 2: Introducing MySQL, you’ll learn the basics of relational databases and start working with MySQL. I’ll also introduce you to the language of database: Structured Query Language. If you’ve never worked with a database before, it’ll be a real eye-opener!
If you enjoyed reading this post, you’ll love Learnable; the place to learn fresh skills and techniques from the masters. Members get instant access to all of SitePoint’s ebooks and interactive online courses, like PHP & MySQL Web Development for Beginners.
Frequently Asked Questions about PHP & MySQL Installation
What are the prerequisites for installing PHP and MySQL?
Before you begin the installation process for PHP and MySQL, you need to ensure that your system meets certain requirements. Firstly, you need to have a computer system with an operating system such as Windows, Linux, or Mac OS. Secondly, you need to have a web server installed. This could be Apache, Nginx, or any other web server of your choice. Lastly, you need to have a text editor for writing and editing your PHP scripts. This could be any text editor like Notepad++, Sublime Text, or Visual Studio Code.
How do I install PHP on my computer?
The installation process for PHP varies depending on the operating system you are using. For Windows users, you can download the PHP installer from the official PHP website. Once downloaded, run the installer and follow the on-screen instructions. For Linux and Mac users, PHP can be installed using the terminal. You can use the package manager of your Linux distribution to install PHP. For Mac users, you can use Homebrew to install PHP.
How do I install MySQL on my computer?
Similar to PHP, the installation process for MySQL also varies depending on the operating system. For Windows users, you can download the MySQL installer from the official MySQL website. Once downloaded, run the installer and follow the on-screen instructions. For Linux and Mac users, MySQL can be installed using the terminal. You can use the package manager of your Linux distribution to install MySQL. For Mac users, you can use Homebrew to install MySQL.
How do I connect PHP to MySQL?
To connect PHP to MySQL, you need to use the mysqli_connect() function in PHP. This function takes four parameters: the hostname of your MySQL server, the username to connect to the MySQL server, the password for the username, and the name of the database you want to connect to. If the connection is successful, the function will return a MySQL link identifier which you can use for further operations. If the connection fails, the function will return FALSE.
How do I run a PHP script?
To run a PHP script, you need to save the script with a .php extension and place it in the root directory of your web server. Then, you can access the script by navigating to the URL of the script in your web browser. For example, if your script is named script.php and is located in the root directory of your web server, you can access it by navigating to http://localhost/script.php in your web browser.
How do I create a database in MySQL?
To create a database in MySQL, you can use the CREATE DATABASE statement. This statement is followed by the name you want to give to your database. For example, to create a database named test, you would use the following SQL command: CREATE DATABASE test;
How do I create a table in MySQL?
To create a table in MySQL, you can use the CREATE TABLE statement. This statement is followed by the name you want to give to your table and the columns you want to include in your table. Each column is defined by a name and a data type. For example, to create a table named users with columns id, name, and email, you would use the following SQL command: CREATE TABLE users (id INT, name VARCHAR(100), email VARCHAR(100));
How do I insert data into a MySQL table?
To insert data into a MySQL table, you can use the INSERT INTO statement. This statement is followed by the name of the table you want to insert data into, the columns you want to insert data into, and the values you want to insert. For example, to insert a user with id 1, name John, and email john@example.com into the users table, you would use the following SQL command: INSERT INTO users (id, name, email) VALUES (1, ‘John’, ‘john@example.com‘);
How do I retrieve data from a MySQL table?
To retrieve data from a MySQL table, you can use the SELECT statement. This statement is followed by the columns you want to retrieve and the table you want to retrieve data from. For example, to retrieve all users from the users table, you would use the following SQL command: SELECT * FROM users;
How do I update data in a MySQL table?
To update data in a MySQL table, you can use the UPDATE statement. This statement is followed by the name of the table you want to update, the column you want to update, the new value you want to set, and a WHERE clause that specifies which rows to update. For example, to update the email of the user with id 1 to john.doe@example.com, you would use the following SQL command: UPDATE users SET email = ‘john.doe@example.com‘ WHERE id = 1;
Kevin Yank is an accomplished web developer, speaker, trainer and author of Build Your Own Database Driven Website Using PHP & MySQL and Co-Author of Simply JavaScript and Everything You Know About CSS is Wrong! Kevin loves to share his wealth of knowledge and it didn't stop at books, he's also the course instructor to 3 online courses in web development. Currently Kevin is the Director of Front End Engineering at Culture Amp.